
Support Center.
Get Started or Become a Pro. Browse our support articles to learn how to get the best out of PeopleGoal.
How to Set up Objectives and Key Results (OKRs)
Objectives and Key Results - otherwise known as OKRs - is a simple yet effective process of goal management by objectives. Having clearly defined and measurable goals provides employees clarity on what they should aspire to achieve and clear direction on the company strategy. Setting Objectives and Key Results is an effective way to boost productivity, as well as align individuals with the wider company objectives.
PeopleGoal translates this multi-step process to a seamless workflow in our Objectives and Key Results app. The app template is ready to go if you're looking for a quick solution, or you can easily customize the process using our simple, no-code workflow builder. Finally, with one step you can align individual OKRs with your company objectives.
Following the steps below, install and launch an Objectives and Key Results process in a few minutes:
1. Install the Objectives and Key Results template
2. Customize the Objectives and Key Results template (optional)
3. Configure the OKRs app states (optional)
4. Manage your app participants
6. Connect individual OKRs to company objectives
7. Launch your Objectives and Key Results process!
Let's begin.
1. Install the Objectives and Key Results template from the app store
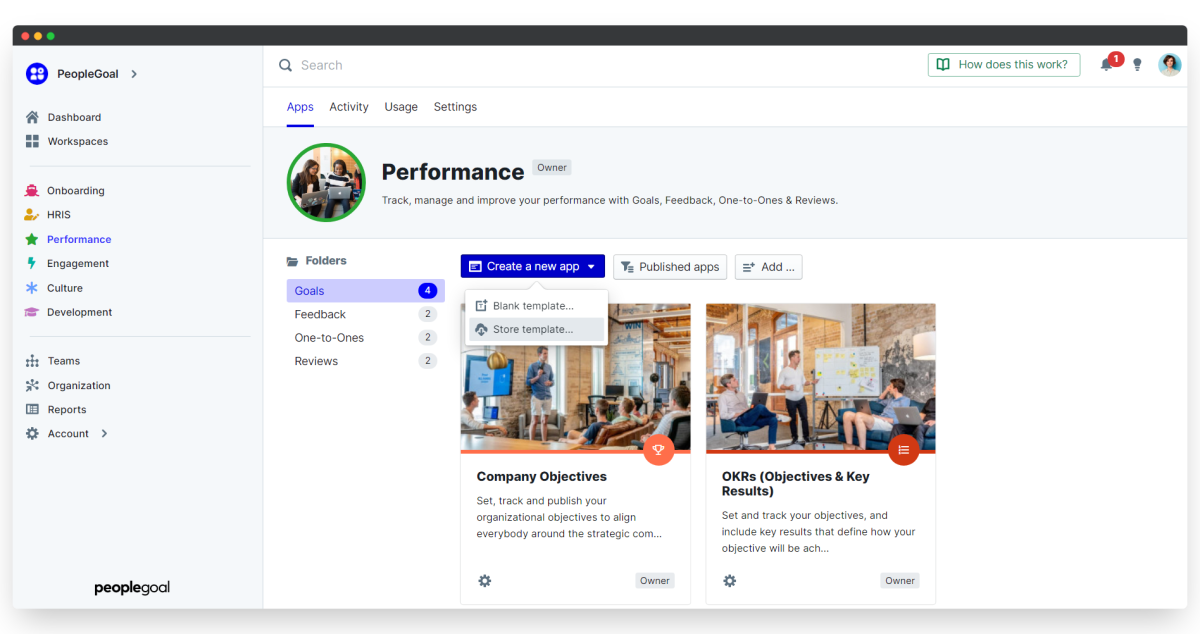
- Open up any workspace, click Create a new app, the select Store template.
- Select the OKRs (Objectives & Key Results) app and click Add this to your account.
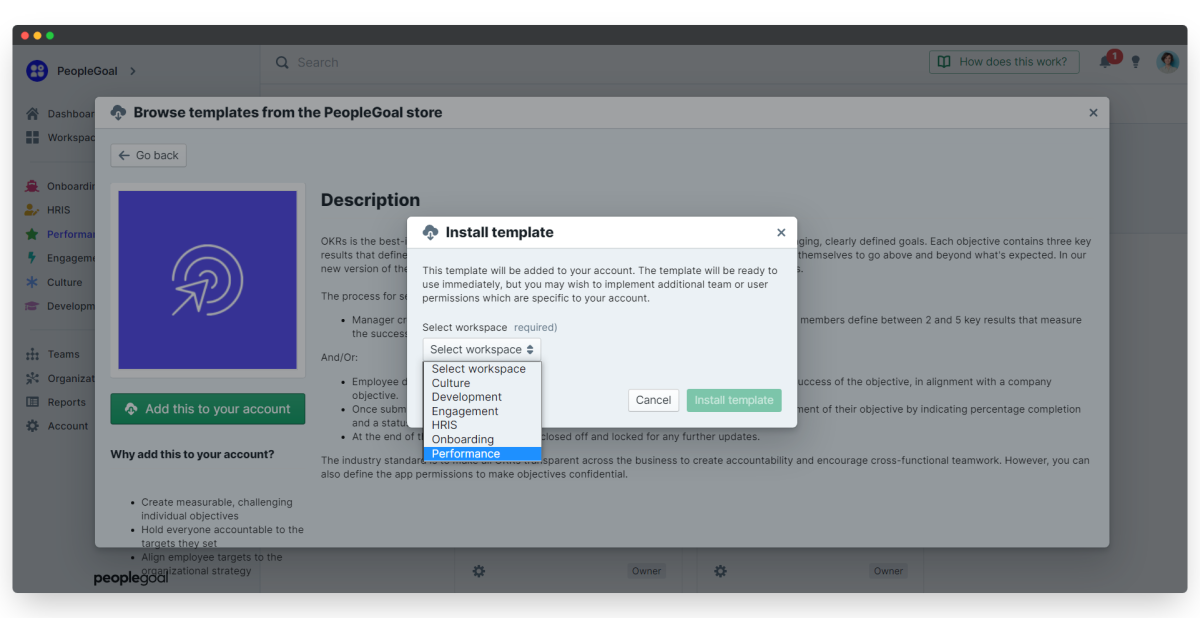
- Select the workspace (and workspace folder) you want this app to belong to from the drop-down menu, then click Install template.
It will take a few seconds to add install the app in your account, and you'll be taken straight to the app to get started.
All of the pre-built review questions and states are installed and ready to go. You can use the app right out of the box!
To skip the customization, jump to step 4 and set up your app participants and permissions.
2. Customize the Objectives and Key Results App Template
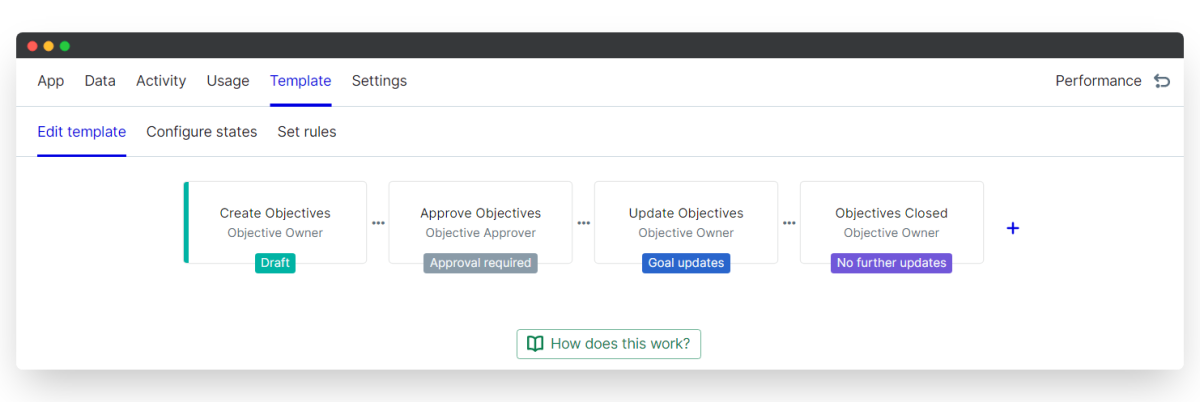
If you wish to customize the template, click the Template menu, and then Edit template.
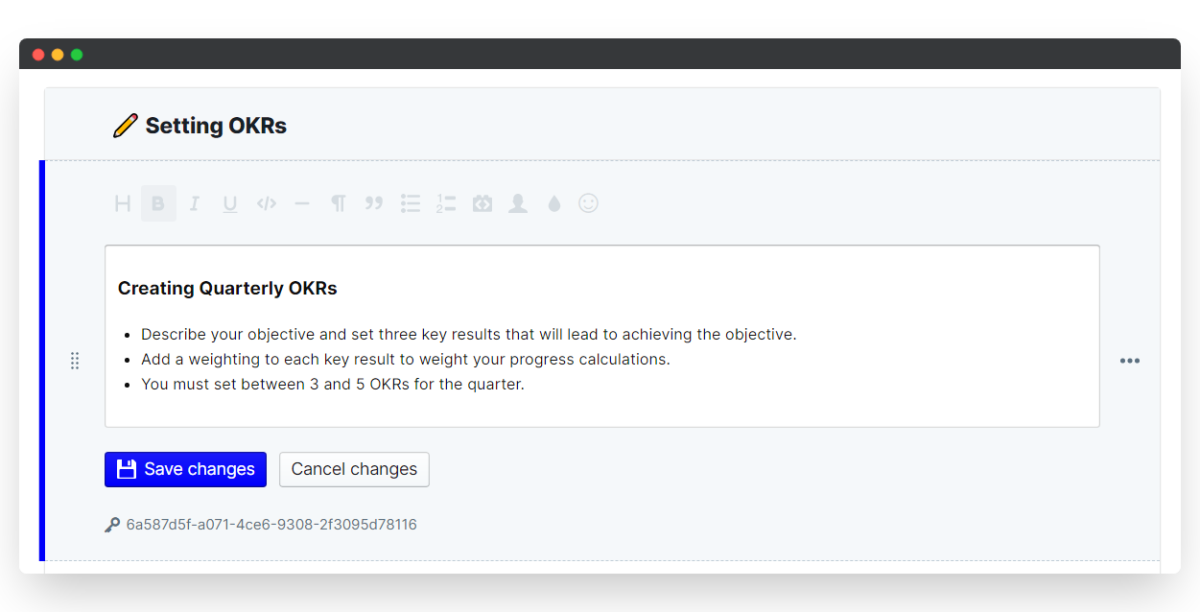
i. Edit existing elements
Elements are your individual form fields that make up the objectives process, and each element is completely customizable and can be changed to suit your custom process and company culture.
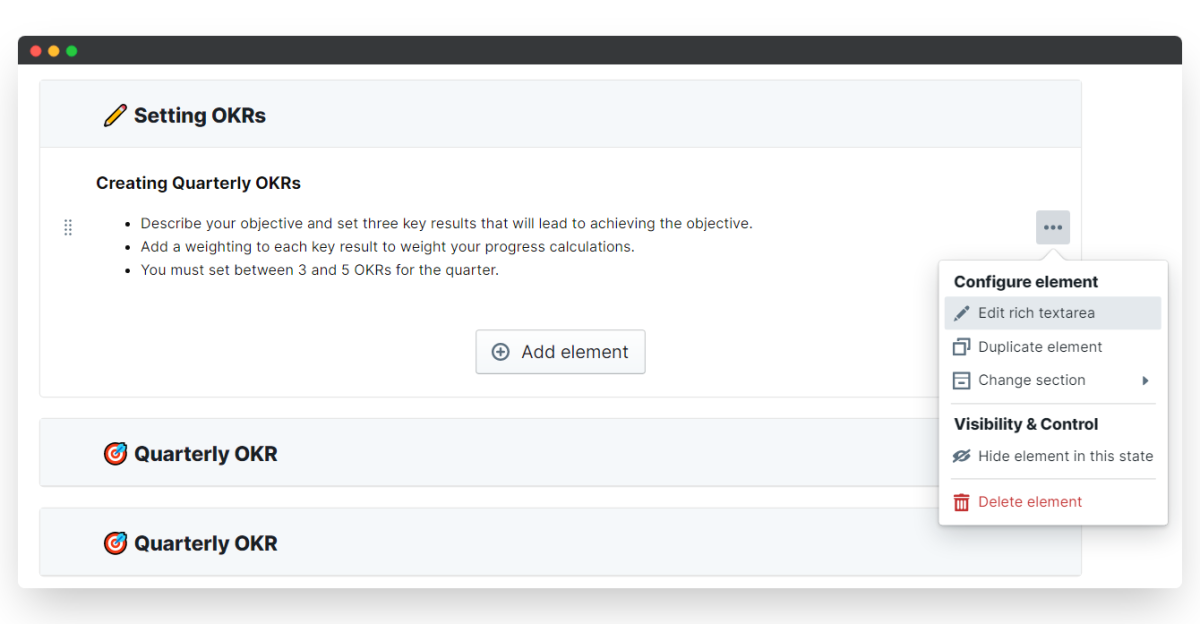
- To change a field, hover over the right-hand side of the element and click the three dots that appear.
- Select Edit element (your element will have a name like "Text", "Date", "Rich-text area", etc.). The element editor will open up.
- Change any fields you need to and click Save changes to update.
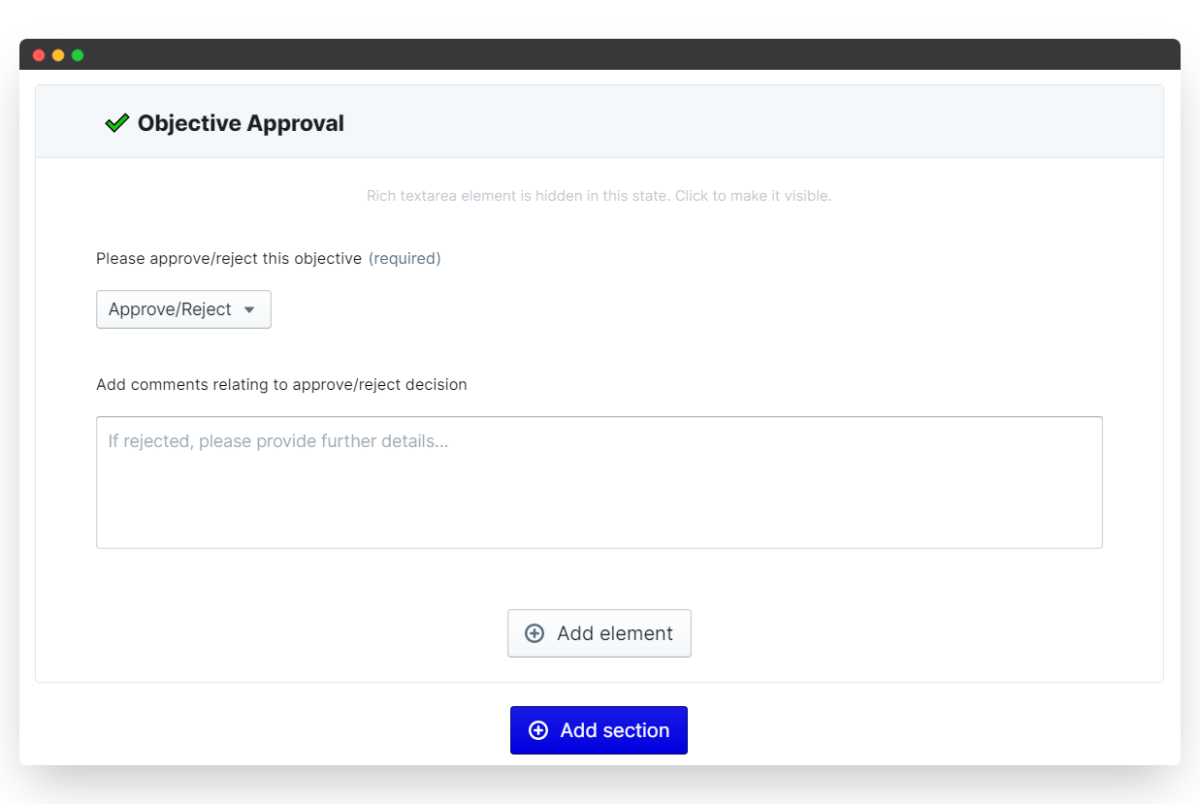
In this example, we will change the "Add a more detailed description for this objective (optional)" field to have a different title. We will also mark it as "required" so that the objective owner has to fill in this field.
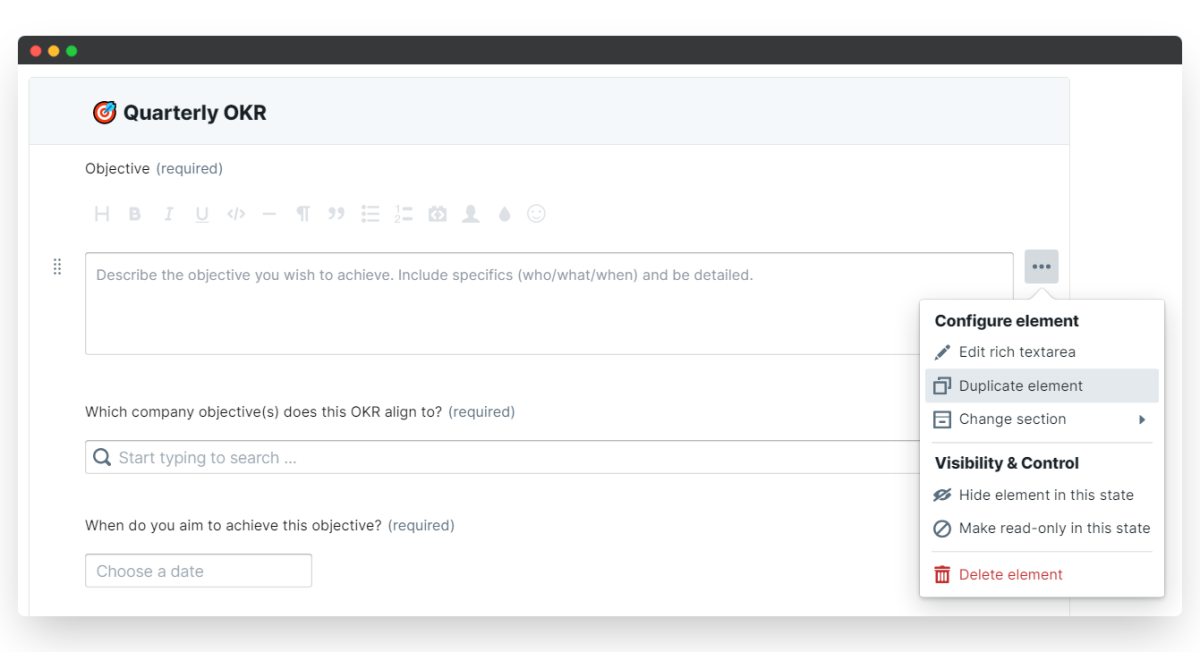
ii. Duplicate elements
- Hover over the right-hand side of the element and click the three dots that appear.
- Select Duplicate element and an exact copy will be created below.
- Edit the duplicated element to change your question text.
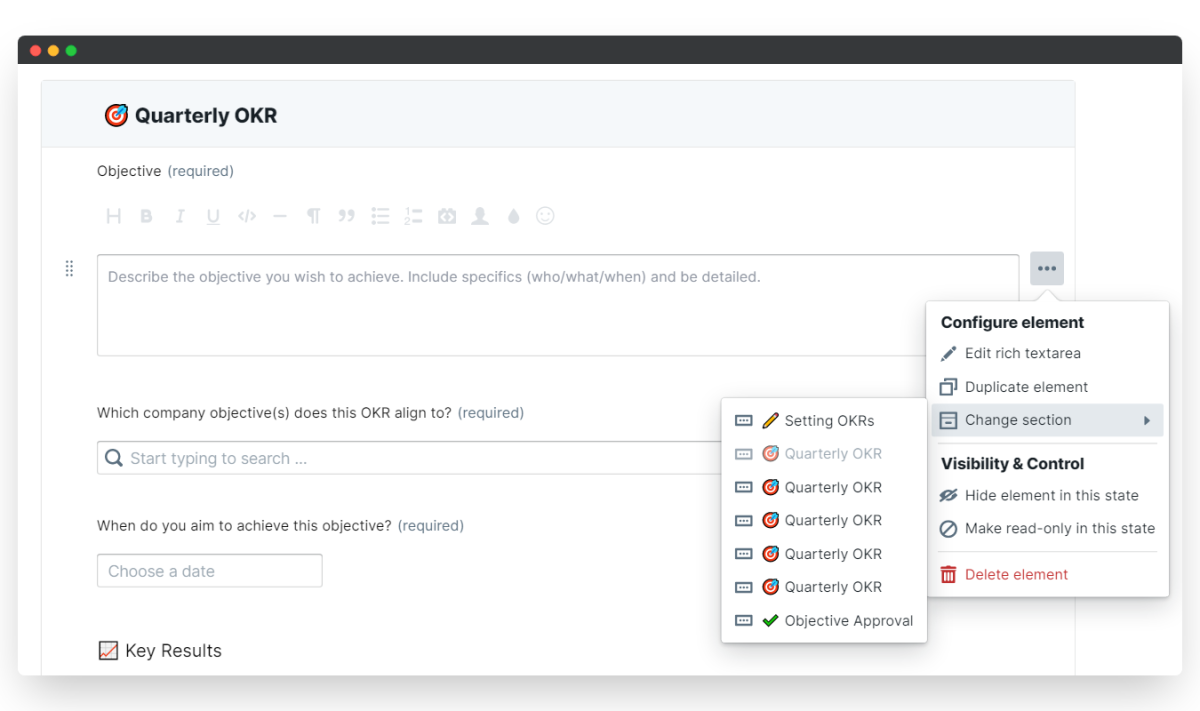
iii. Reorder elements and sections
Reordering is easy - you just click and drag to change the element or section order.
- Hover over the left-hand side of the element (or section title) and click and drag your element or section to its new location.
- To move an element to a different section, hover over the right-hand side and click the three dots that appear.
- Select Change section and choose the new section you want the element to belong to.
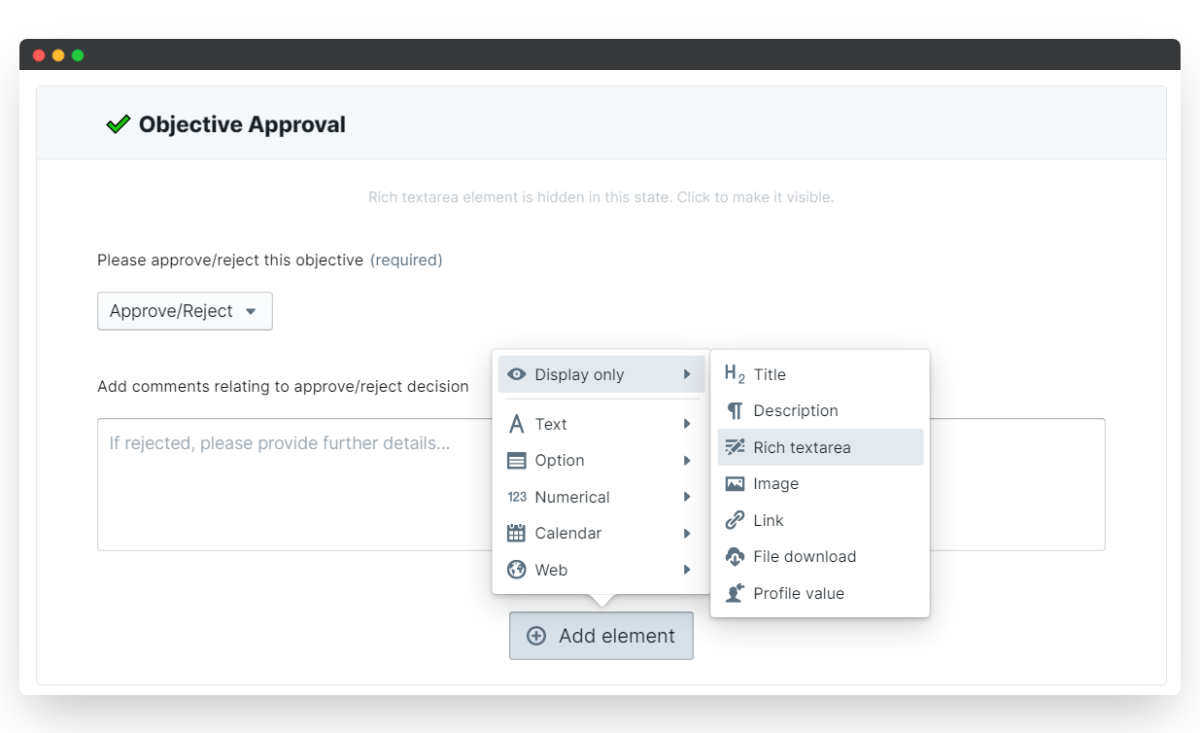
iv. Create new elements and sections
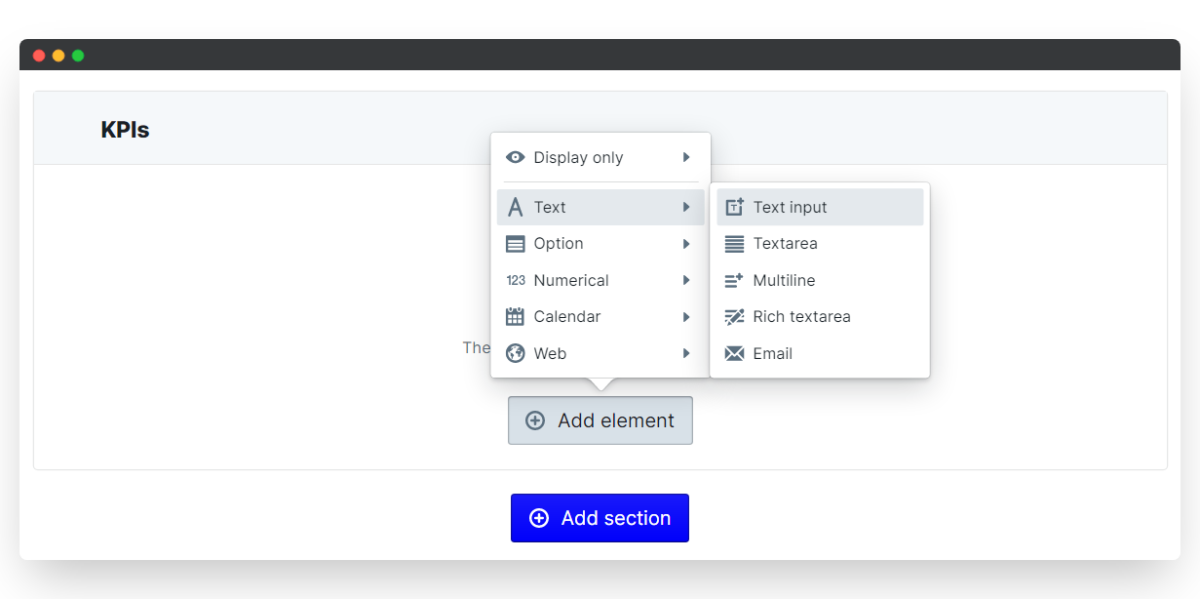
At the bottom of each section, click Add element and select the element type you want to insert.
A new element that's useful to add to your first section is a display-only Description or Rich-text area. You can use this to remind employees and managers of the key OKRs cycle dates, or give instructions on how to complete their objectives and key results.
- To add a new section, scroll to the very bottom of your template form and click Add section.
- Then click and drag your new section to where you want it to sit in the review flow.
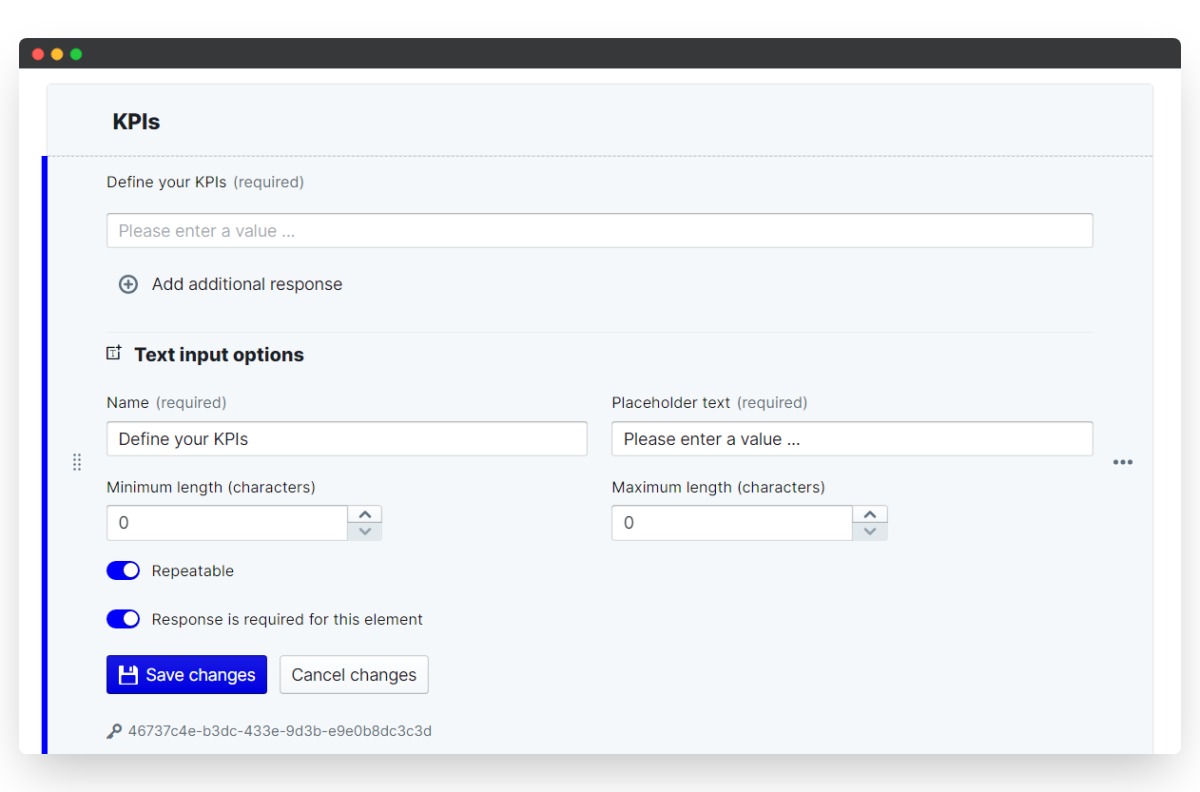
In the below example, we are going to add a section for tracking KPIs, which are often used in addition to key results. We'll make this a repeatable element so that users can add as many KPIs as they need for their objective.
3. Configure the OKRs App States
States are the steps in your Objectives and Key Results workflow, and each state has its own participant. The "Objective Owner" is one state and the employee is the participant, and the manager will most likely be the "Objective Approver".
There's no limit to the number of states you can add to your OKRs workflow, allowing you easily create a complex process where different stakeholders can weigh in. You can also control the visibility of sections (and individual elements) in every state, and select whether they are read-only, editable or hidden to the selected state participant.
i. Remove a state
- To take out a state you won't be using, click the Template tab and select Configure states.
- Select the state you want to delete and you'll see the blue highlight bar appear to confirm which state you've selected.
- Click Delete state to remove it completely.
In our example the employees don't need manager approval on their objectives, so we're going to take out the "Approve OKR" state. We'll need to also delete the "Objective Approval" app template section, so that the approval questions aren't included in the employee's workflow.
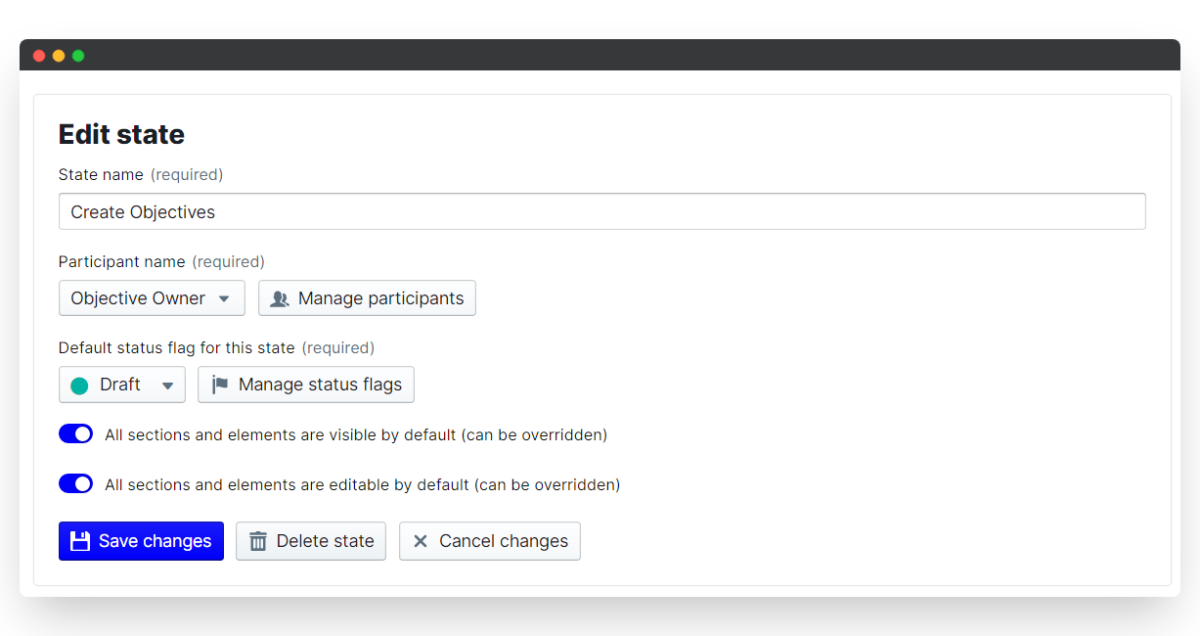
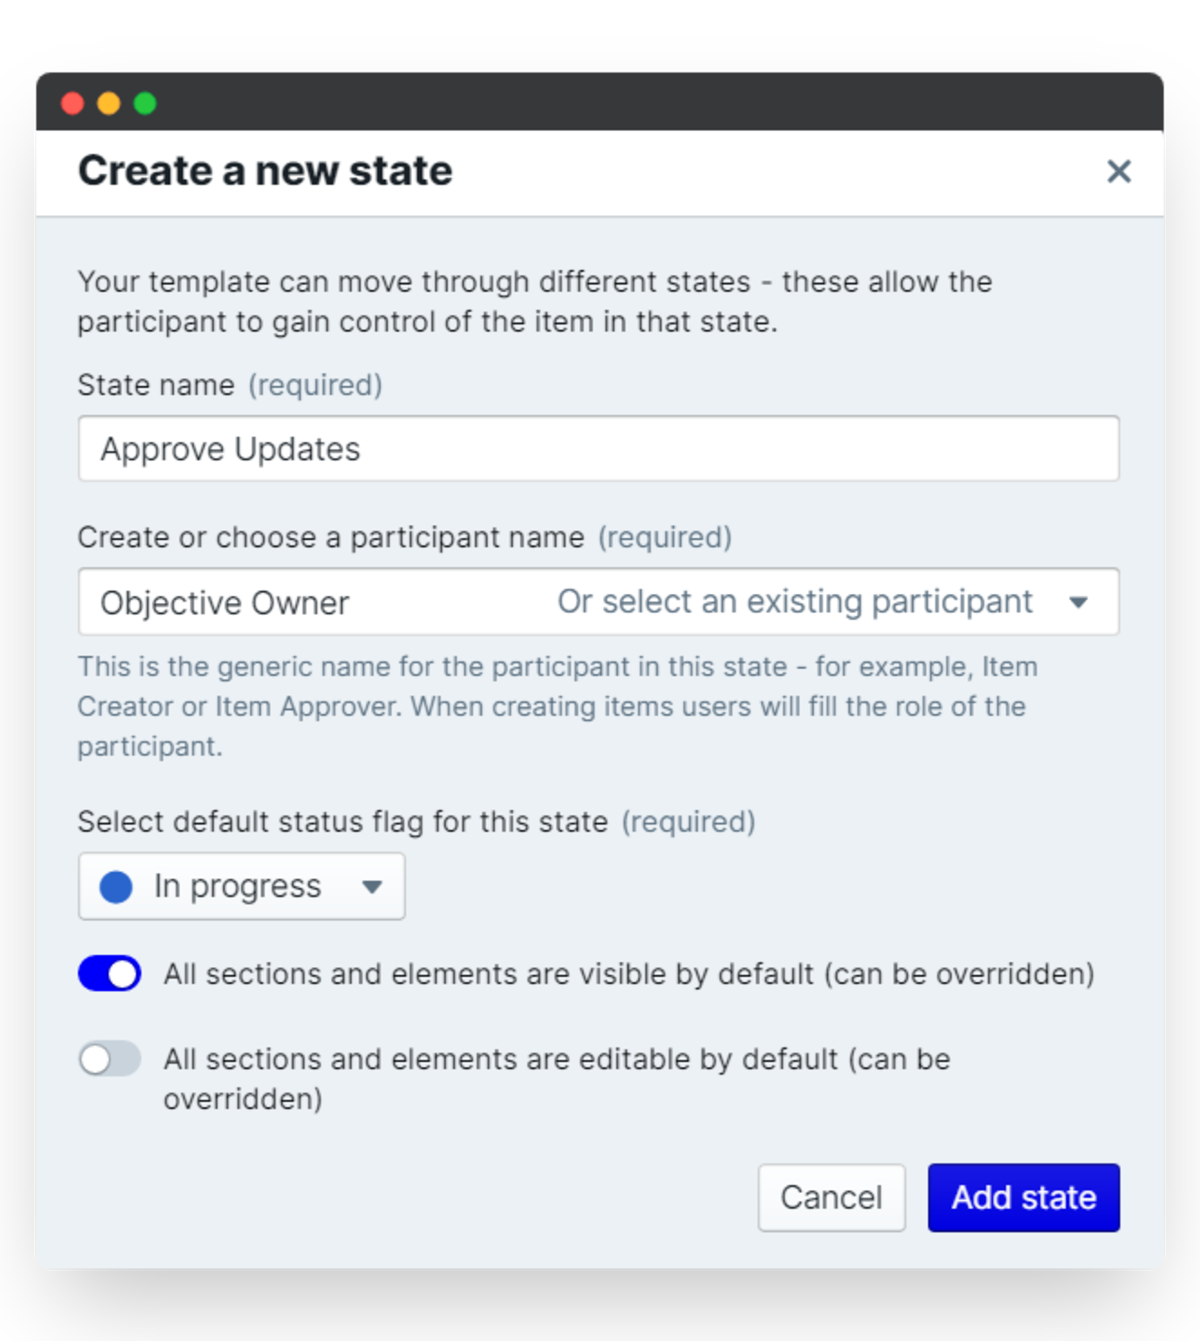
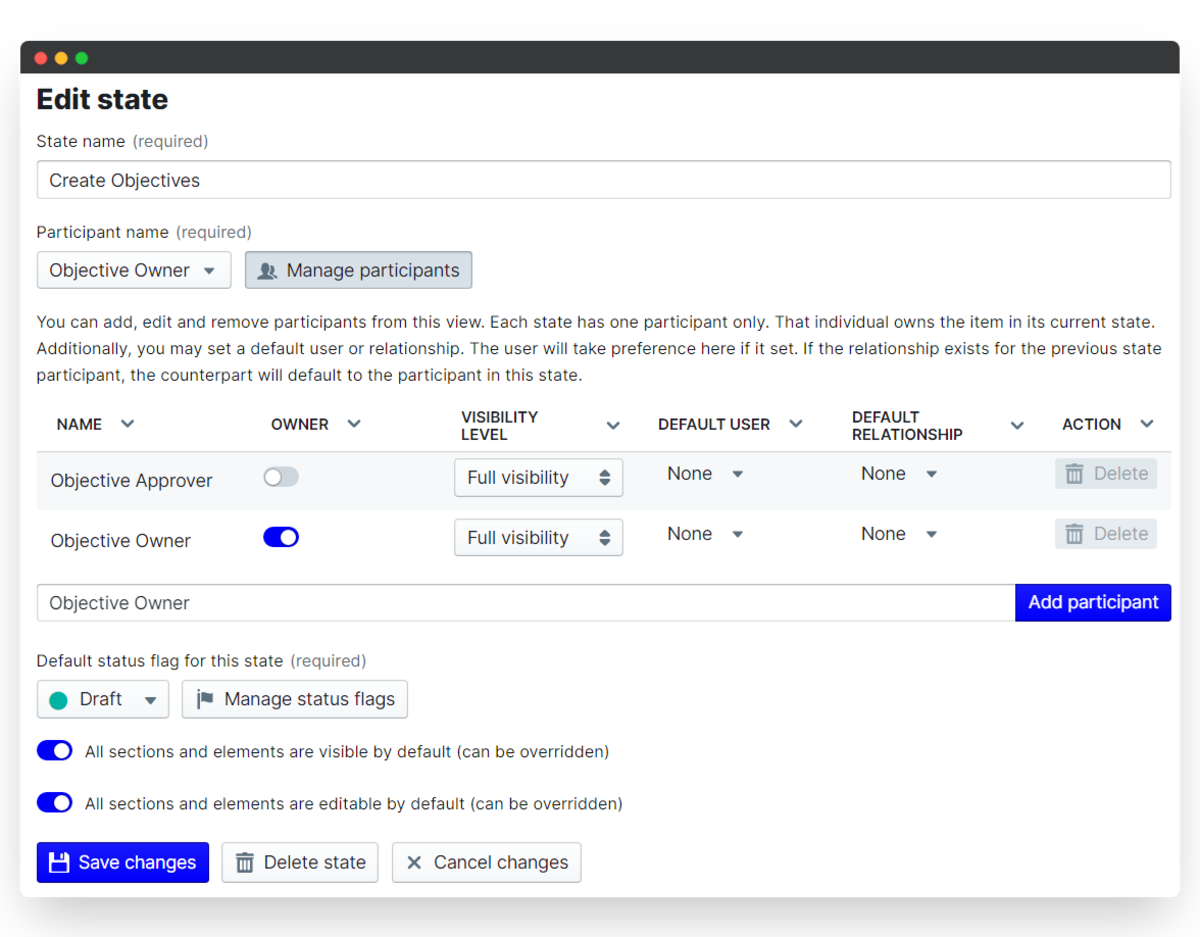
ii. Add a new state
- Click the + button in your workflow builder to create a new state.
- Enter your state name, define the participant, and choose a status flag.
- Toggle on/off whether sections are visible or editable by default (don't worry - you can override this later if you need to).
- Click and drag your state to reorder your OKRs workflow and you're done!
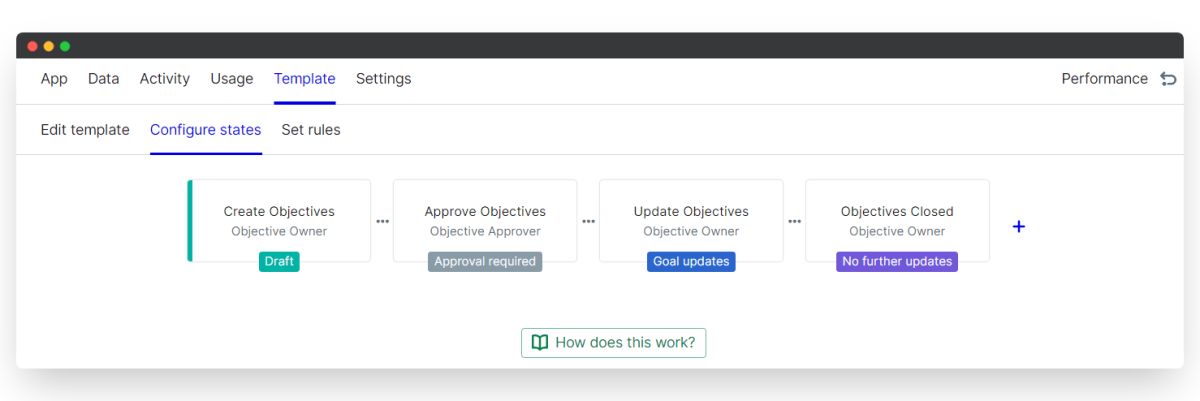
In the below example, we are going to add a state for a second "Objective Approval", to confirm that this objective can be closed once all updates have been made. We are going to create a state for this section so that the OKR can be sent to the manager one more time. This section is only relevant after the objective updates have been made, so we're also going to hide it from all other states. Lastly, we want the manager to be able to read the OKR details and updates so we will make sure to mark all other sections as read-only, and make the final approval editable in the appropriate state.

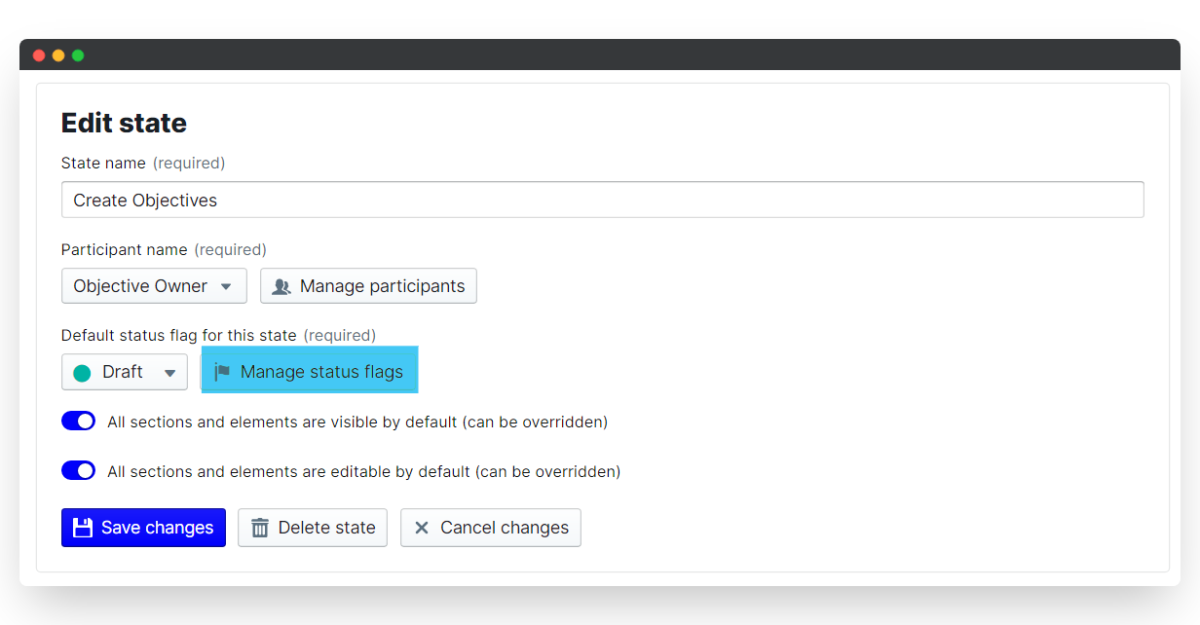
iii. Customize your status flags
Every state has a default status flag that indicates to all participants what stage of the process their item is in. Your OKRs app is set up with default status flags which you can customize.
- In the Configure states menu, click on Manage status flags.
- Click a flag title to rename it, and click the color picker to choose a new flag color.
- Click Create a new status flag to add an additional flag.
- Select the state to which you want to assign your flag, choose which flag to give it and click Save changes to update.
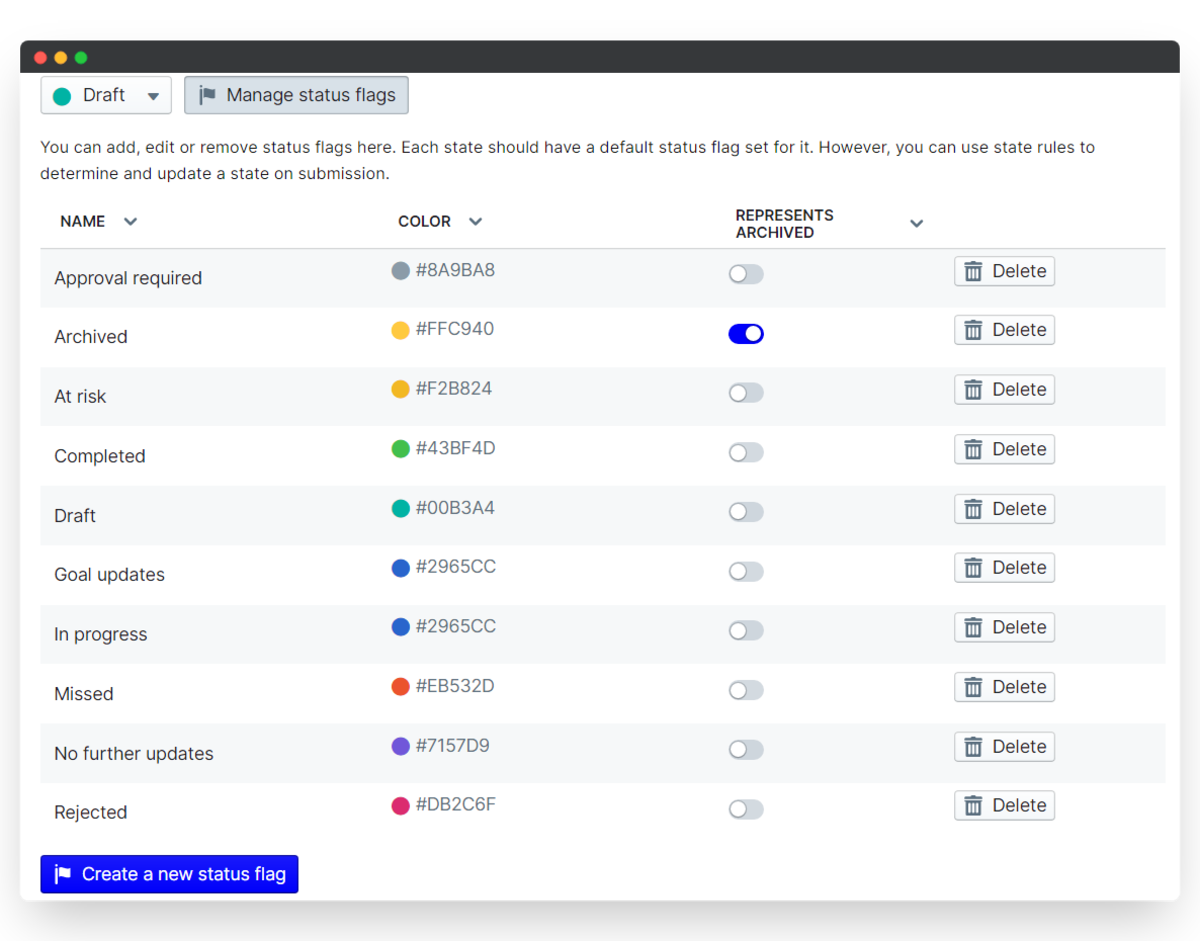
It's a good idea to delete any unused status flags so that they don't clutter up your Item filter once your OKRs are underway. If you've taken out your Objective Approval state for example, you should also remove the "Approval required" and "Rejected" status flags.
4. Manage your Objectives and Key Results App Participants
Participants are the individuals involved in the OKRs and each state has one participant. To automate your OKRs, you can create default participants based on your account Relationships, define an individual as the state participant, or leave these blank to allow the employee to select all participants in the process.
Setting up your participants based on relationships means that when an employee's OKR is created, all of the people who need to be involved in the workflow are automatically assigned.
i. Set default relationships and users
- Click the Template from the menu bar.
- Open up Configure states and select Manage participants.
- For each participant set a default user or default relationship to automate the OKRs workflow. You can also rename the participants to suit your company language.
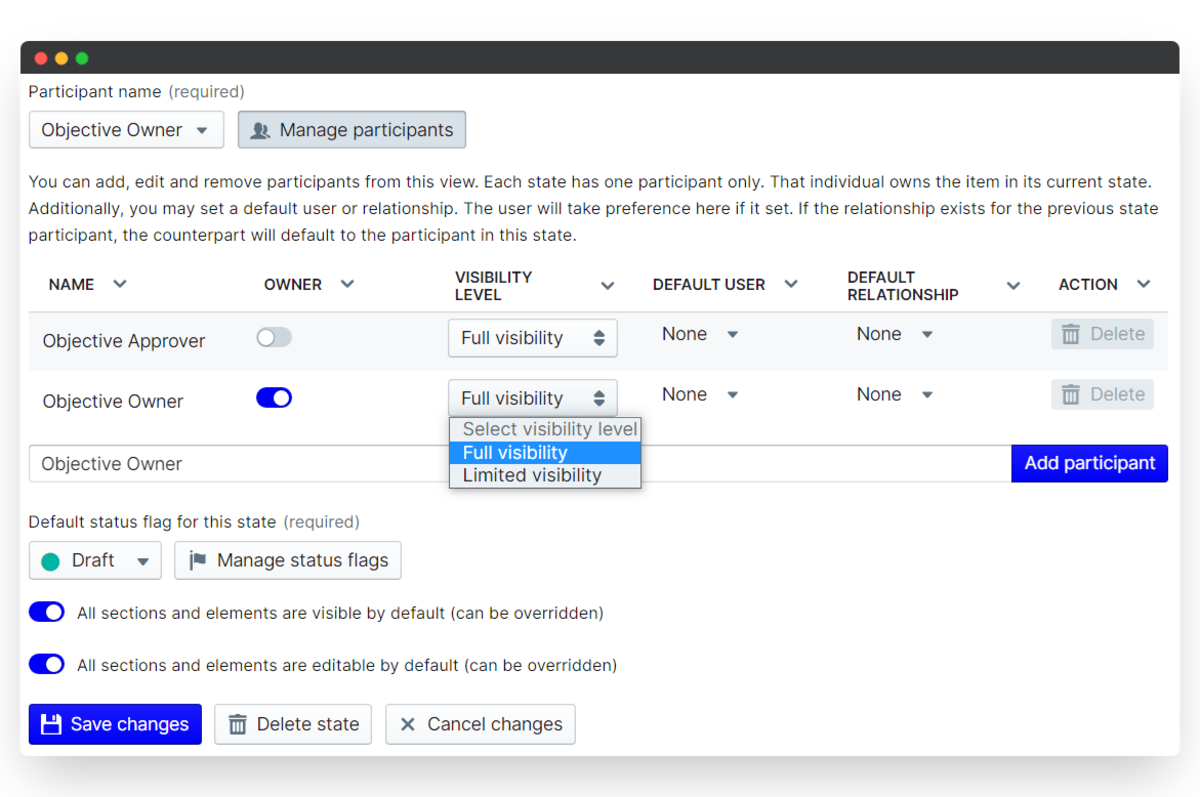
ii. Define the participant's visbility
Visibility defines whether a participant can see the OKRs only in the state that they own (limited visibility), or in all states (full visibility).
The employee and manager should have full visibility because we want them both to see the OKR in all states.
However, if you want to change a visibility level, click the drop-down next to the participant name and choose Limited or Full visibility.
Click Save changes to lock in your updates.
5. Set the Objectives and Key Results App Permissions
Nearly ready to launch! The last step in automating the OKRs workflow is to decide who can create, edit and/or view all the OKRs in your account. To do this, we use Permissions.
Permissions control the access to your app within your PeopleGoal account.
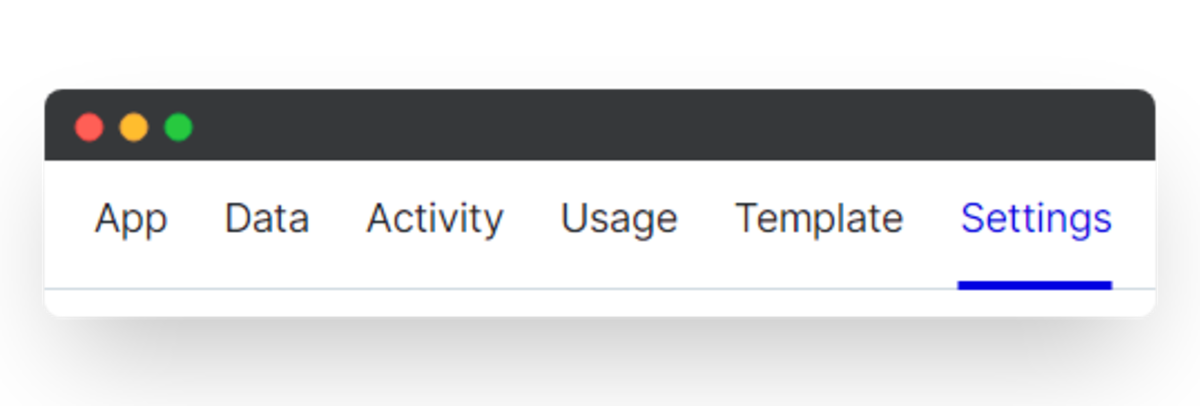
- To set your permissions, click on the Settings menu, then expand the Permissions section.
- Click on Explain permission types to understand the access that each permission gives your account users.
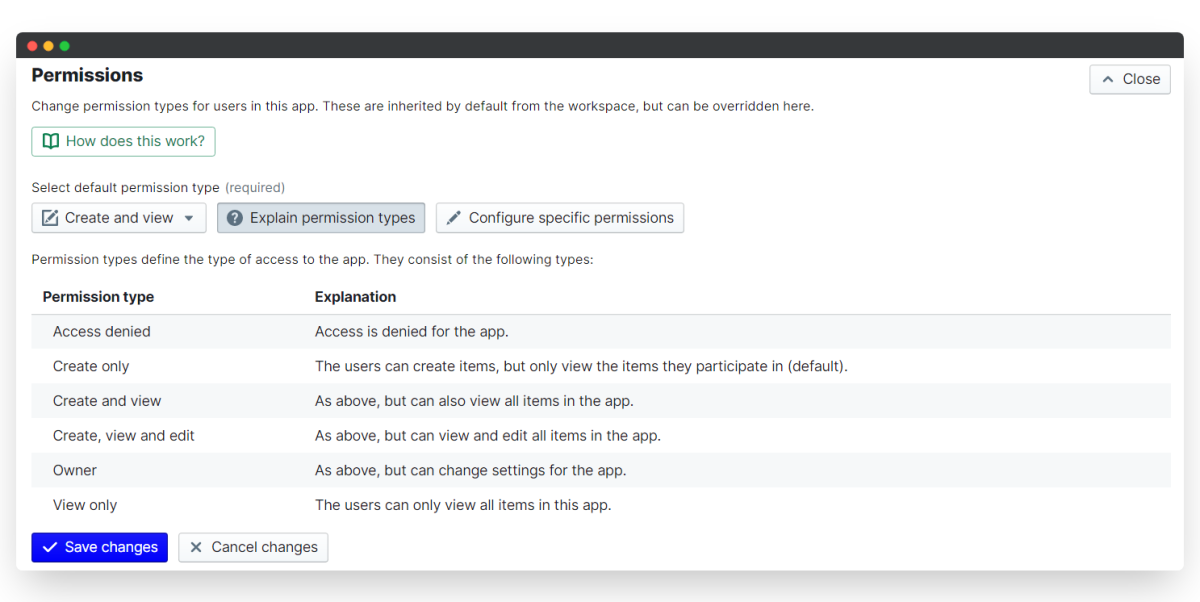
i. App-wide permissions
For OKRs we recommend one of two options. Either you set the permission to Create only; this means employees can create OKRs for themselves but can't see any colleagues' OKRs.
Alternatively, you can set the permission to Create and view. This means that employees can create OKRs for themselves and see their colleagues' OKRs. To view colleagues' OKRs, select Your colleagues from the menu on the left hand side.
ii. Specific team and user permissions
The user who installed the OKRs app template has Owner permission by default, and can assign specific permissions to other teams or users. Specific team and user permissions supersede the default permission type.
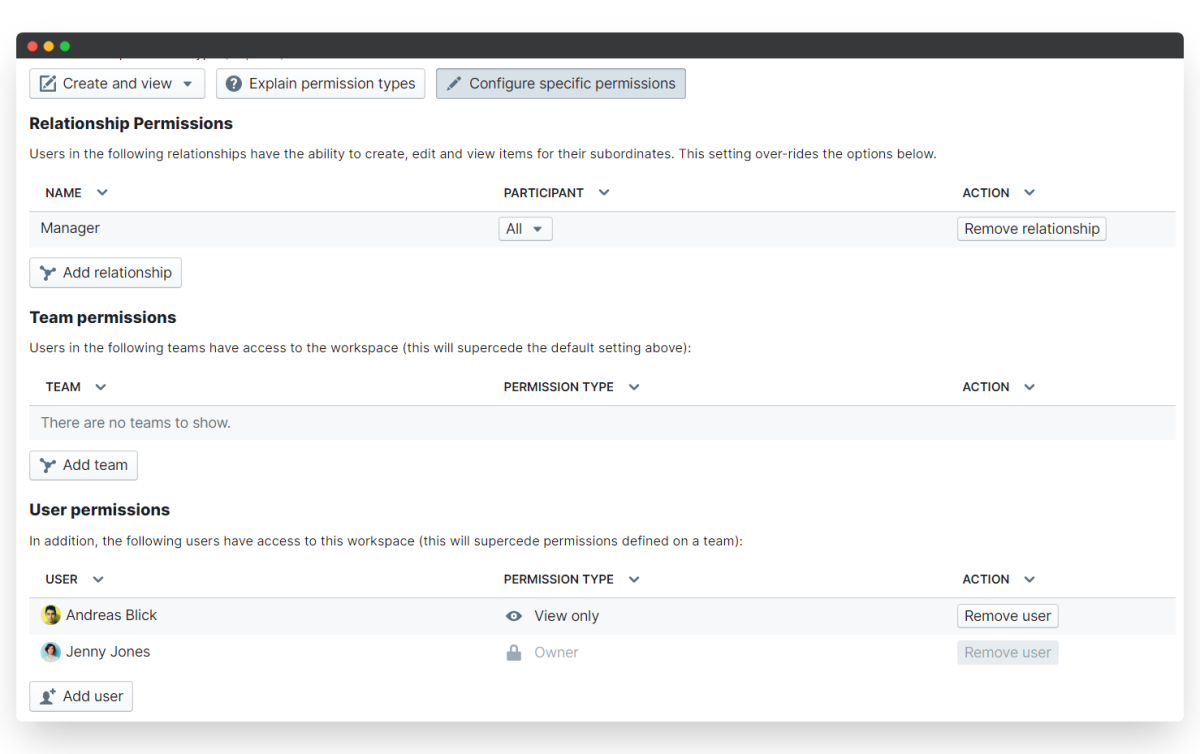
- To assign a specific permission, select Configure specific permissions.
- Under "User permissions" click Add user.
- Type your colleague's name to add them to the permissions list. In the "Permission type" column, select which permission level to give them.
You might want to give "Create and view" permission to your C-Suite, so that they can create OKRs for themselves and see all other OKRs in the app, but they don't need access to the Template or app Settings menus.
Additionally, you should set a specific Relationship permission to give the manager "Create, view and edit" permission for their direct reports. Managers will then be able to create OKRs for their direct reports, including all the objective details needed in the first state.
6. Connect Individual OKRs to Company Objectives
A key part of the OKRs strategy is to have employees link their individual targets to the wider company objectives by following these quick steps.
Before you start, ensure that you have input your company objectives into PeopleGoal with the Company Objectives App. This can be downloaded as a template from the app store, or found in the Performance workspace under Goals.
- Open your OKRs app and click on Template from the top menu, then select Edit template.
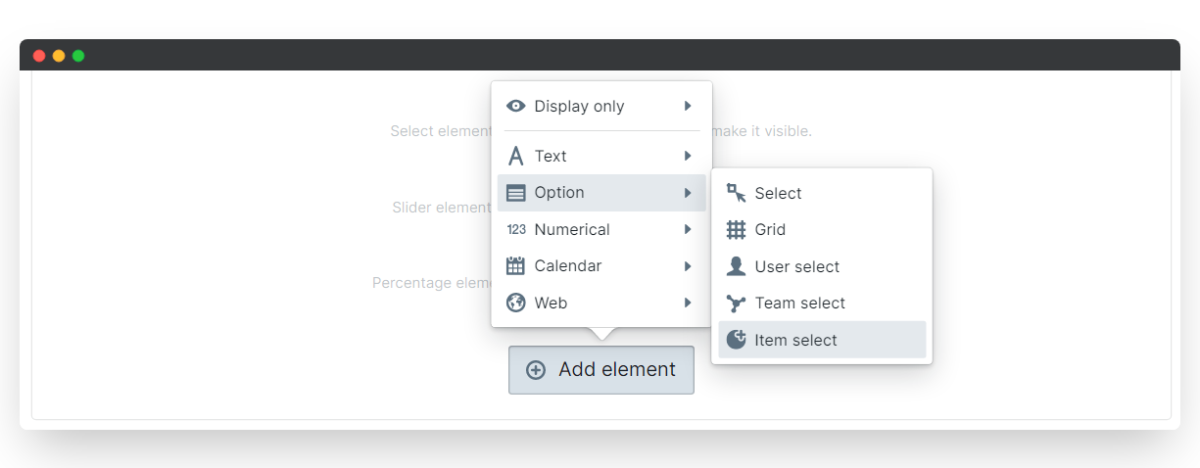
- Select Add element in the Objective Details section.
- Click on Option and then Item Select.
- Input a title into the name field and a short description of what the objective owner needs to do in the placeholder text field.
- Select the Company Objectives App from the drop down list, and leave the option type as multiple choice. If it is essential that the employee does this, leave the Response is required toggle switched on.
- Finally, click Save changes to lock in the update.

Now, when employees create an individual OKR for themselves they'll be able to select from all of the available company objectives to align their goal to the organization's strategic objectives.
7. Launch your Objectives & Key Results!
You're ready to roll! All you need to do now is kick off the OKRs process for your employees. You can create these for individuals, have users create OKRs for themselves, or set up a regularly recurring OKRs schedule.
i. Create one-off OKRs
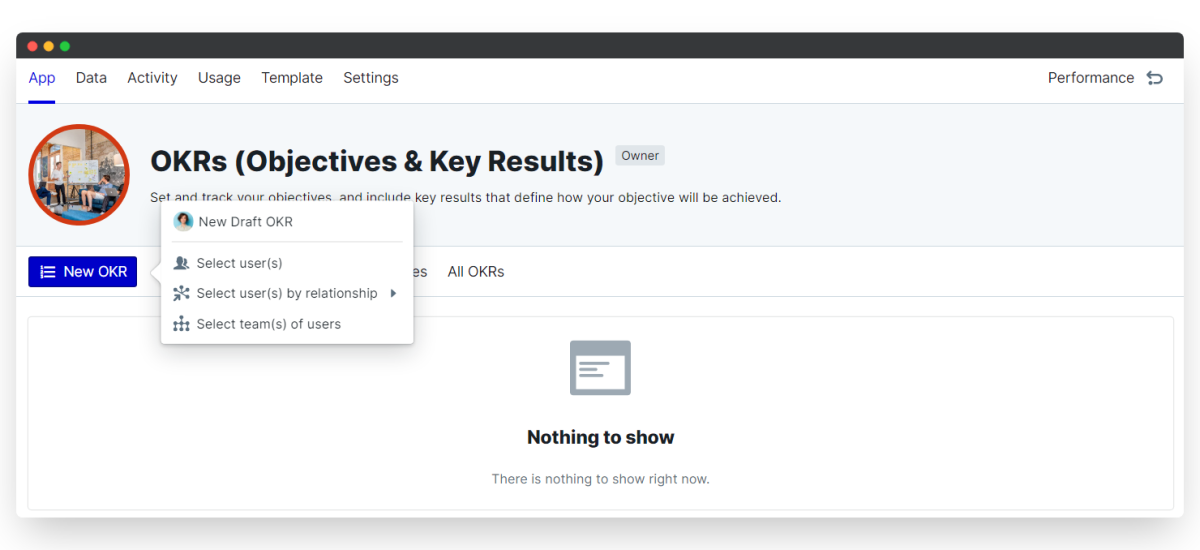
- Click on the OKRs menu and click New OKR.
- To create an OKR for yourself select your own name.
- To create an OKR for others, click Select user(s) and search for individual employee names.
- Or, to create an OKR for direct reports only, click Select user(s) by relationship and select the relationship type. A list of your direct reports will open up.
- You can also create draft OKRs for whole teams! Select team(s) of users and select your Company team here to kickstart OKRs for everyone in the account.
ii. Schedule a regular OKRs cycle
Especially when you're getting started with OKRs for the first time, it's a great idea to set up regular reminders to everyone to create their OKRs. Typically these are created every quarter, but you can schedule reminders at any time based on fixed dates or relevant employee profile dates, like their hire date.
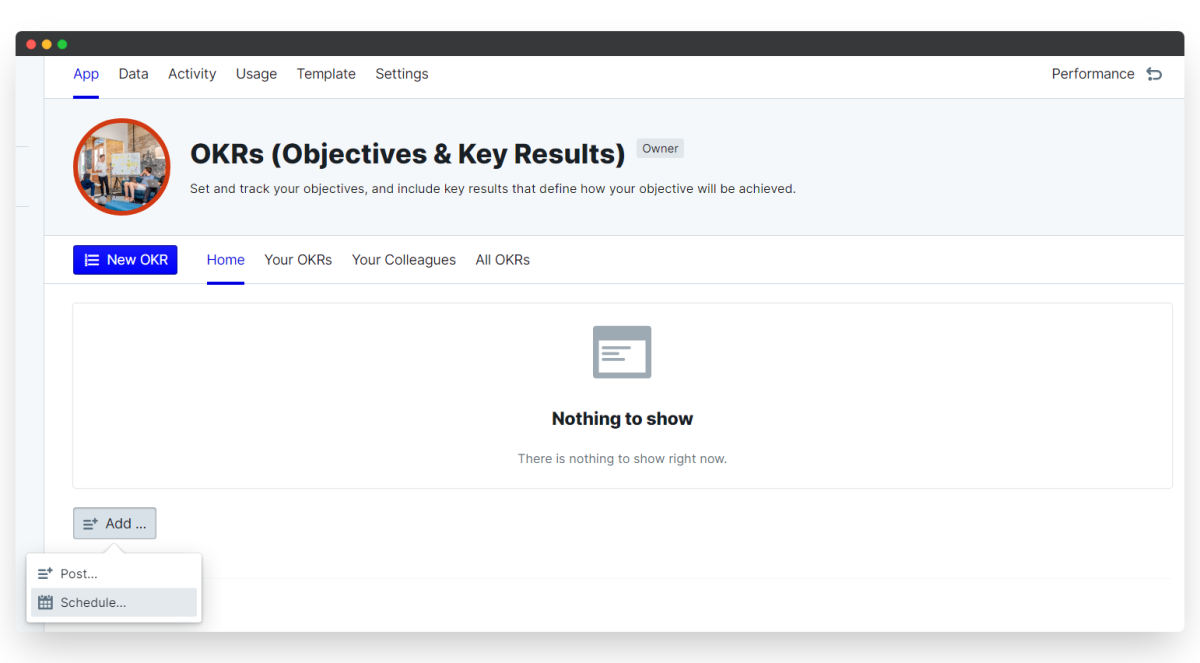
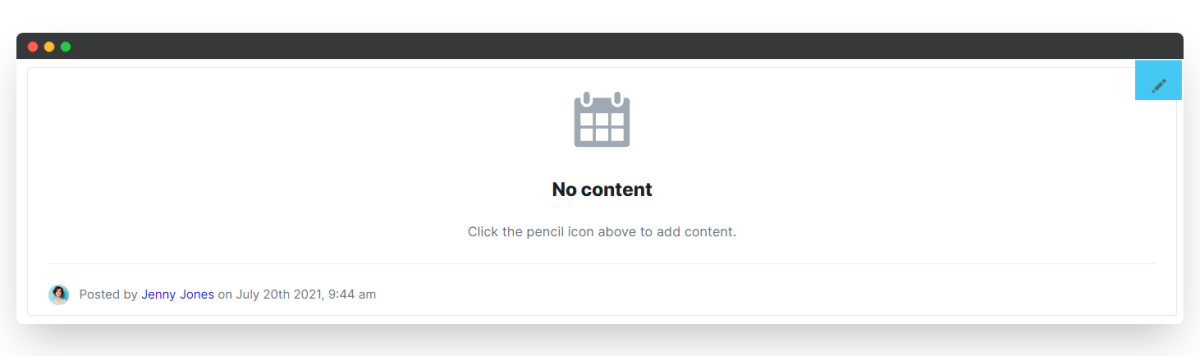
- Go to your OKRs homepage and click Add, then Schedule.
- In the content box that appears, click the pencil icon to set up your Schedule details.
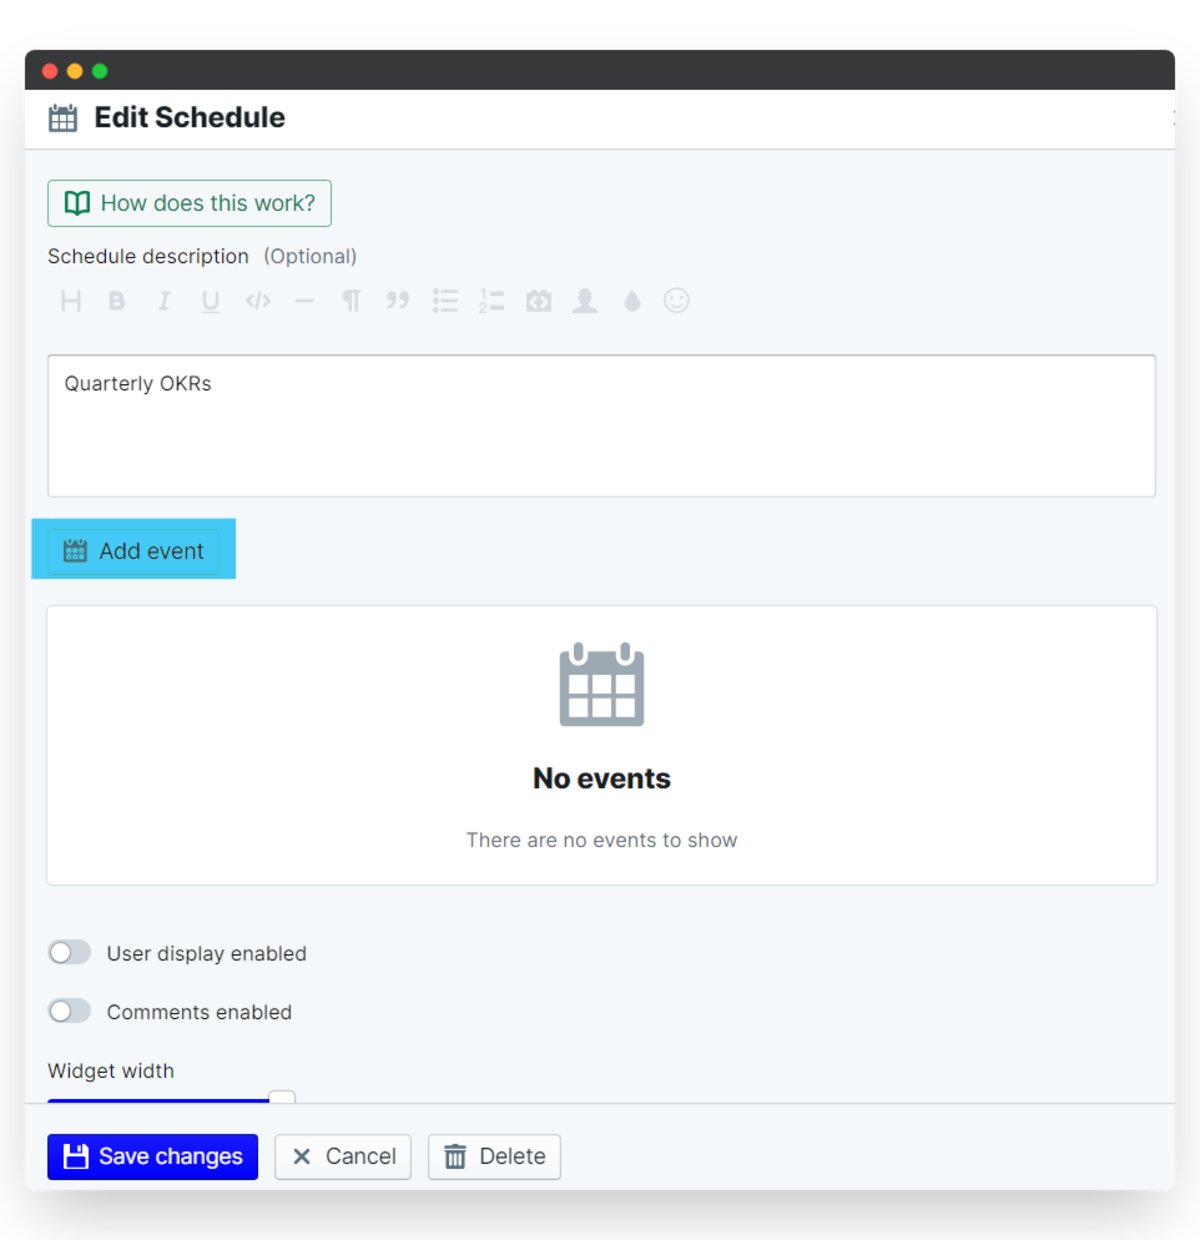
- Add a description, then select whether to display this schedule to users, whether to allow comments and whether to display this on the Dashboard.
- Click Add event to set up reminders and automatically create new items.
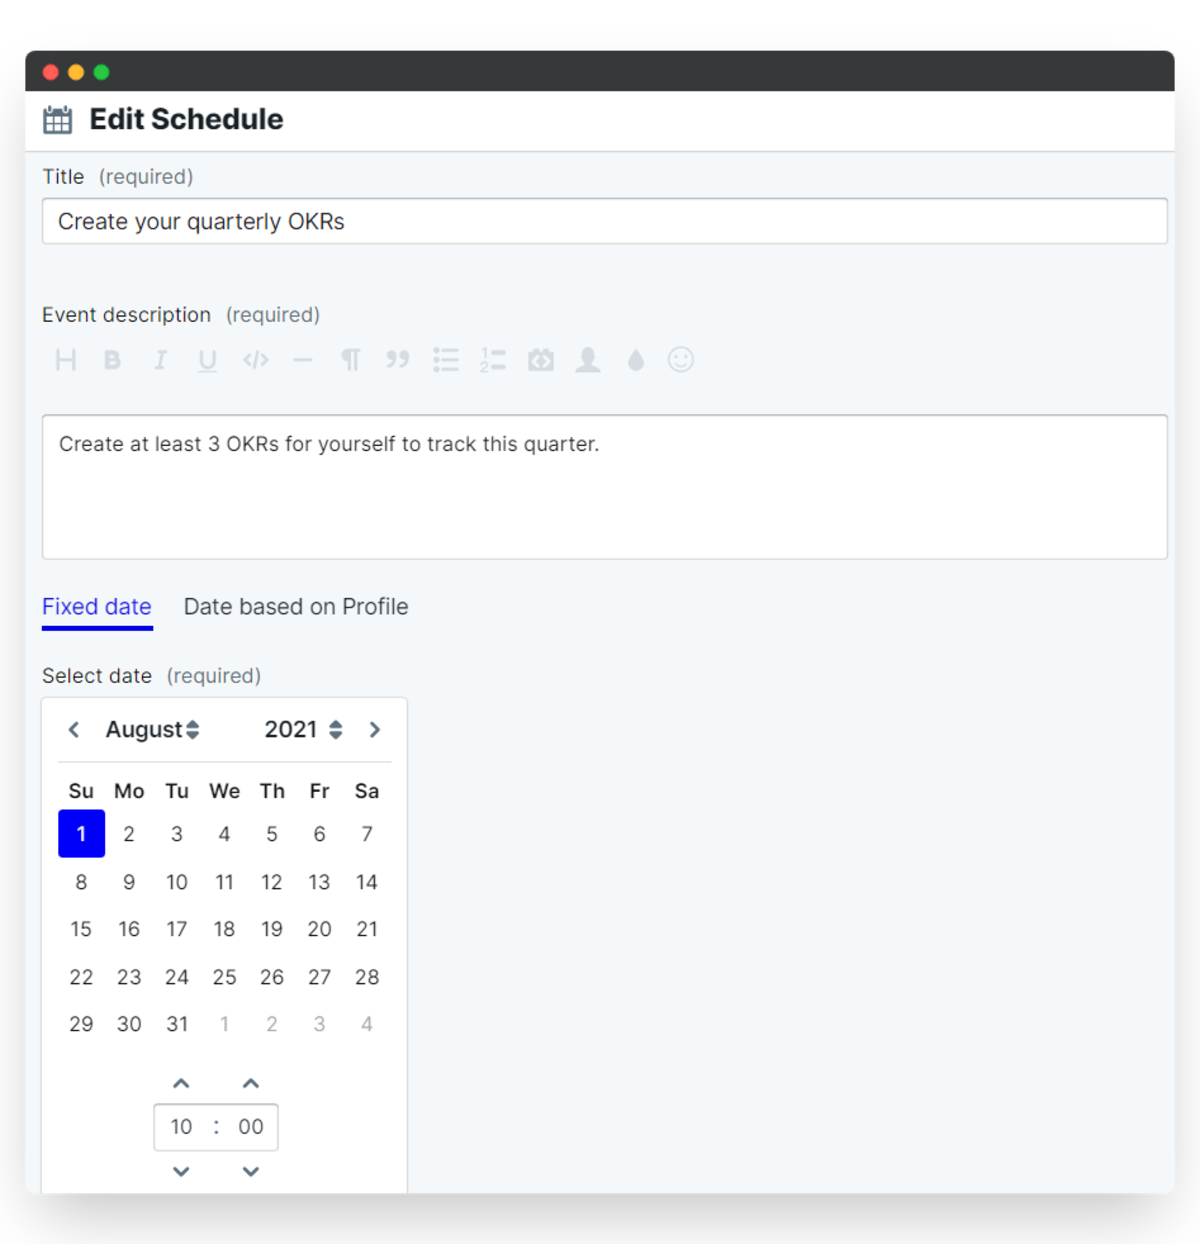
- Enter your event title and description. This content will become your custom notification to users.
- Select a fixed date if everyone is working on the same schedule, for example the first of the month.
- Or, select "Date based on Profile" to select a hire date, date of last promotion, or any other profile date field to create a relative employee schedule.
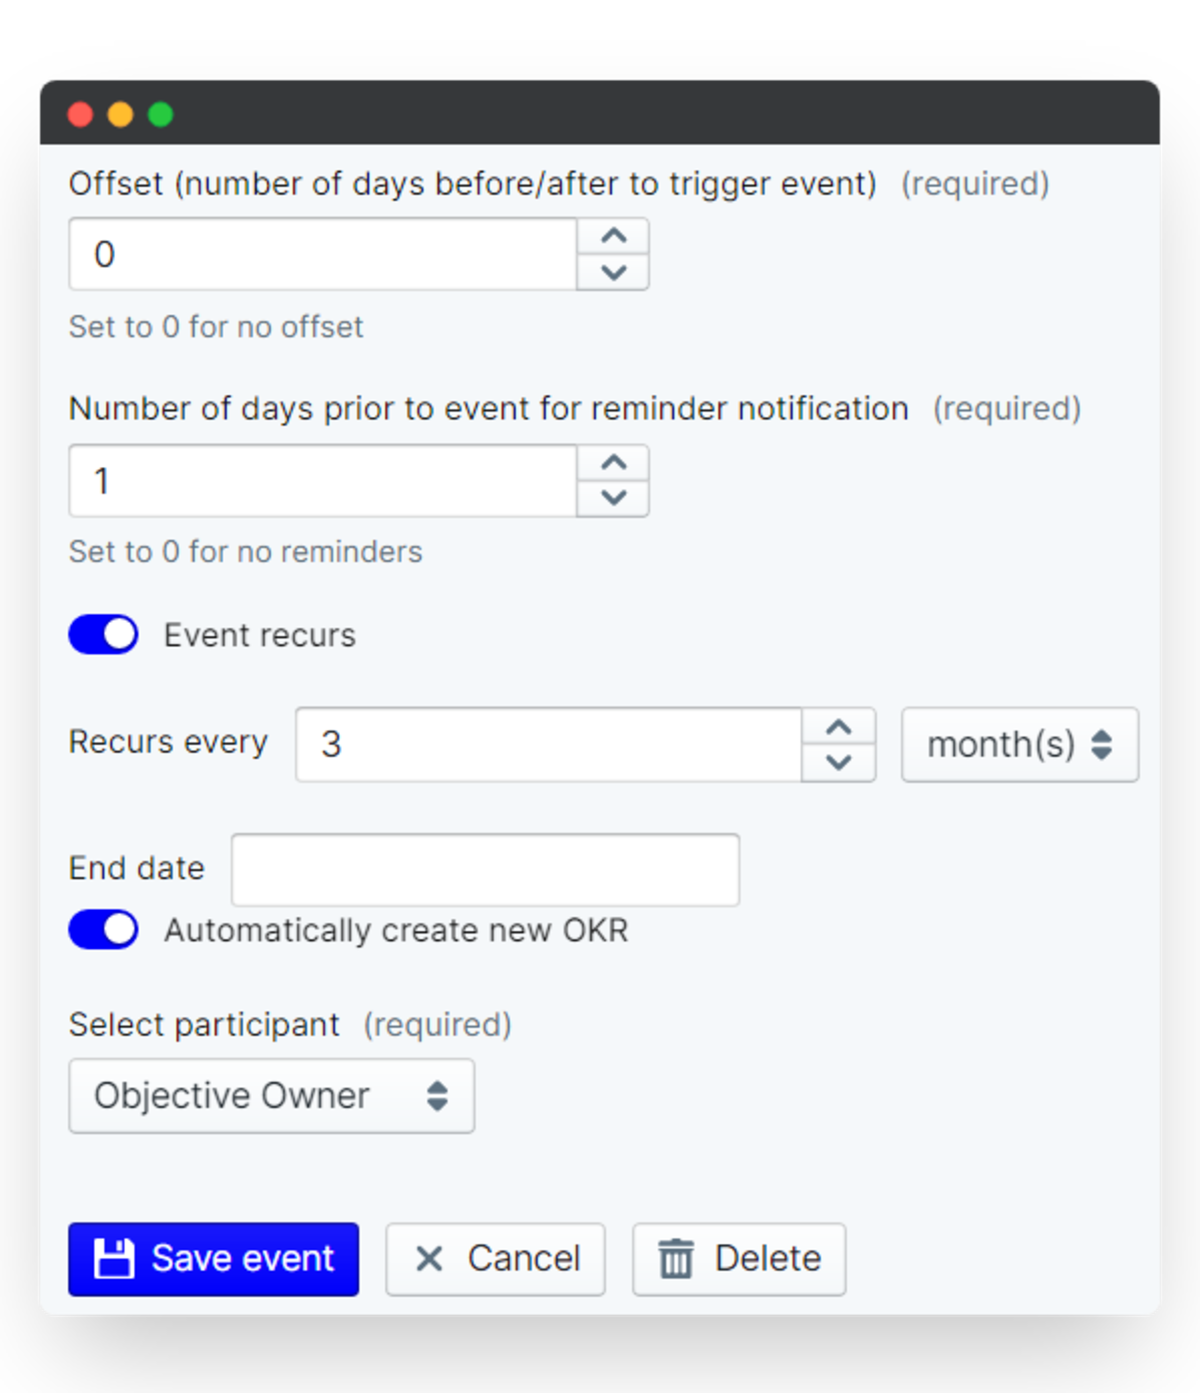
- Enter a reminder day count, or leave as "0" for no reminders.
- Finally, select whether your schedule recurs and on what cycle, and click Automatically create new OKR to create draft items on the scheduled date.
Next steps: set up your custom OKRs analytics and reports
We know that every company has its unique ways of working, and the OKRs metrics you want to analyze are different to any other organization. We capture every single data point from your Objectives and Key Results app in the Data table, to help you to build custom reports and automated charts. Head over to our Reports building article to learn how to create custom reports and analytics tracking.
Once you've got your Objectives and Key Results process up and running, take a look at some of the other apps you can install within your Performance workspace.
If you haven't already, we recommend using the Company Objectives App which can be easily linked to individual OKRs (see section 6 of this article). In addition, consider implementing Performance Reviews (or reviews with multiple managers) to streamline your employee appraisal process, regular check-ins to improve your employee/manager relationships, and 360 degree feedback to gather insights from peers, colleagues and supervisors. You can find all these and more in our App Store.
Don't have a PeopleGoal account yet? Book a demo to see our no-code HR workflow builder in action!


PeopleGoal Support Team
Account Management & Implementation Specialists


