
Support Center.
Get Started or Become a Pro. Browse our support articles to learn how to get the best out of PeopleGoal.
How to Create Career Development One-to-Ones
At the heart of any successful organization is a strong understanding of the importance of good communication. No matter how big or small your team is, you must maintain a consistent and clear channel of communication between all team members. High performing companies are fully aware of the power of encouraging strong working relationships. In order to sustain professional development, real-time feedback encourages career growth. Through regular career development one-to-ones, employees are able to work on action items that align better with their current objectives and goals.
In this 'How to', we will demonstrate a great way to start leading your employees to engage in conversations about their career development. As opposed to waiting all year round to undertake a performance review, this approach will generate more up to date short term goals that will convert into fulfilling employee career goals. Furthermore, for a manager to put aside the time and to give their full attention to each employee for an allotted amount of time each week demonstrates a commitment to their personal development.
The Career Development 1 on 1s App will facilitate any team to keep focused on their day to day progression towards career goals. Through the regular meetings, employees can receive constructive feedback and provide status updates on their training and development programs, as and when they happen each week. Maintaining consistent communication with employees is better for engagement and motivation. With a clear structure to follow, employees are better equipped to not only take on their tasks but aim for pre-set deadlines based on their 1 on 1 meetings.
Stimulating conversation by enabling users to enter talking points prior to the meetings, the app contributes to more time efficient and productive meetings. Additionally, the ability to prepare for these discussions will also encourage employees to produce new ideas or solutions that can be brought up in the meeting. Keeping the meeting as a focal point for the participants to commit to with their career development also gives more confidence to managers that their employees are in fact working to meet their professional development goals.
Beyond this, the value of the app is demonstrated in how easy it is to arrange and continue these meetings. Managers or employees can schedule a slot that best suits them and any communication about the meeting arrangements can be delegated through the software. All in all, by installing this app you are providing your team with an extremely effective and streamline method of guaranteeing that each and every development plan is executed to its best possible standard.
Following the steps below, install and launch your Career Development 1 on 1s in a matter of minutes:
1. Install your Career Development One-to-Ones app
2. Customize the app template (optional)
3. Configure the app states (optional)
4. Manage your app participants and permissions
5. Set up recurring development meetings
7. Launch your Career Development One-to-Ones app!
1. Install the Career Development One-to-Ones App
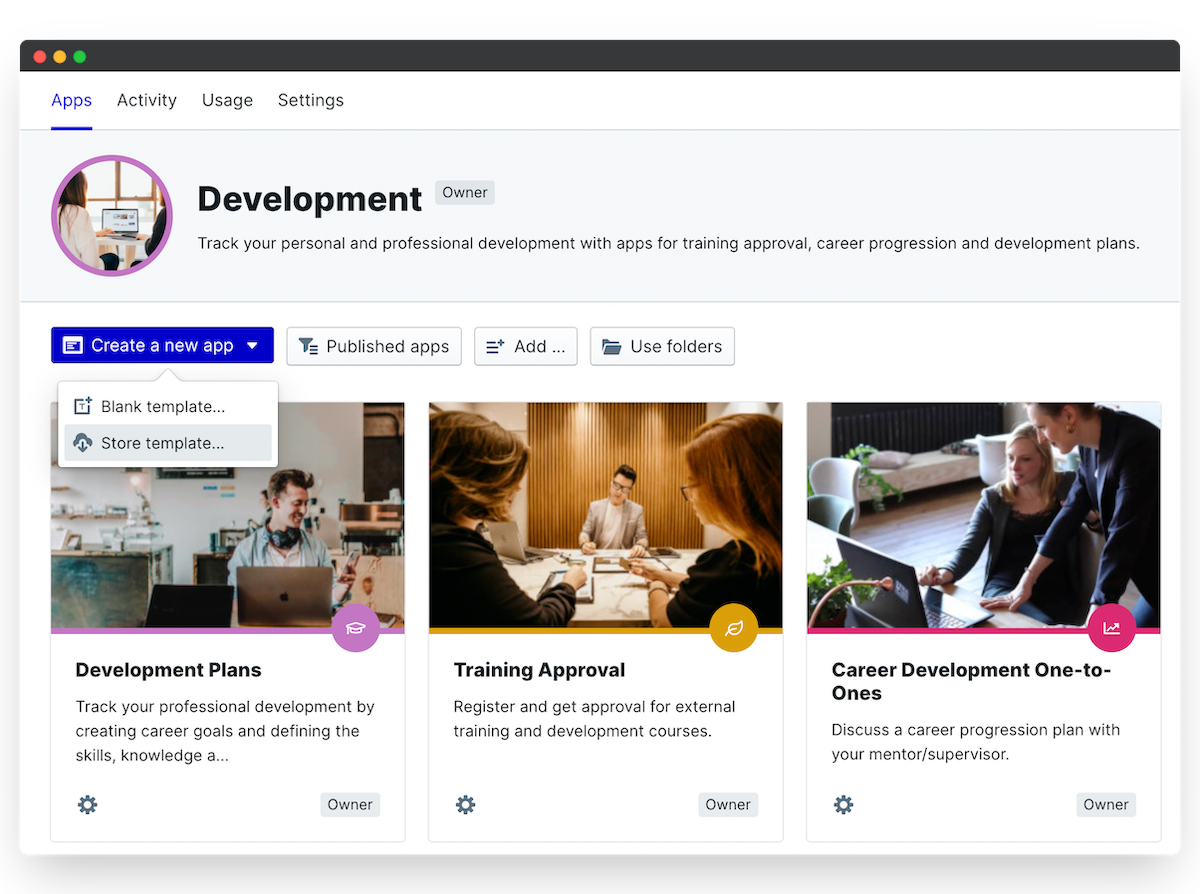
Open up any workspace, click Create a new app, then select Store template.
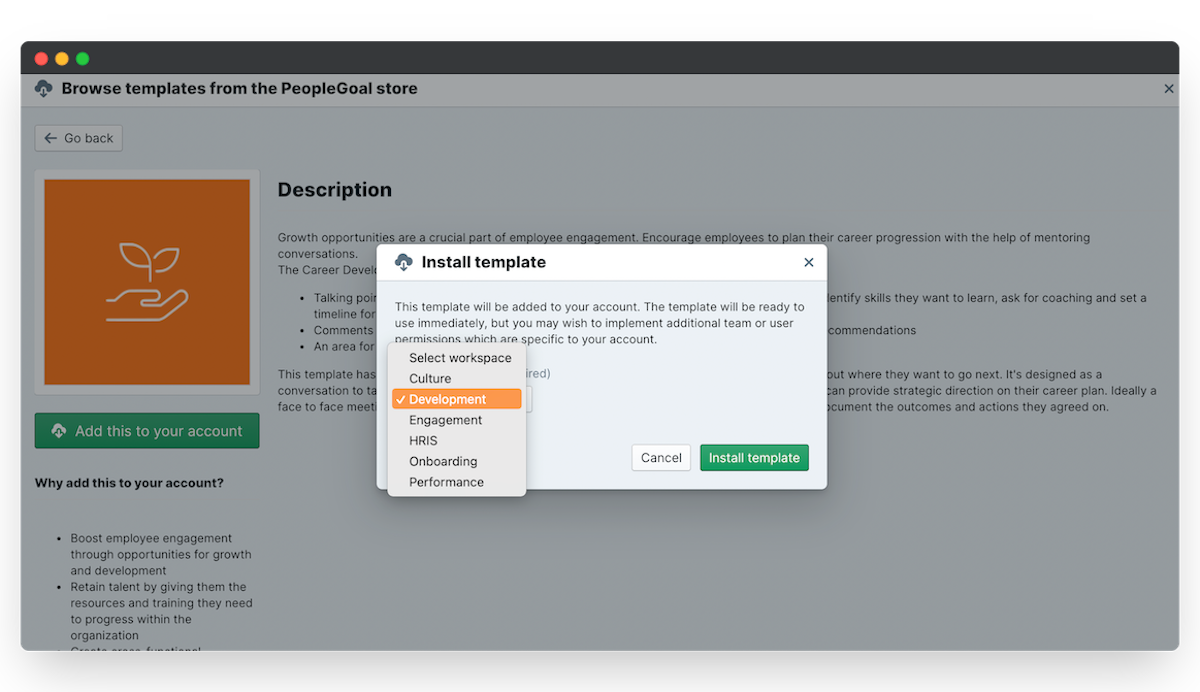
Select the Career Development 1 on 1s app and click Add this to your account.
- Select the workspace (and workspace folder) you want this app to belong to from the drop-down menu, then click Install template.
We'll take a few seconds to add this to your account. You'll be taken straight to the app to get started.
All of the pre-built questions and states are installed and ready to go. You can use the app right out of the box! To skip the customization, head on down to step 4 and set up your app participants and permissions.
2. Customize the App Template
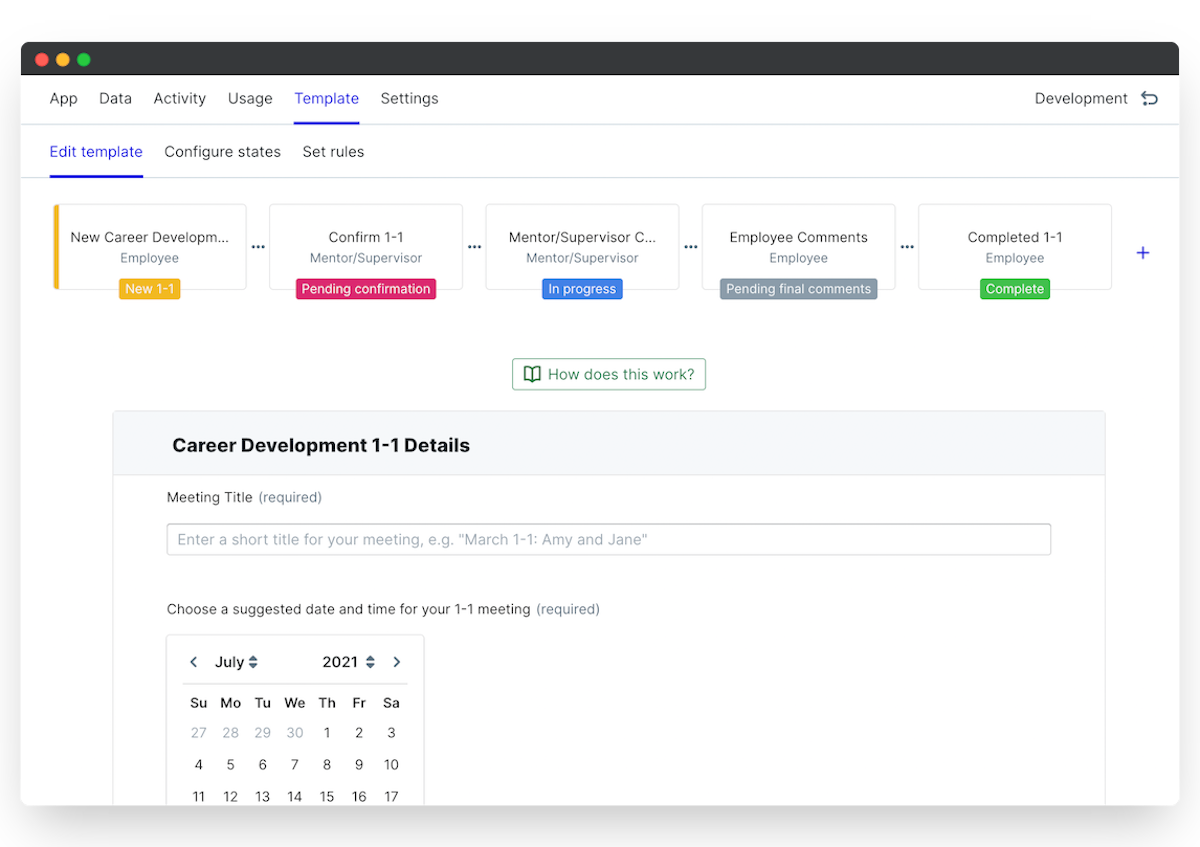
If you would like to configure the Development Meetings form to add your own questions and states, click the Template menu, then Edit template.
i. Edit existing elements
Elements are your individual form fields that make up your form. Whether they're text questions, drop-down menus, display-only fields or numerical calculations, every element can be changed to suit your custom process.
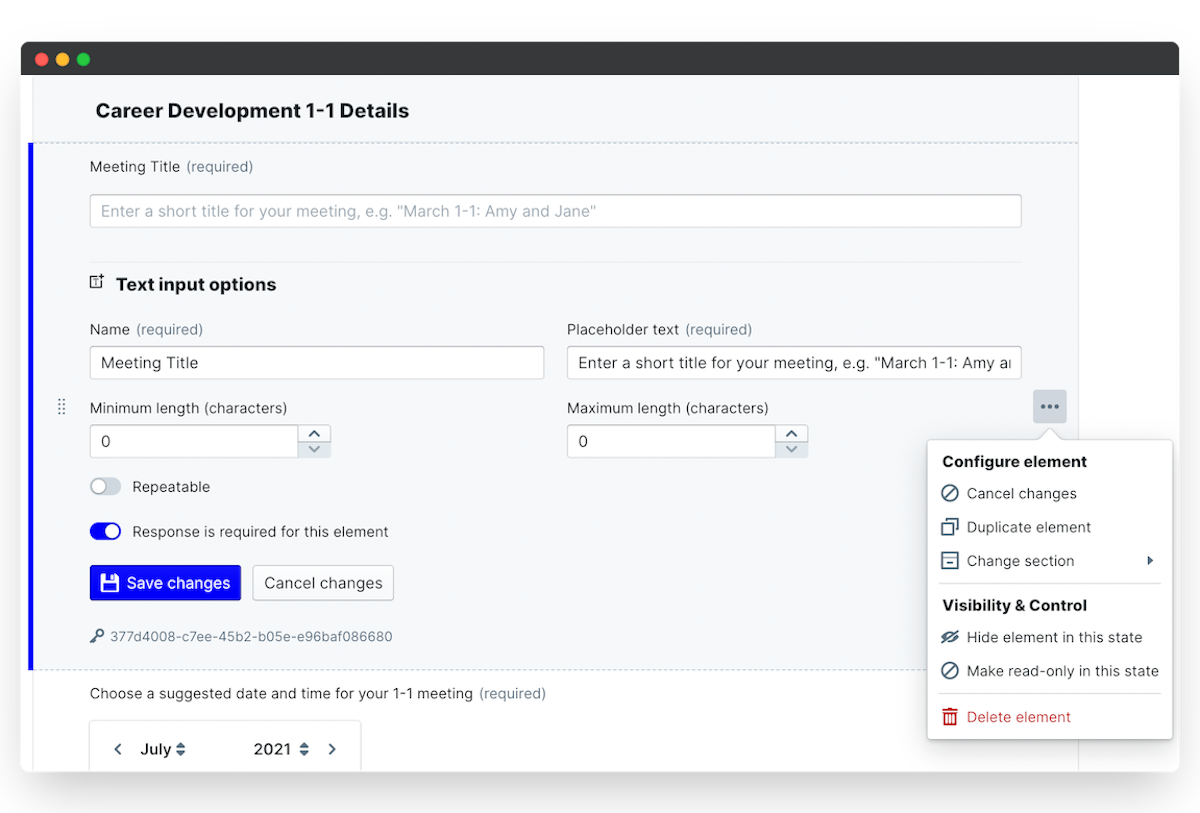
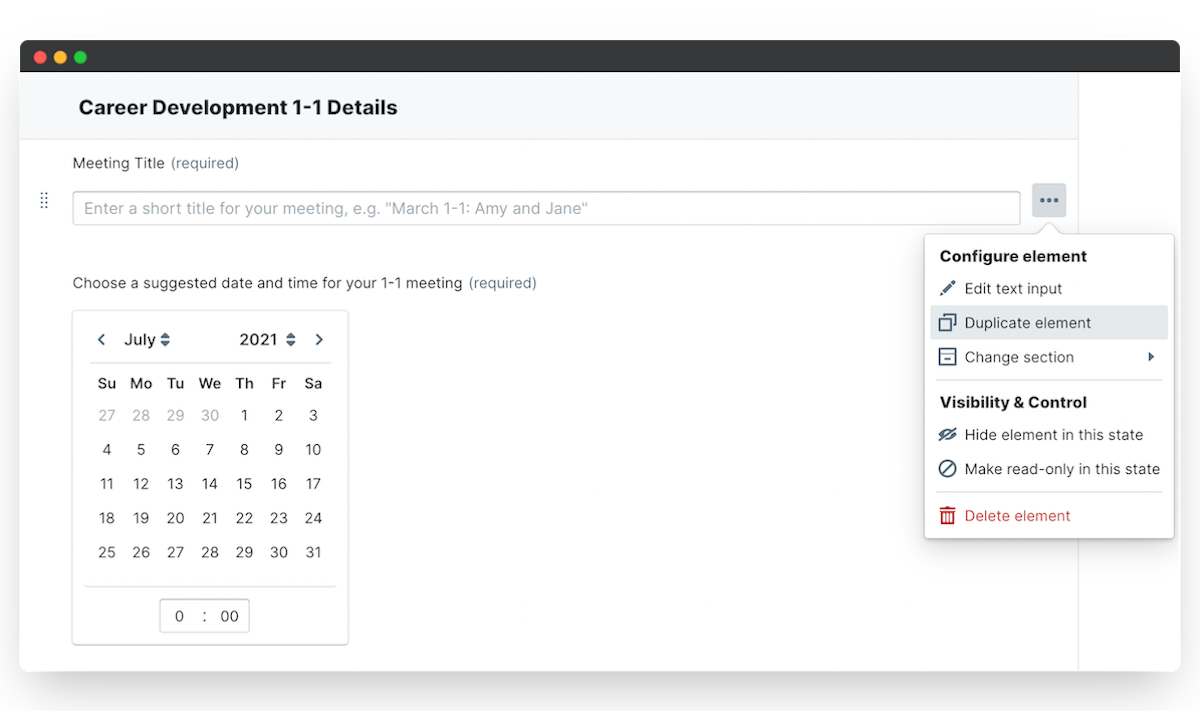
- To change a field, hover over the right-hand side of the element and click the three dots that appear.
- Select Edit element (your element will have a name like "Select", "Description", "text area", etc.). The element editor will open up.
- Change any fields you need to and click Save changes to update.
For this example, we are going to edit the display text to align more with the company's own language. You able to edit just about anything in these templates, so feel free to alter whatever you deem necessary.
You should note that each element is unique, so if for example you change the rating set on one element you'll need to change any other questions to match this. Don't worry, it's quick and easy to duplicate an element once you're happy with its setup.
ii. Duplicate elements
- Hover over the right-hand side of the element and click the three dots that appear.
- Select Duplicate element and an exact copy will be created below.
- Edit the duplicated element to change your question text.
iii. Reorder elements and sections
Reordering is super easy - you just click and drag to change the element or section order.
- Hover over the left-hand side of the element (or section title) and click and drag your element or section to its new location.
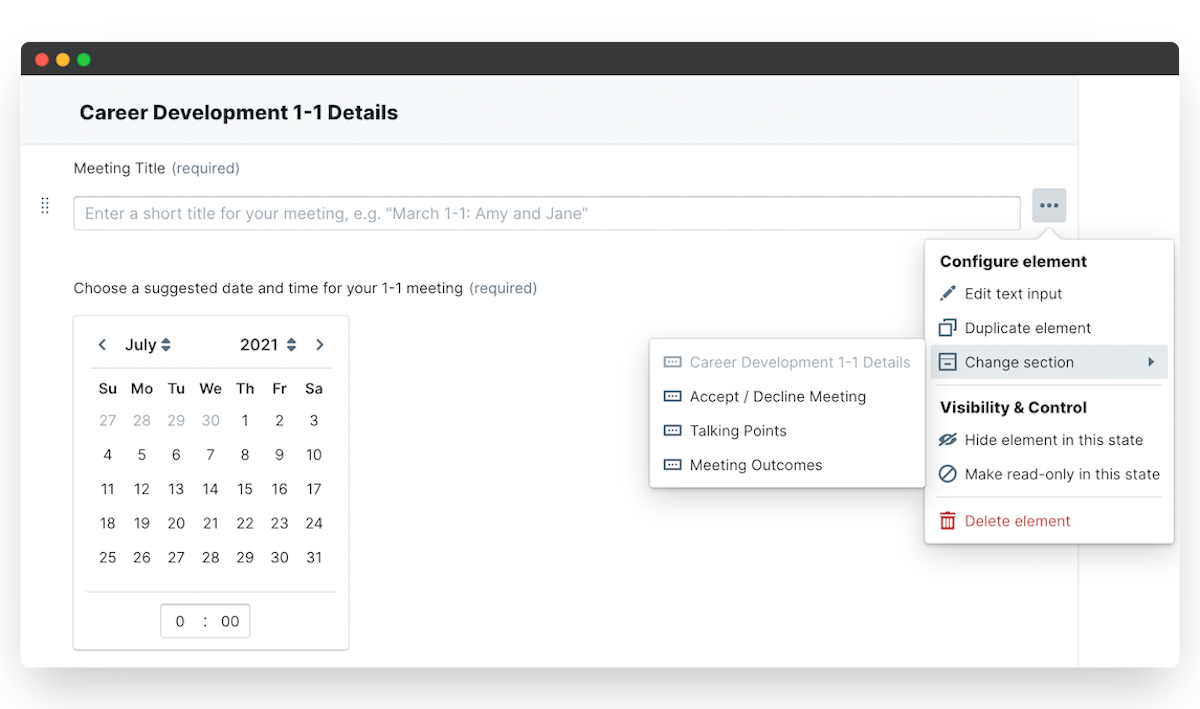
- To move an element to a different section, hover over the right-hand side and click the three dots that appear.
- Select Change section and choose the new section you want the element to belong to.
iv. Create new elements and sections
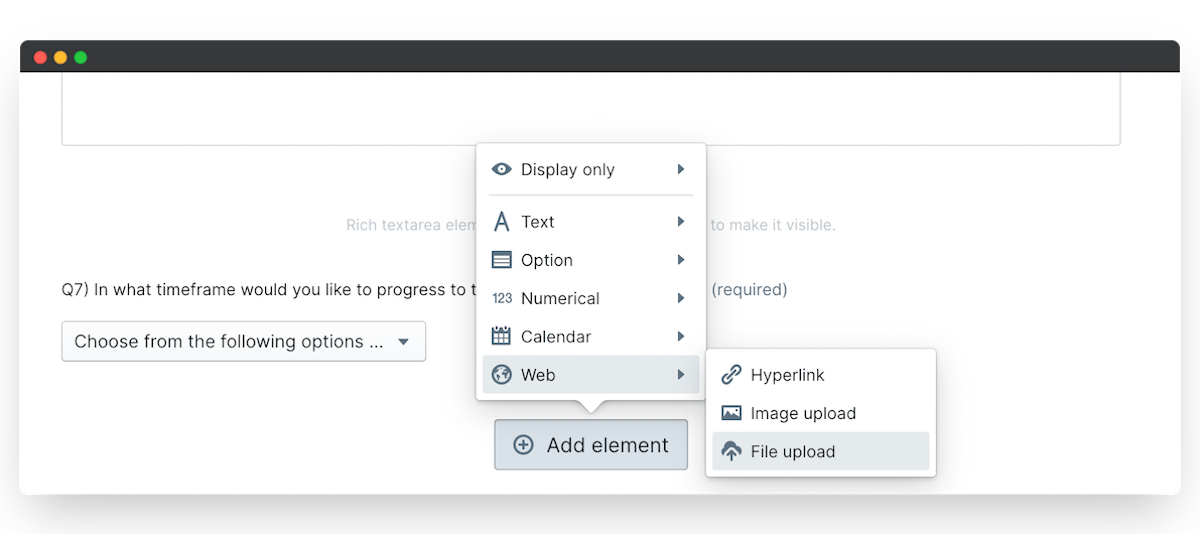
- At the bottom of each section, click Add element and select the element type you want to insert.
- To add a new section, scroll to the very bottom of your template form and click Add section. Then click and drag your new section to where you want it to sit in the survey flow.
A new element that's useful to add to your first section is a display-only Description or Rich-text area. For example, you can use this to inform employees about the dedicated slots that managers have assigned for these meetings.
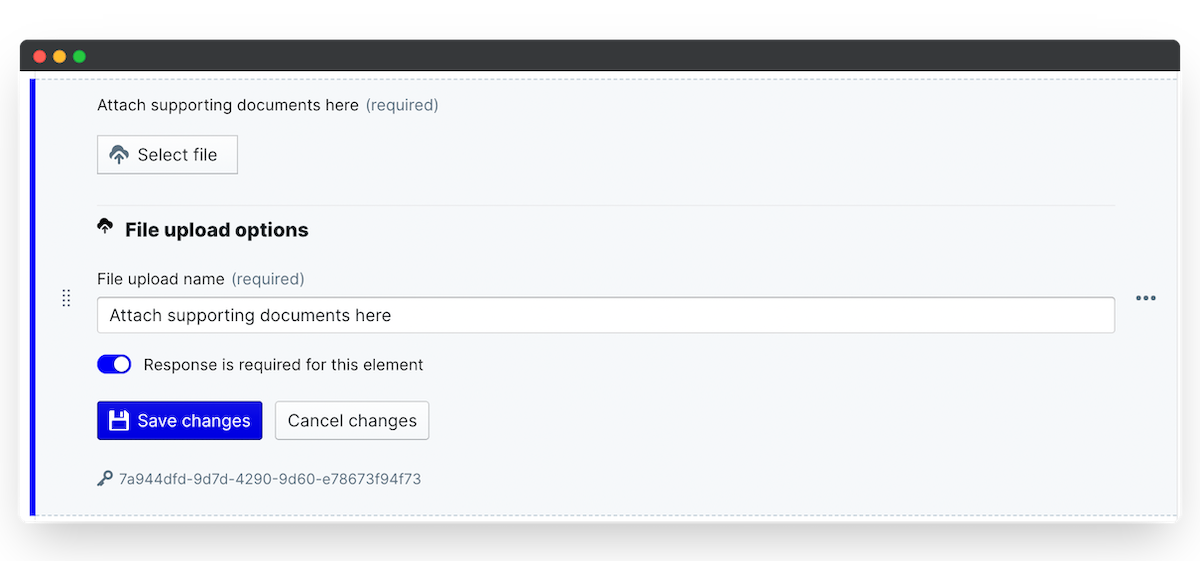
In the example, we add a section with a File upload element. The employee will be prompted to provide some evidence of their progress or the work they've done towards their training and development since the last meeting.
3. Configure the App States
States are the steps in your Development Meetings workflow, and each state has its own participant. The New Career Development 1 on 1 is one state and the Employee is the participant - likewise with the Mentor/ Supervisor and their states.
There's no limit to the number of states you can add to your survey workflow. What's more, you can select whether each state is read-only, editable or hidden to the selected state participant.
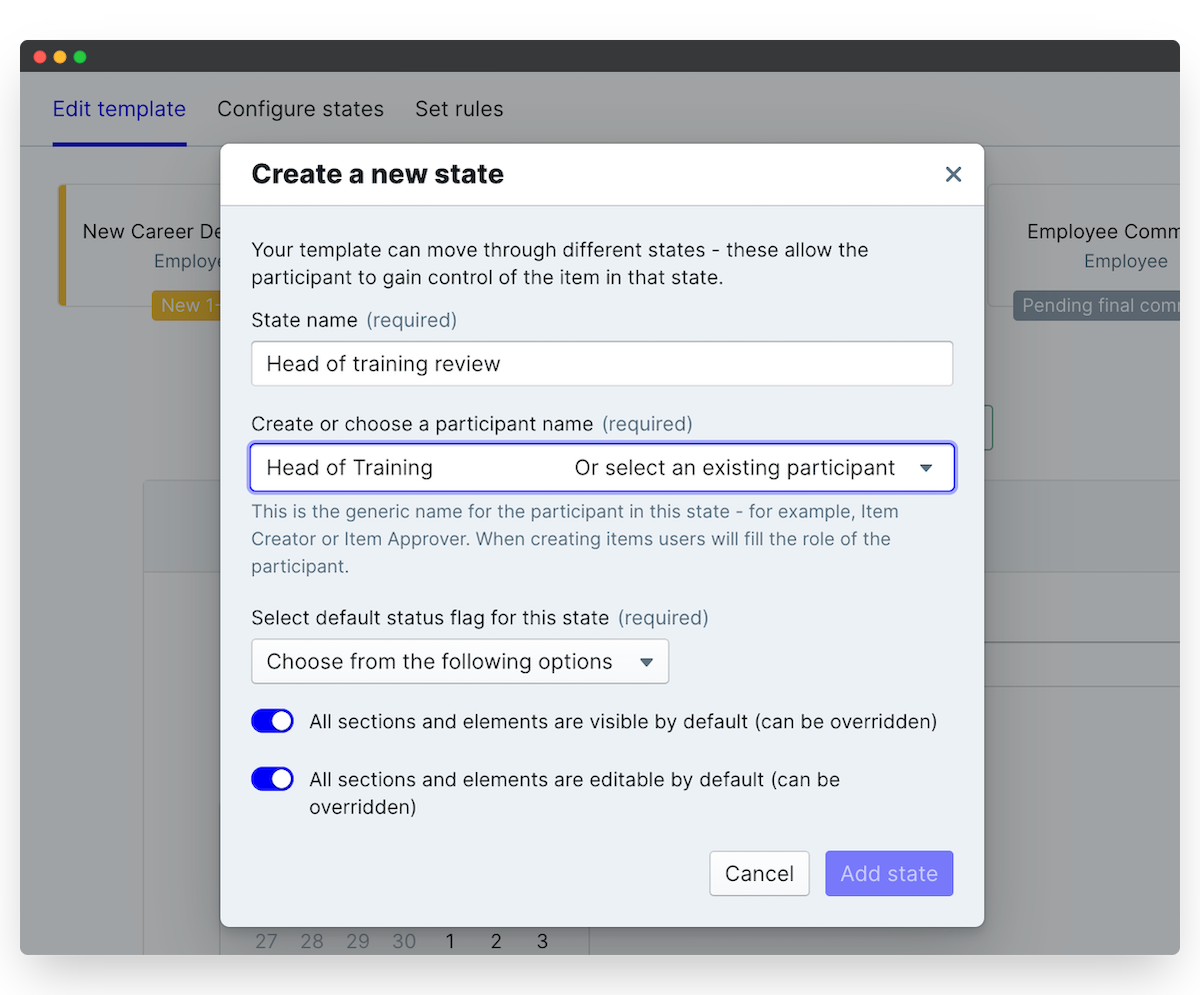
i. Add a new state
- Click the + button in your workflow builder to create a new state.
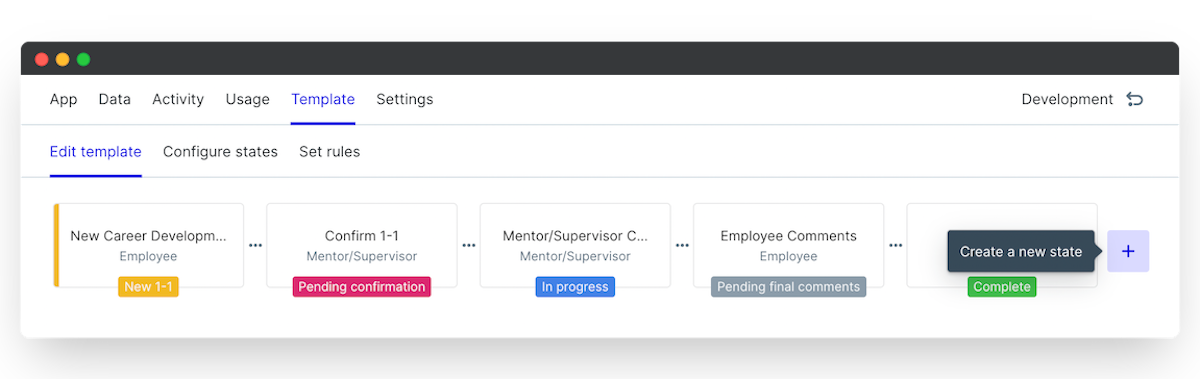
- Enter your state name, define the participant, and choose a status flag.
- Toggle on/off whether sections are visible or editable by default (don't worry - you can override this later if you need to).
- Click and drag your state to reorder your tracking form workflow and you're done!
See how we add in a new state for the Head of Training. This additional state is included so that the workflow will involve the individual responsible for overseeing all training programs. With this state included as an additional check, it notifies the Head of Training that each check-in has been fulfilled. We'll add in a new section for the Head of Training to fill in, this will be made hidden from all other participants as it is simply a process of approving that the 1 on 1 has been completed properly.
ii. Delete a state
- To take out a state you won't be using, click the Template tab and select Configure states.
- Select the state you want to delete and you'll see the blue highlight bar appear to confirm which state you've selected.
- Click Delete state to remove it completely.
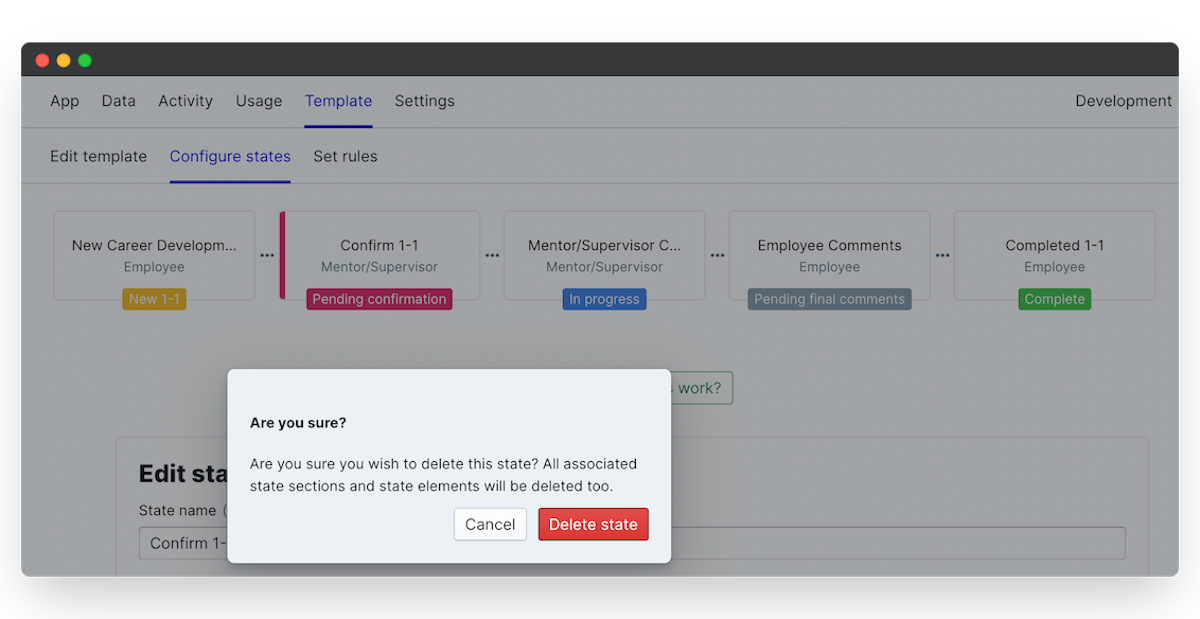
Here we no longer need the Head of Training state and so this can be deleted. Since we've discontinued the need for the 1 on 1 monitoring we can also delete the relevant section in the workflow.
iii. Customize your status flags
Every state has a default status flag that indicates to all participants what stage of the process their item is in. Your Development 1 on 1 app is set up with default status flags which you can customize.
- In the Configure states menu, click on Manage status flags.
- Click a flag title to rename it, and click the color picker to choose a new flag color.
- Click Create a new status flag to add an additional flag.
- Select the state to which you want to assign your flag, choose which flag to give it and click Save changes to update.
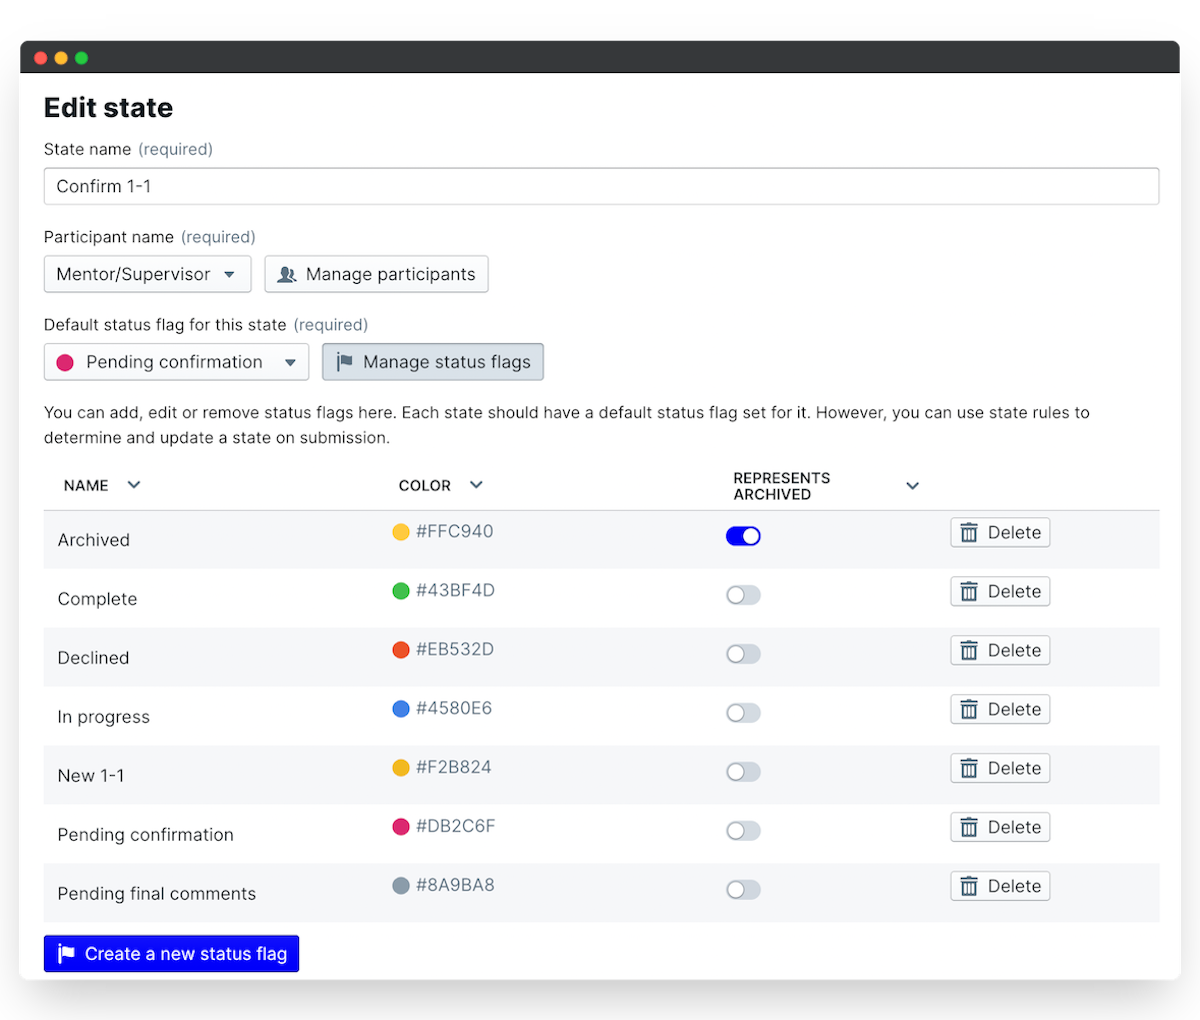
We recommend that you delete any flags that are unused. You may want to add in some additional states for alternate needs. For example, if a state is reviewed and declined due to a lack of notes, you could create a new status flag that reads "Provide more notes" and will be returned for the necessary participant to resubmit.
4. Manage your Development 1 on 1s App Participant and Permissions
Participants are the individuals involved in the Development 1 on 1 workflow and each state has one participant. To automate your process, you can create default participants based on your account Relationships, define an individual as the state participant, or leave these blank to allow the employee to select all participants when they come to fill in the form.
Setting up your participants based on relationships means that when an employee creates a new form, all of the people who need to be involved in the workflow are automatically assigned.
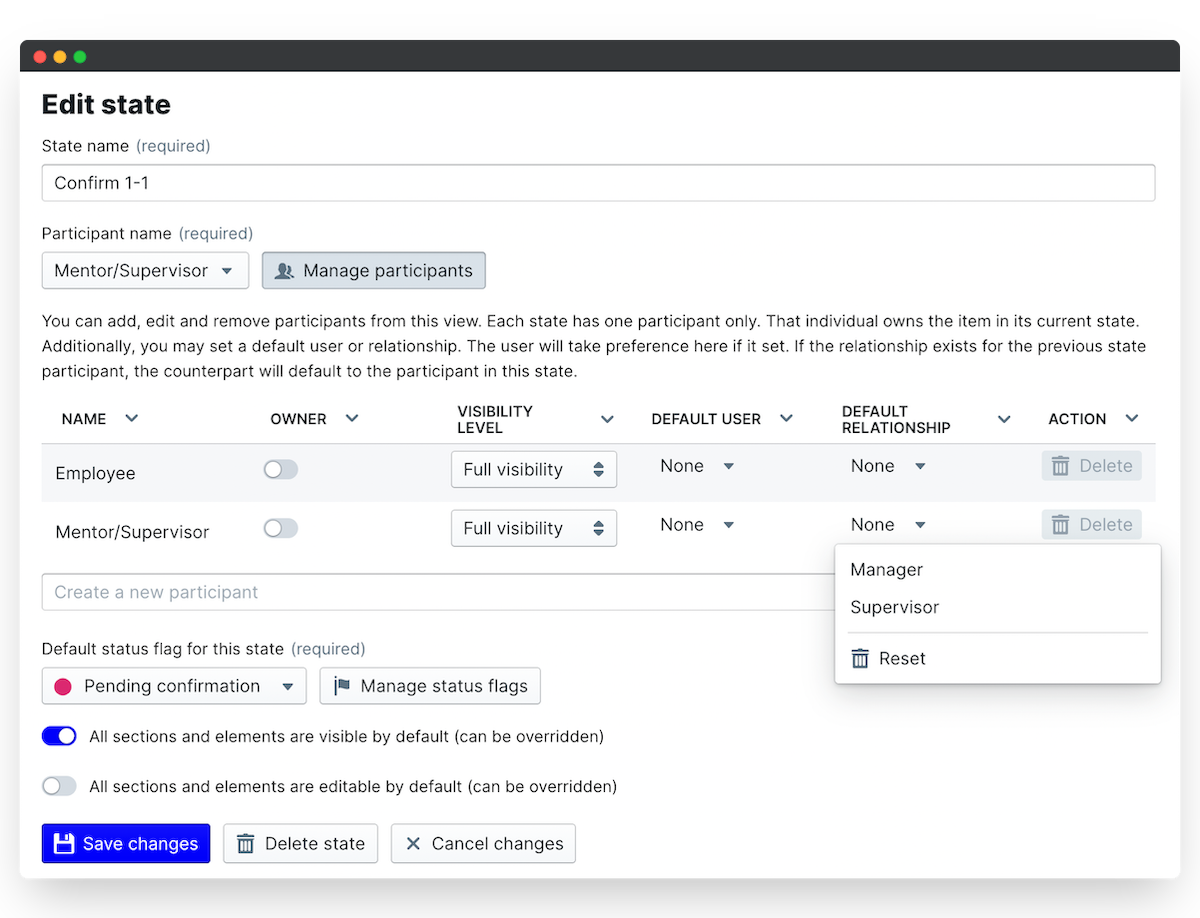
i. Set default relationships and users
- Open up the Configure states menu and select Manage participants.
- For each participant set a default user or default relationship to automate the process throughout arranging your 1 on 1s workflow.
- You can also rename the participants to suit your company language.
In our example, we edit the participants and assign the default relationship for the employee to be their manager. This way, whenever a 1 on 1 meeting is scheduled the manager will be auto-assigned, this can of course be changed but it will make for a much more streamlined and automated process for most users.
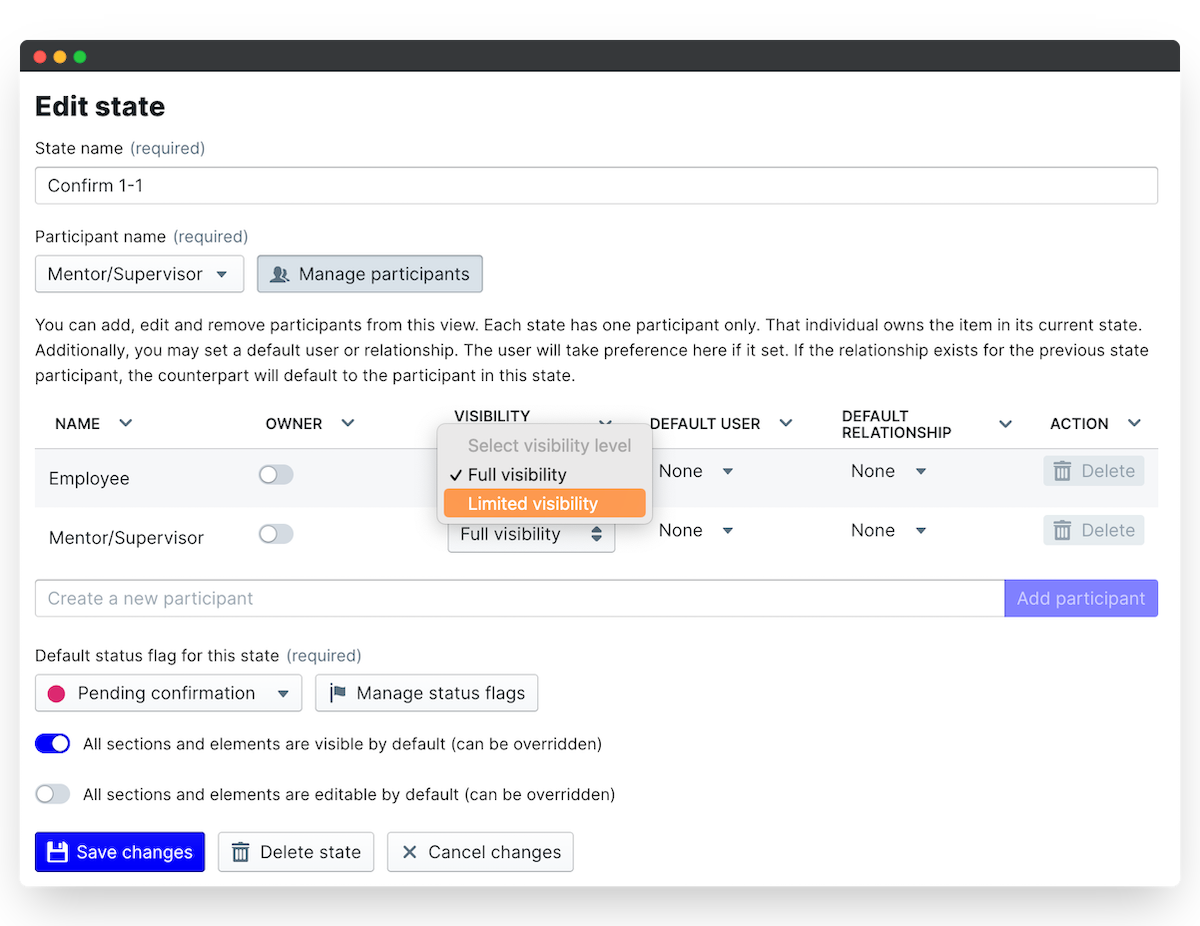
ii. Define the participant's visbility
If you have lots of different participants you need to control who can see the data at every step. Visibility defines whether a participant can see the review only in the state that they own (limited visibility), or in all states (full visibility).
By default participants can only see the development plan when it's in a state that they own. For 1 on 1s, all participants should have full visibility because we want them to see the discussion and comments made by all involved in the meetings before they are officially released. The employee will see the form in the first, last and penultimate states - when they draft their meetings and following the discussion to note down the points to continue their development. These are the states where the employee is the participant.
The mentor/supervisor will also have full visibility over the whole process - even when they're not directly participating.
- To change a visibility level, click the drop-down next to the participant name and choose Limited or Full visibility.
- Click Save changes to lock in your updates.
iii. App-wide permissions
Permissions control the access to your app within your PeopleGoal account.
- To set your permissions, click on the Settings menu, then expand the Permissions section.
- Click on Explain permission types to understand the access that each permission gives your account users.
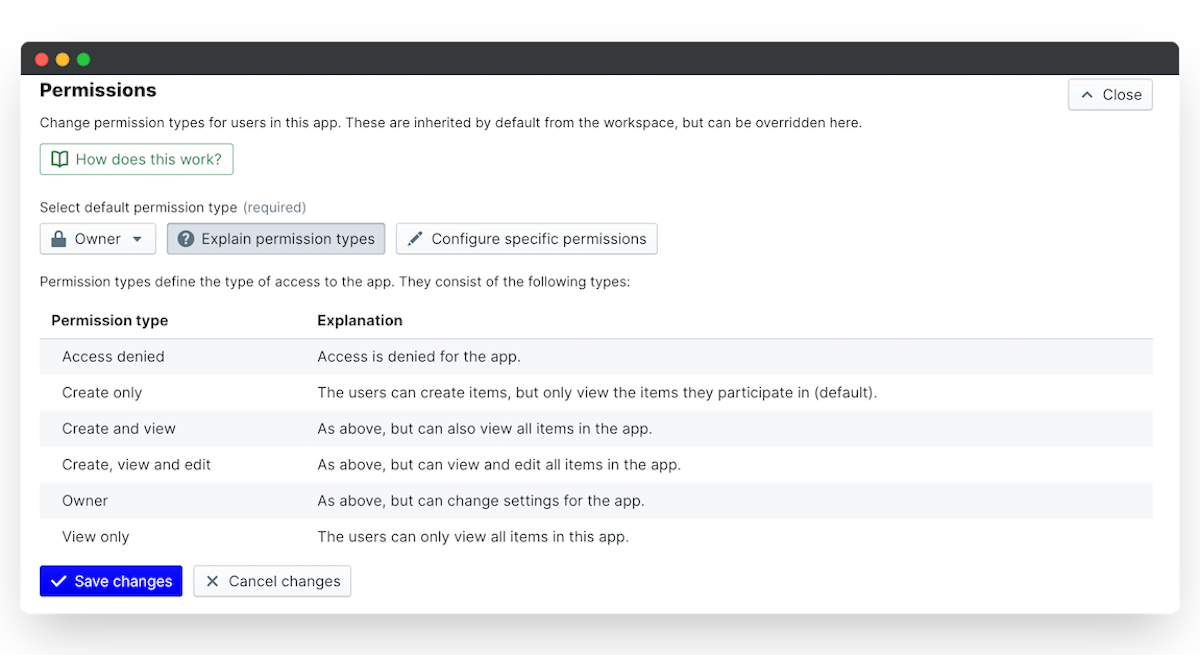
In your Development 1 on 1s form, we'd recommend you set the permission to Create only. This means employees can create forms for themselves but can't see any colleagues' forms since this isn't really necessary and prevents confusion.
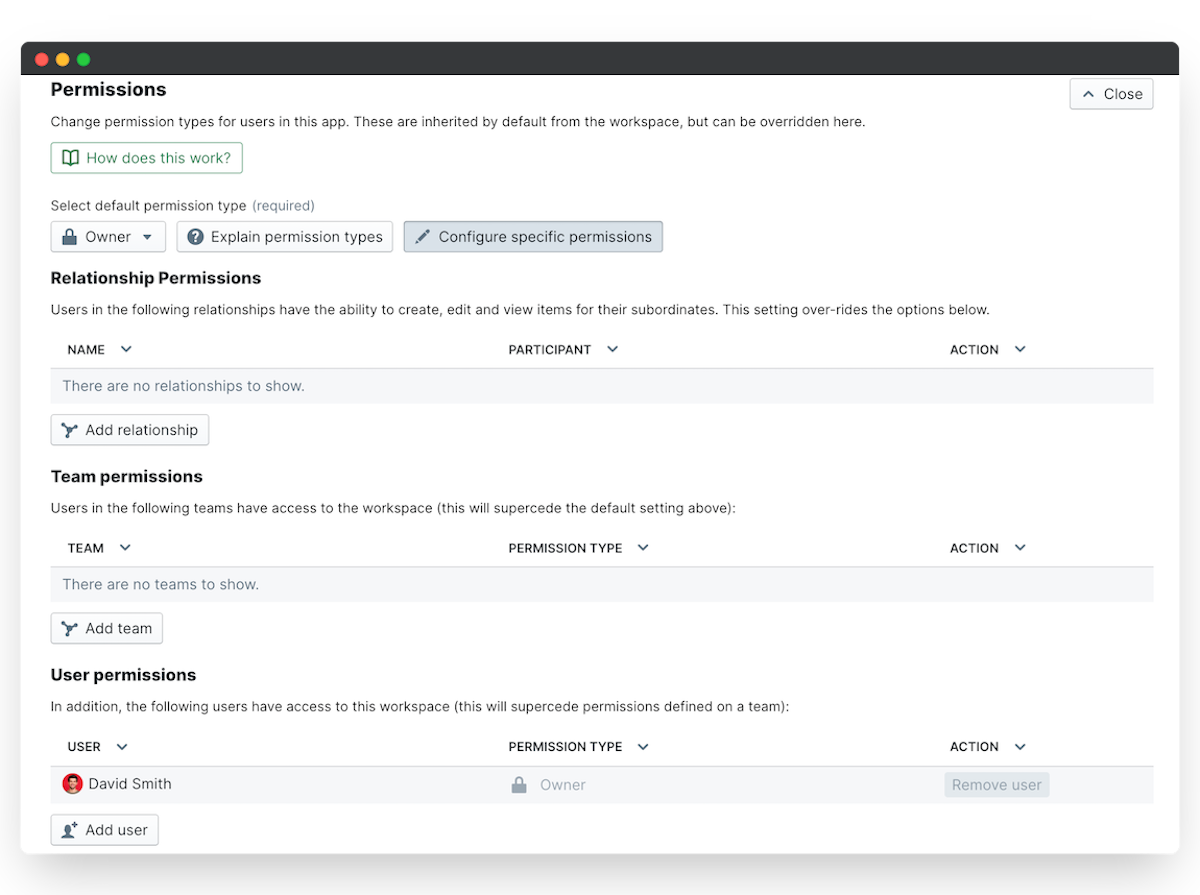
ii. Specific team and user permissions
The user who installed the Development 1 on 1 app template has Owner permission by default and can assign specific permissions to other teams or users. Specific team and user permissions replace the default permission type.
- To assign a specific permission, select Configure specific permissions, then under "User permissions" click Add user.
- Type your colleague's name to add them to the permissions list. In the "Permission type" column, select which permission level to give them.
In a somewhat similar but also different approach to the example about the Head Training earlier, you might want to give "Create and view" permission to your C-Suite so that they can oversee the status/comments for all Development forms but without being able to change the app settings or edit forms they're not a participant in.
5. Set up recurring Career Development 1 on 1s
When it comes to arranging regular 1 on 1s, the power of this app is found in its capacity to automate the scheduling of recurring meetings. This step is all about demonstrating to you how easy it is to set up regular meetings for all of your employees.
Setting up recurring forms is a no-brainer and once put in place, you won't have to look at it again. By automating this process, it makes the process far smoother and hassle-free. Please note that it is not obligatory for you to schedule these meetings if that better suits your company, but it is highly recommended.
i. Schedule recurring surveys
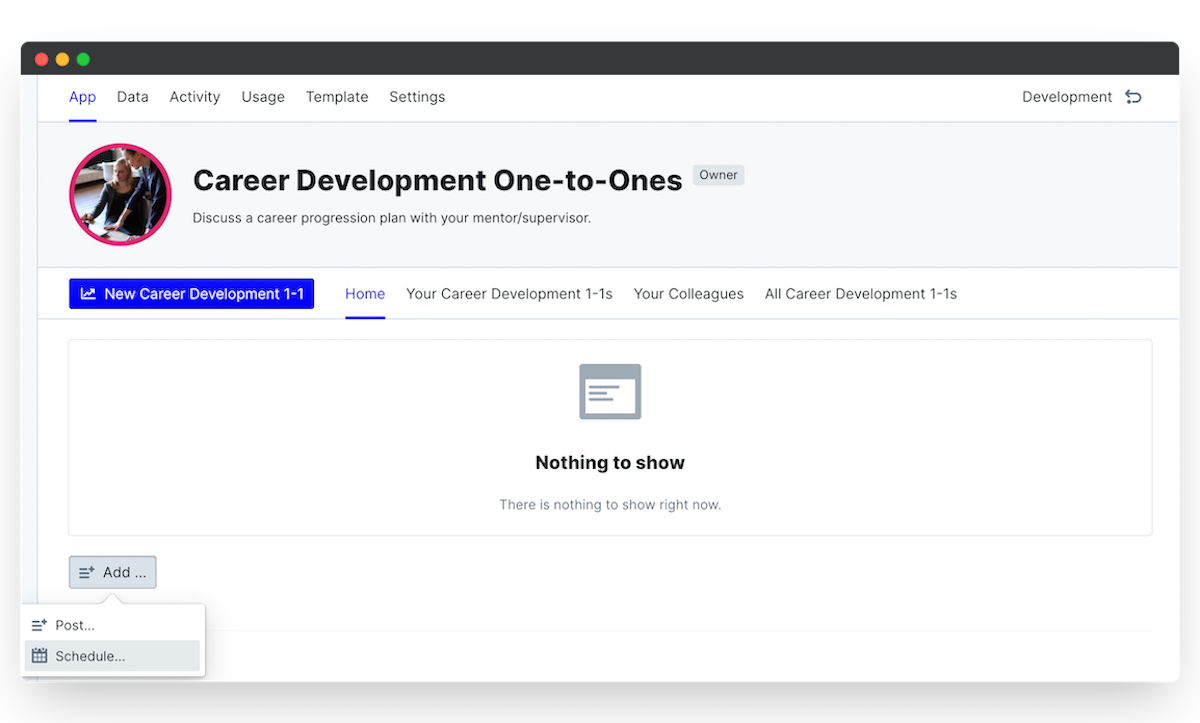
- To automate the process of creating scheduled 1 on 1s click on Add... in the workspace.
- Then select Schedule... and in the top right corner of the box that appears above click on the pencil icon.
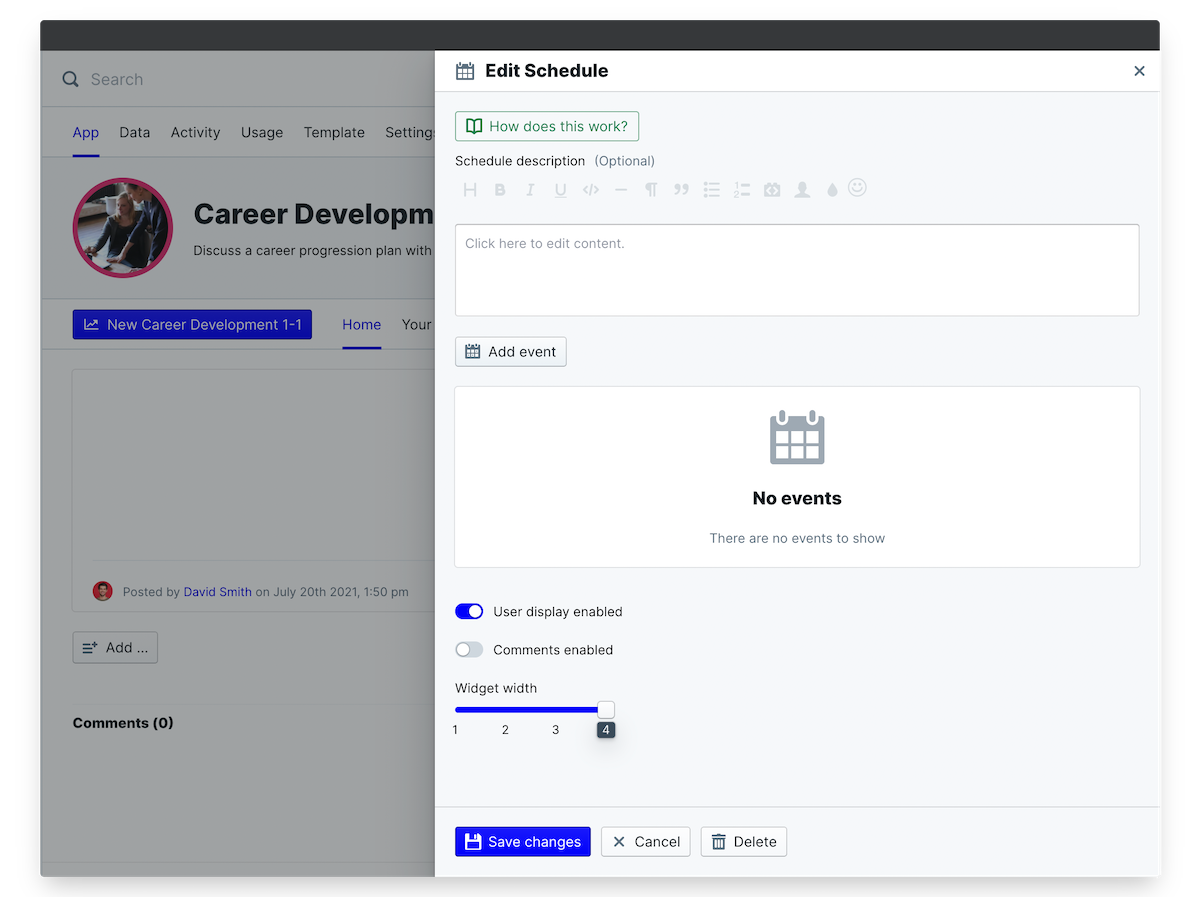
- From this next menu, you can enter some details about the meetings in the Schedule description. Then click on Add event and from here you can provide further details.
- Select the date and time that you want the meetings to take place by interacting with the relevant areas.
- Set the number of days prior to the event for however much time you want to notify the employee ahead of time to fill out the talking points in the workflow.
- Then toggle on Event recurs and change the settings to how you want, we've gone with once a month.
- It's also important to toggle on to Automatically create new Create Development 1-1 and set the required starting participant, e.g. Employee.
- Always make sure to click Save changes as you come out of each of these menus. You don't want to forget this!
6. Creating Reports
Every single data point entered in apps from PeopleGoal are collated and can be used in data analysis. To see the data at work, jump over to the Data tab and marvel at the wonders of the numbers.
From here you can sort and filter any categories you like. Create reports that can provide you with more information about the qualitative or quantative data gathered from your employees. You may want to determine the most occurring talking points or anything else that is important for your company's development and training programs.
Anything entered in these meetings will be obtainable and can be used to better the running and progression of your organization.
7. Launch your Development 1 on 1s!
Give yourself a pat on the back, you're now all set to get your meetings started. In order to launch you 1 on 1s all you need to do is follow the relevant steps that apply to you. Moreover, if you have scheduled your one-to-ones then when the time is right these will be launched automatically.
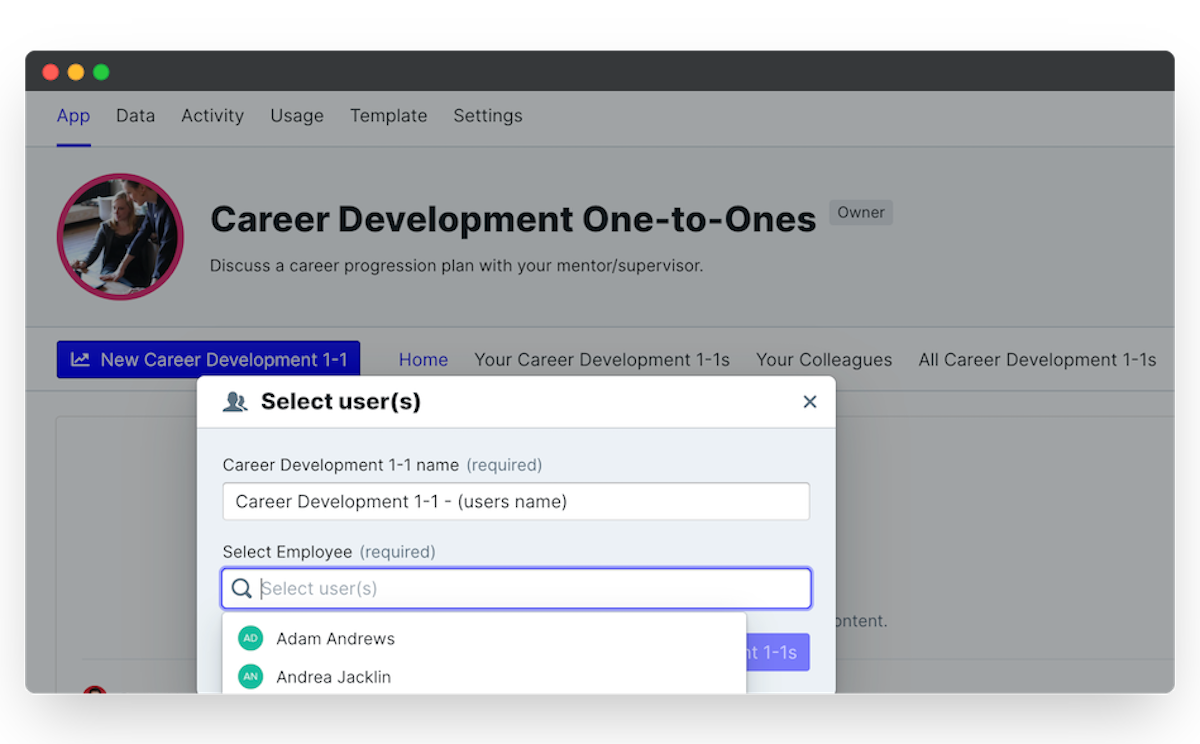
- To create a new form, select New Career Development 1-1 and then select the participant(s).
- To start a form for yourself select your own name.
- To start forms for multiple individuals, click Select user(s) and search for individual employee names.
- Or, click Select team(s) of users and you can kick off forms for entire user groups!
Tip: It may not ever be required but you can select your Company team here to initiate a meeting request for everyone in the account.
With your Development 1 on 1s launched and hopefully, set up to recur automatically, you may want to take some time to check out what else our Development workspace has to offer. Given you will be discussing employee and organizational development, you should be sure to check out the Development Plans app. Through this app you are able to concoct your very own plan for development, providing a clear and measured route for employee growth and learning. You'll be able to find this and so much more in our App Store.
Don't have a PeopleGoal account yet? Book a demo( to see our no-code HR workflow builder in action!


PeopleGoal Support Team
Account Management & Implementation Specialists


