
Support Center.
Get Started or Become a Pro. Browse our support articles to learn how to get the best out of PeopleGoal.
How to create an HR Workflow
HR workflows are a great way to break down a task or process into individual steps. They are often illustrated as a diagram of series of steps that need to be complete sequentially. This helps individuals to visualize the steps that need to be taken to complete a process. This system can be hugely beneficial to the majority of human resources processes, and help simplify complex processes for both HR teams and employees.
With PeopleGoal, you can design custom workflows with no-code configuration. Our advanced workflow builder allows you to customize your HR processes to match your individual needs and unique company culture.
How do PeopleGoal workflows work?
Workflows are the steps that define your HR processes. Each app (HR process) moves through a workflow of different states, and users will create items which are defined by the app template. As an example, a performance review workflow might include the following states:

1. Employee self assessment (employee completes their section)
2. Peer assessment (peer completes this section)
3. Manager assessment (manager views the employee and peer responses and completes their section)
4. HR review (HR views the employee and manager submissions, and adds private HR comments for employee records)
5. Completed review (employee receives the final review form back)
Each state has one participant. In our example above, the participants are employee, peer, manager and HR. Because there's no limit to the number of states you can create for an app, your workflow can have multiple participants weighing in to create a complex processes - each with their own visibility and access permissions.
You can automate the app workflow further by defining state participants according to pre-set relationships within your account. If you predefine the manager relationship then any time an employee starts a new review the "manager" participant will be automatically assigned to enable a seamless workflow across teams.
You can also define custom rules which are triggered as the form is submitted. You could set a rule to automatically send an email, change the status or reset the form state. We will cover all of this later in the article.
1. Configure states
States are the steps in your workflow, and each state has its own participant. There is no limit to the number of states you can add to your workflow, allowing you to easily create a complex process where many stakeholders can participate. You can also control the visibility of each section in each state, and select whether they are editable, read-only or hidden to the selected state participant.
It's best to create your entire workflow upfront in the first state. It's much easier to then edit the section and element visibility when you create new states.
Your app states are shown at the top of the app template, and you'll have your first state that you've already been editing.
i. Add a new state
- Click the + button in your workflow builder to create a new state.
- Give your state a name that describes what action will be taken in this state. For example, you might add a state called "HR review".
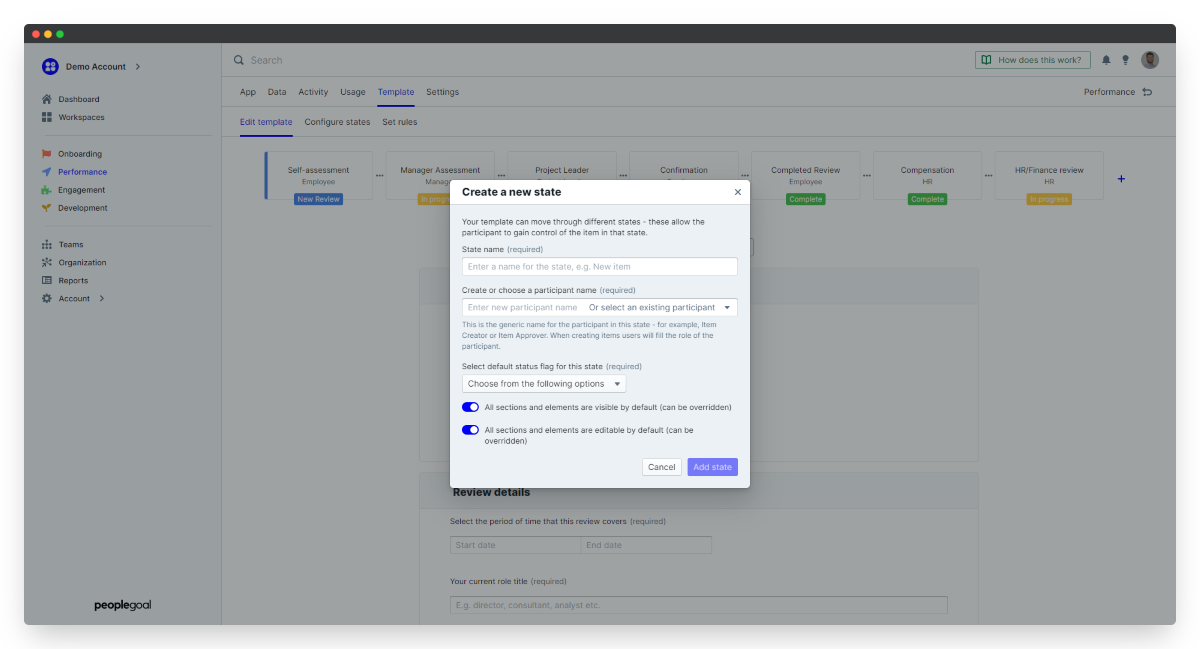
ii. Define state participant
- The participant is the person who completes the workflow in this state. In our reviews example, the participant would be called "HR Reviewer". The same participant can own many states within the app workflow.
- If this is the first time you're defining the participant, type in the name here.
- If you've already created this participant for another state, select an existing participant from the existing participant list.
iii. Set the status
- Select Choose from the following options to pick a Status flag for this state.
- We've got five commonly used statuses to choose from, but you can customize your own status flags in the Configure States menu (see below).
iv. State visibility
- Last thing is to choose the visibility defaults for this state. This is just to help you with your visibility configuration to add a "blanket" rule for all sections and elements in this state.
- Toggle on/off All sections and elements are visible (i.e. none of the form data should be hidden in this state) and All sections and elements are editable (i.e. the state participant can edit the responses. Typically this should be off, as the responses from the previous state should be "read only" when they're sent to the next state).
v. Edit states
- If you want to change any of the state configuration you've set above, click on your Templates tab then select Configure states. This will bring up the States editor view of your app template.
- Click on the state you want to edit in the workflow at the top of the template.
- Here you can change any of the name, participant, status flags and and default visibility for the selected state.

vi. Create new status flags
- Click Manage status flags to expand the status editor.
- Change the name or color of the existing status flags. This will update these for all flags assigned to existing states.
- Click Create a new status flag to add an additional flag.
- Select the state to which you want to assign your flag, choose which flag to give it and click Save changes to update.
- It's a good idea to delete any unused status flags so that they don't clutter up your Item filter once your process is underway.
vii. Delete a state
- To take out a state you won't be using, click the Template tab and select Configure states.
- Select the state you want to delete and you'll see the blue highlight bar appear to confirm which state you've selected.
- Click Delete state to remove it completely.
2. Manage participants
Participants are the individuals involved in the process and each state has one participant. To automate your process you can create default participants based on your account Relationships, define an individual as the state participant, or leave these blank to allow the employee to select all participants in the review.
Setting up your participants based on relationships means that when an employee's review is opened, all of the people who need to be involved in the workflow are automatically assigned.
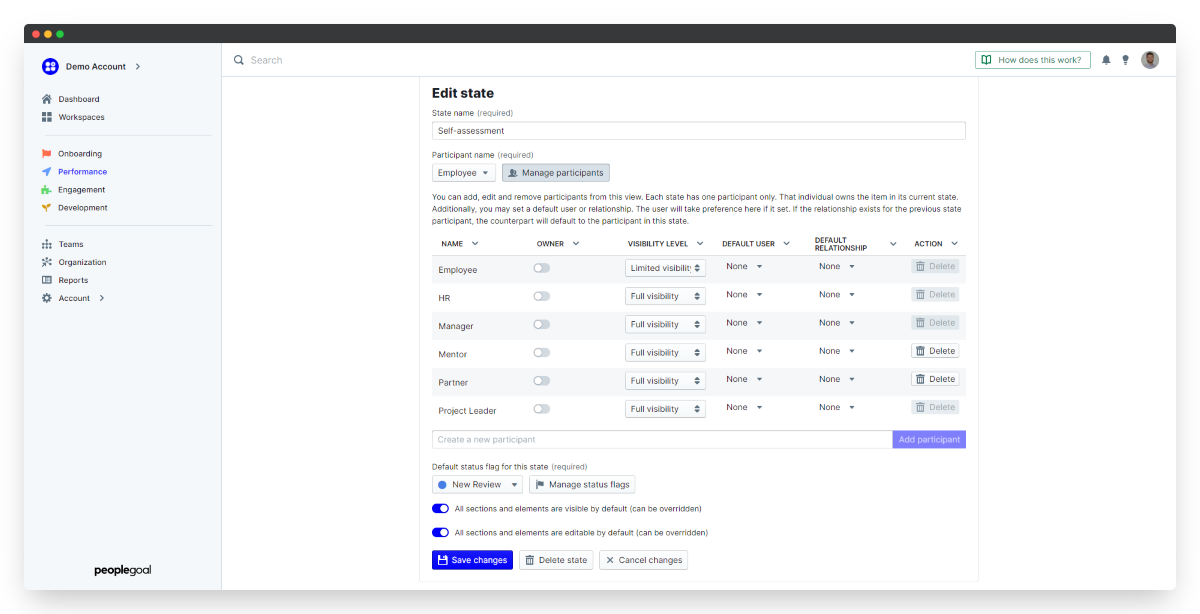
i. Set default relationships and users
- Open up the Configure states menu and select Manage participants.
- For each participant set a default user or default relationship to automate the reviews workflow.
- You can create new participants by typing the participant name into the box and clicking Add participant.
- You can also rename the participants to suit your company language.
ii. Define the participant's visbility
With different participants you need to control who can see the data at every step. Visibility defines whether a participant can see the review only in the state that they own (limited visibility), or in all states (full visibility).
By default participants can only see the review when it's in a state that they own. The employee should have limited visibility because we don't want them to see their managers' assessments before they are officially released.
The manager, however, should have full visibility over the whole process - even when they're not directly participating.
- To change a visibility level, click the drop-down next to the participant name and choose Limited or Full visibility.
- Click Save changes to lock in your updates.
3. Set state rules
State rules allow you to set custom actions when an item is submitted to the next state in the workflow. These actions are:
- Change state (use this to move to any state other than the next state in the workflow, for example to send a rejected goal back to the draft goal state instead of on to the "approved" state).
- Change status flag (by default the status flag of the next state will apply, but in our example above you could override this with a "rejected" status flag instead).
- Send email (send a custom email to participants and other specified users or email addresses).
- Post webhook (a webhook allows you to easily post data from this app to another online location outside of PeopleGoal).
State rules are built by defining conditions and then setting actions if those conditions are met. Each state can have multiple rules. Each state rule can also have multiple conditions and actions that must be met in the order in which they're displayed.
In this example, we have created a rule where if the HR Reviewer rejects the performance review, it will be sent back to the manager.
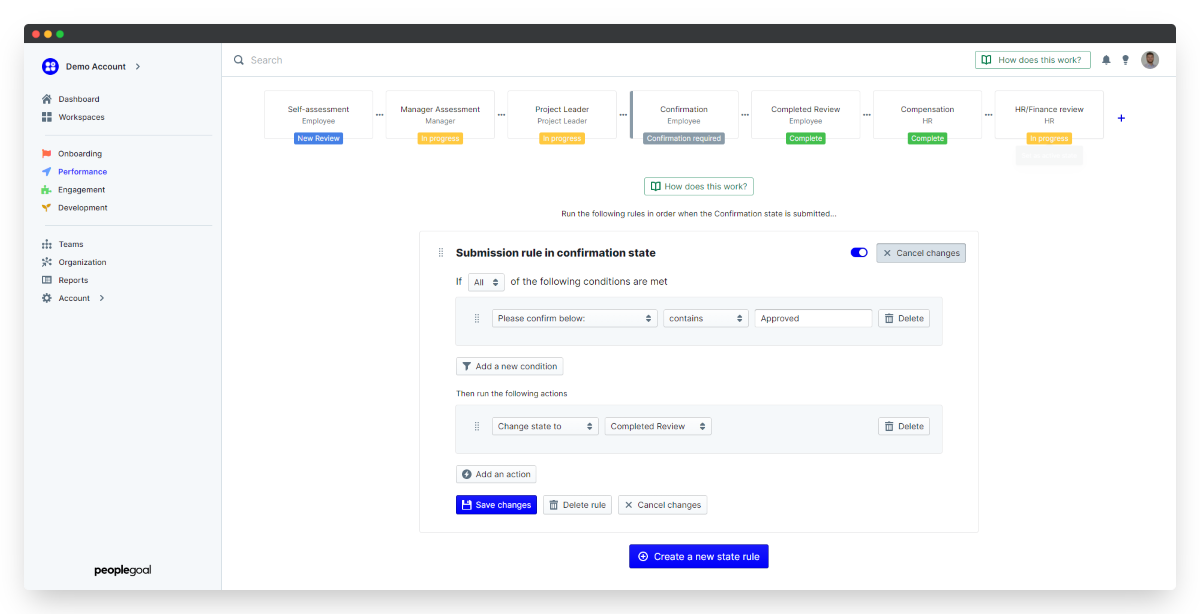
i. Create a state rule
- Click the Templates tab of your app, then select Set rules.
- Click the state icon in the workflow visual to set it as the active state, and define rules for this state.
- Then click Create a new state rule.
- Click the title (defaults to "Submission rule in state") to change the name of your rule. This helps you to identify what the rule is doing and to put it in the correct order if you're using multiple rules.
ii. Create a condition
Conditions are the parameters that need to be met to trigger the action. You can add many conditions for each rule - you're not limited to just one.
- To set your first condition, click Add a new condition.
- In the "Select element" drop-down, choose the element to define your condition.
- Then click Select operator to define the element parameters for this condition and input your parameter in the box that appears.
- Click out to save.
There is an "if" statemement at the top of the Conditions area that defaults to "If all of the following conditions are met". This means every condition needs to be valid to run the actions.
You can change this from "all" to any, and the actions will run if any one of the listed conditions are met.
iii. Create an action
Next you'll create an action to trigger when the condition above is met. You can add many actions to each rule - you're not limited to just one. Click Add an action to get started.
- Select your action type.
- Change state to: (select which state the workflow will be sent to.)
- Change status flag to: (select which status flag you want to display in the next state._
- Send email: (select which app participants should receive the email, and enter your subject line and content. Click Show additional email options to add recipients who are not participants, or who have an external email address.)
- Click Save changes to lock in your updates.
iv. Reorder conditions, actions and state rules
Each state can have many rules, and those rules can have many conditions and actions. Because of this, we'll always run the rules in the order in which they're displayed, from top to bottom. You might want to reorder a rule, or reorder the conditions and actions that make up that rule.
Hover over the left side of the rule, the condition or the action, then click and drag to change the order. Drop your rule, condition or action where it needs to be and that will save the reordering.
v. Turn a state rule off
Sometimes you might want to pause a state rule for the moment, but have the option to switch it back on in the future. To do that, toggle the blue switch in the top right of the Rule area to turn the rule off.
vi. Edit a rule
You can change an existing rule by clicking Edit rule to open up the Conditions and Actions editor.
vii. Delete a state rule
If you want to delete the rule entirely, click Delete rule at the bottom of the rule area. This action is not reversible, so if you're not quite sure - turn off the rule instead of deleting.
Now you can create more rules for your other states. Click the state icon to make it the active state and create more rules!
4. Edit the app template
Now you've set up your process workflow, you can start to build your performance review form!
- Click the Template tab, then select Edit template.
- App templates contain Sections and sections contain Elements. Elements are the form fields that participants will complete, and sections allow you to group those elements in an easy-to-read way.
Tip: It's best to create your entire form in the first state. It's much easier to then edit the section and element visibility in the other states.
i. Create sections
You'll start with one default section.
- Click the Section title to rename it. Click out to auto-save.
- Click Add section at the bottom of the form to create more sections, and click the "New section" title to rename it.
ii. Reorder sections
You can drag and drop the section order by hovering over the left of the section title.
- Click the box that appears and drag and drop your section to its new place in the workflow.
iii. Configure sections
- Hover over the right side of the section and click the three dots.
- You can change the section title or Duplicate the whole section, including the section's elements.
- Click Hide section in this state if you don't want it to be visible to the participant. For example, you would want to hide the peer review, manager review and HR review from the employee in the Self-assessment state.
- Click Delete section to remove it completely from the app. This will delete the section in all states, so be careful!
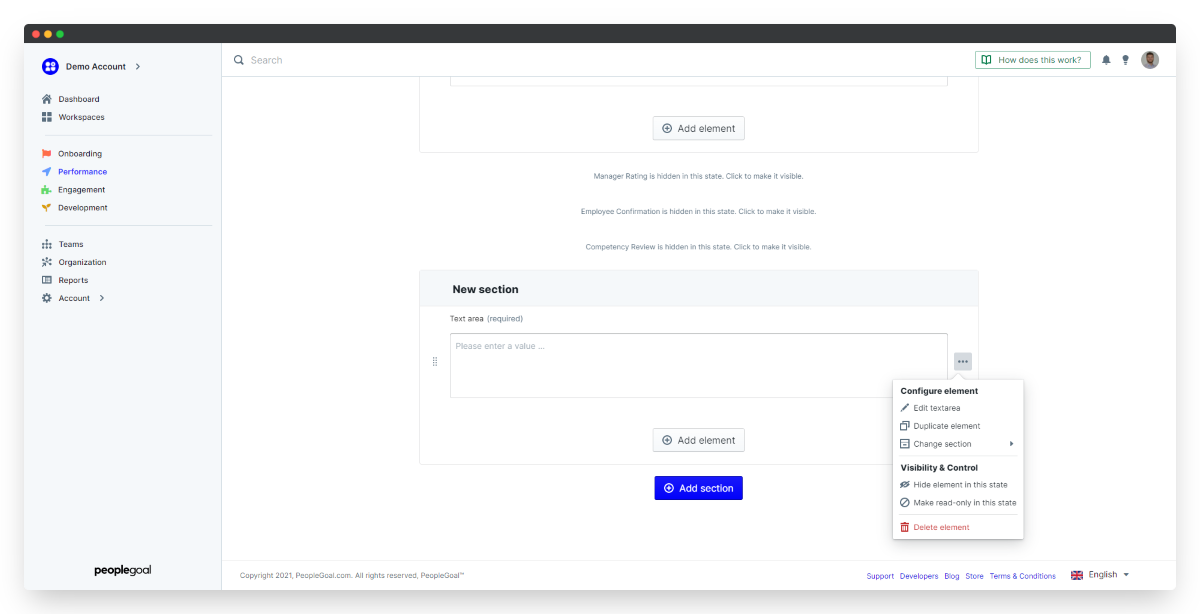
iv. Create elements
- Click Add element to add a new element to a section.
- Select your Element type from the pop-up. Your element editor will open up and you can configure the specific element here.
- Click Save changes to lock in your updates.
v. Reorder elements
- You can drag and drop the element within its section by hovering over the left side of the element.
- Click the box that appears and drag and drop your element to its new place within the section.
vi. Configure elements
- Hover over the right side of the element and click the three dots.
- Select __Edit element to change its details.
- Click Duplicate element to create an exact copy of this element, including all its details.
- Hover over Change section to move this element to another section. Select which section you want to move it to from the list.
- Click Delete element to remove it completely from the app. This will delete the element in all states, so be careful!


PeopleGoal Support Team
Account Management & Implementation Specialists


