
Support Center.
Get Started or Become a Pro. Browse our support articles to learn how to get the best out of PeopleGoal.
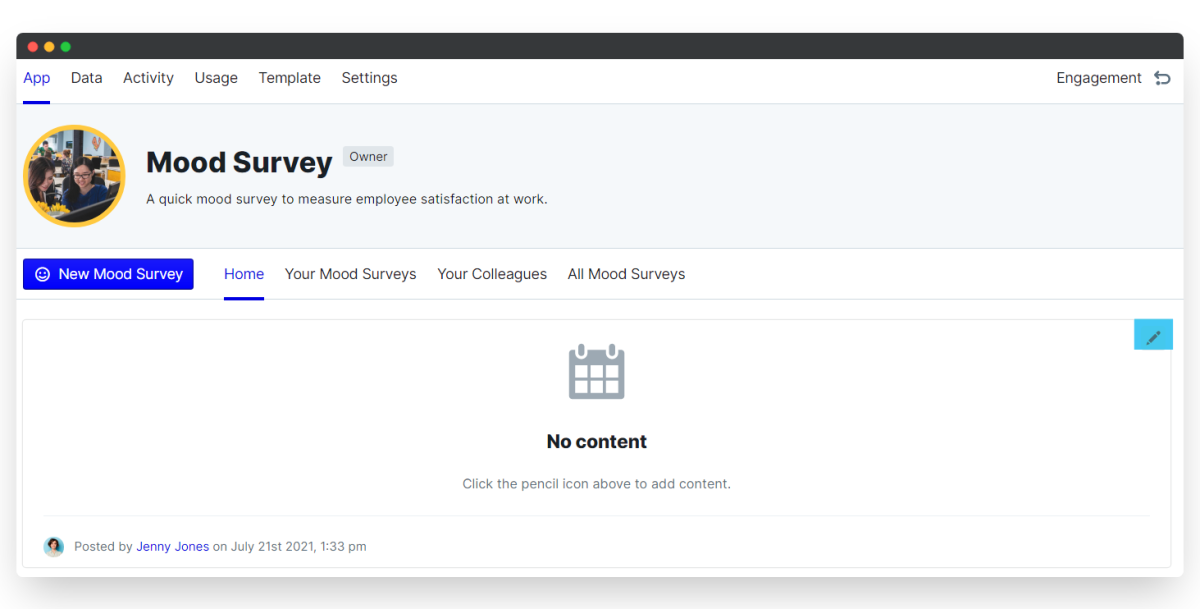
How to create and run a Mood Survey for your Remote Team
Putting time aside to check up on the physical and mental wellbeing of your team members is an important task that should not be overlooked. After all a healthy workforce is far more likely to perform at a higher level of productivity and will find more innovative ways to solve solutions. This is especially true when working remotely. Remote teams have far fewer opportunities to check up on each other and discussions through the webcam just can't capture the same sense of emotion as can be read subconsciously through face to face interactions.
Every remote working team needs a medium for employees to communicate their mood and wellbeing without them feeling forced to speak up. A mood survey presents the opportunity for team members to share their thoughts and feelings in a secure and reassuring manner.
Dedicating a call or meeting to discuss one's well-being can be useful for some, however, for many, it may seem like a pointless exercise that needlessly takes a chunk out of their working day. If an employee has an issue that might be too sensitive to share this could prevent an employee from being honest with the other participant. This awkwardness might stop them from revealing their true thoughts and resultantly doing more harm than the good intended.
A mood survey prevents this as it takes out the awkward or intense nature of a one-to-one specifically arranged for an employee to share their feelings. Furthermore, the confidential nature of this process will encourage team members to give more honest and critical feedback which is important to identify and improve the employee experience. Results from mood surveys can help your organization to increase engagement and productivity through dispelling or reinstating particular aspects of work that are either well-received or not.
Mood surveys are short and sweet. The PeopleGoal Mood Survey App prompts users to give ratings from 1-10 on an array of questions covering areas from an employee's enthusiasm towards their work to how tiring they find their workload. Giving employees the opportunity to rate and/or describe their day presents managers with invaluable insights as to how much their work has an impact on their health.
Now let's get into the process of starting up your own Mood Surveys!
1. Install the Mood Surveys App
2. Customize the app template (optional)
3. Configure the app states (optional)
4. Manage your app participants + permissions
5. Establish frequency of Mood Surveys
1. Install the Mood Surveys App
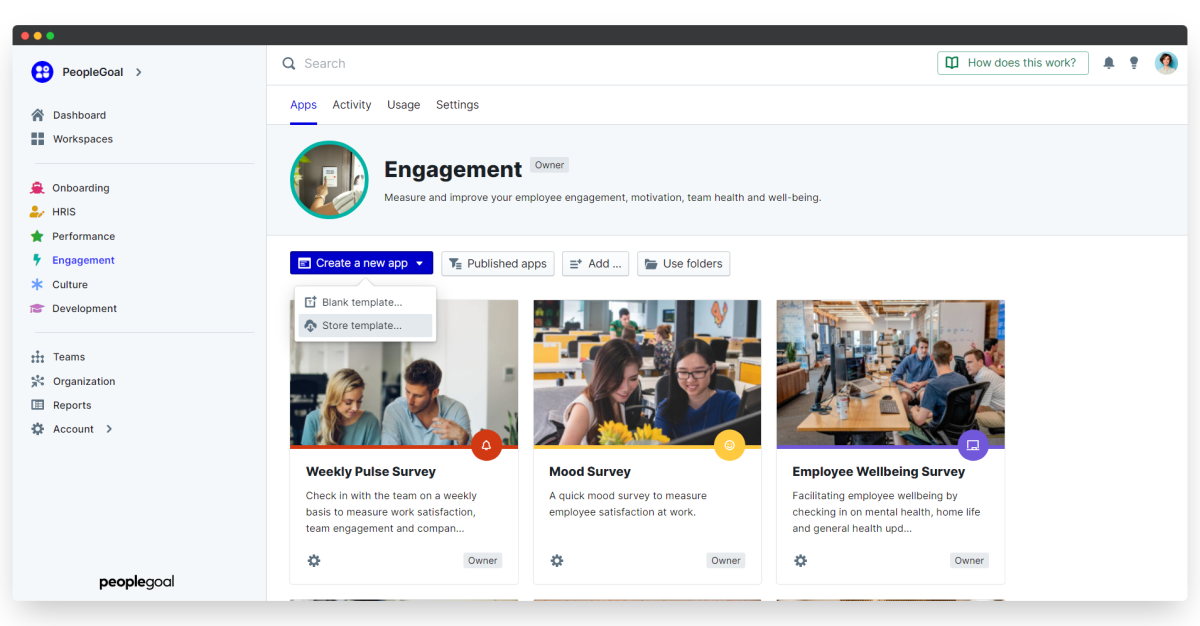
- Open up any workspace, click Create a new app, then select Store template.
- Select the Mood Surveys app and click Add this to your account.
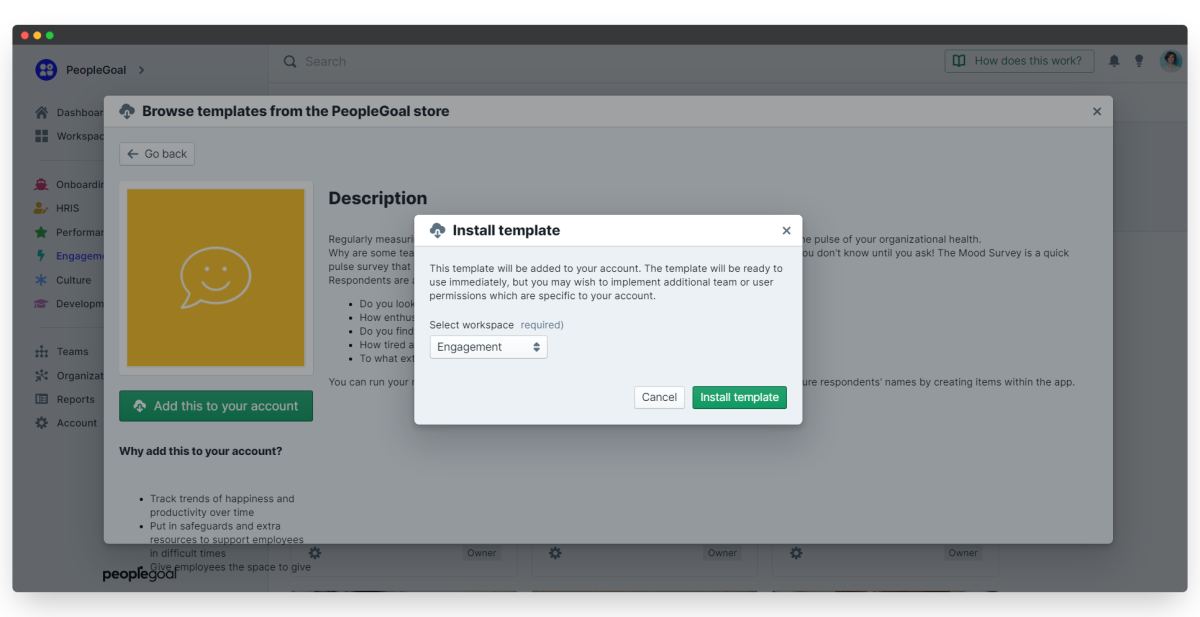
- Select the workspace (and workspace folder) you want this app to belong to from the drop-down menu, then click Install template.
We'll take a few seconds to add this to your account.
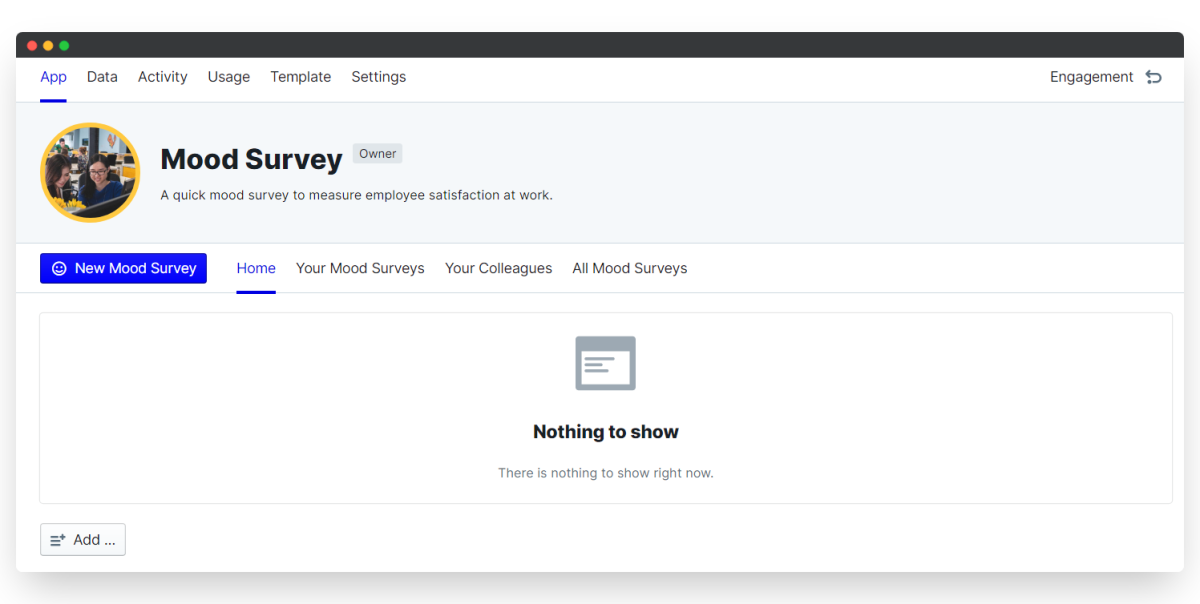
All of the pre-built review questions and states are installed and ready to go. You can use the app right out of the box! To skip the customization, head on down to step 4 and set up your app participants and permissions.
2. Customize the Mood Surveys App Template
If you would like to configure the review to add your own questions and states, click the Template menu, then Edit template.
i. Edit existing elements
Elements are your individual form fields that make up your survey content. Whether they're text questions, rating selects, display-only fields or numerical calculations, every element can be changed to suit your custom process and company culture.
- To change a field, hover over the right-hand side of the element and click the three dots that appear.
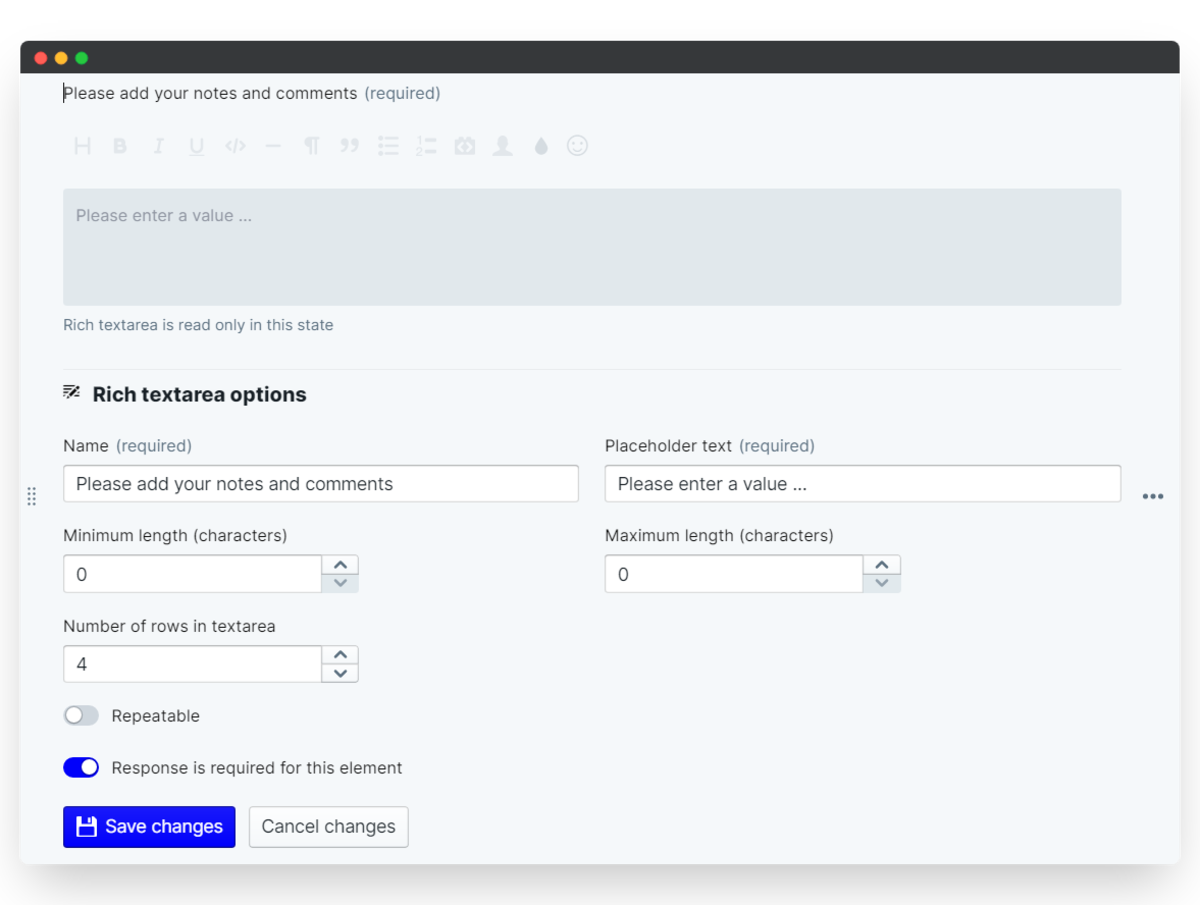
- Select Edit element (your element will have a name like "Grid", "Description", "Rich-text area", etc.). The element editor will open up.
- Change any fields you need to and click Save changes to update.
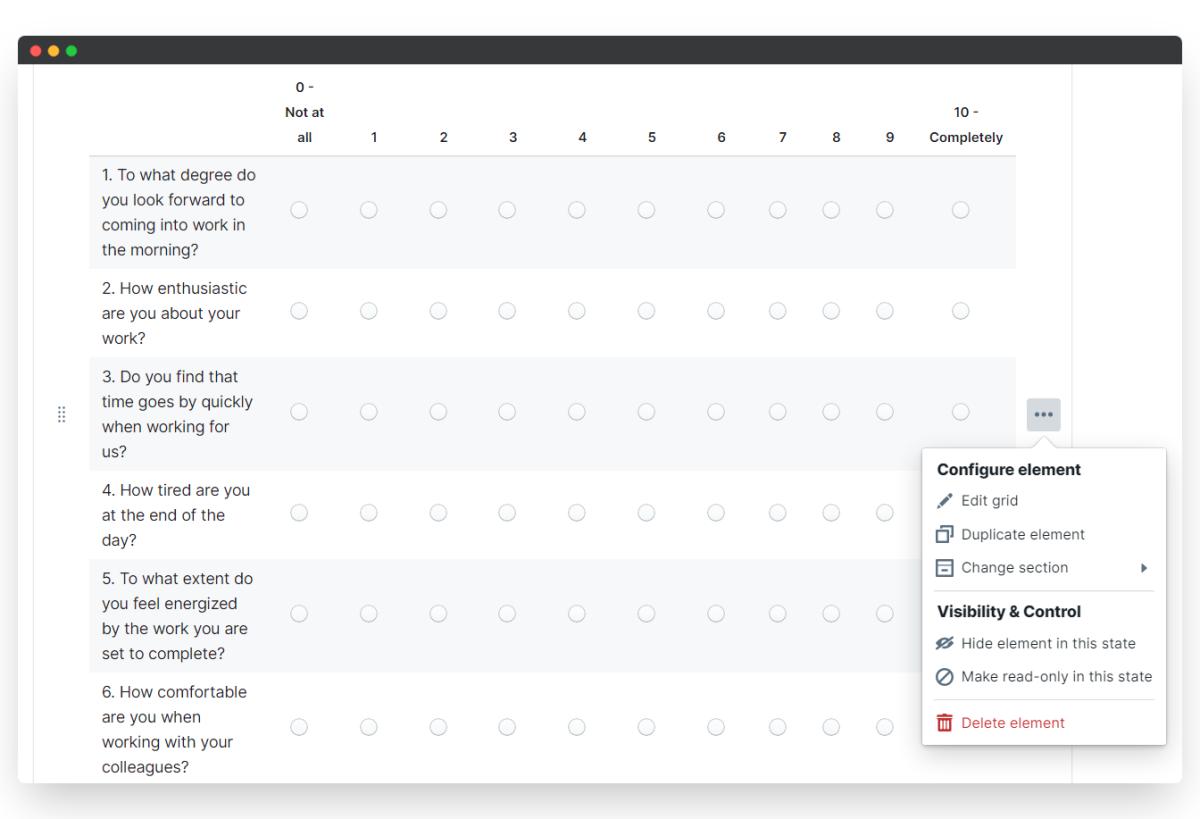
Bear in mind that each element is unique, so if for example you change the rating set on one element you'll need to change any other questions to match this. Don't worry, it's quick and easy to duplicate an element once you're happy with its setup.
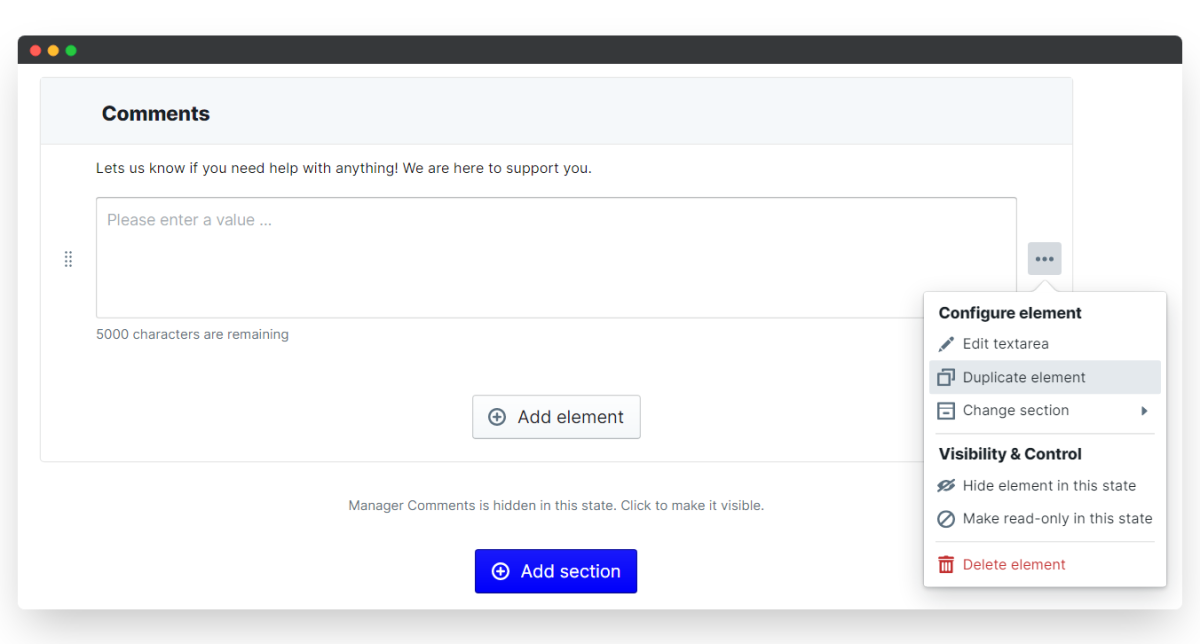
ii. Duplicate elements
- Hover over the right-hand side of the element and click the three dots that appear.
- Select Duplicate element and an exact copy will be created below.
- Edit the duplicated element to change your question text.
iii. Reorder elements and sections
Reordering is super easy - you just click and drag to change the element or section order.
- Hover over the left-hand side of the element (or section title) and click and drag your element or section to its new location.
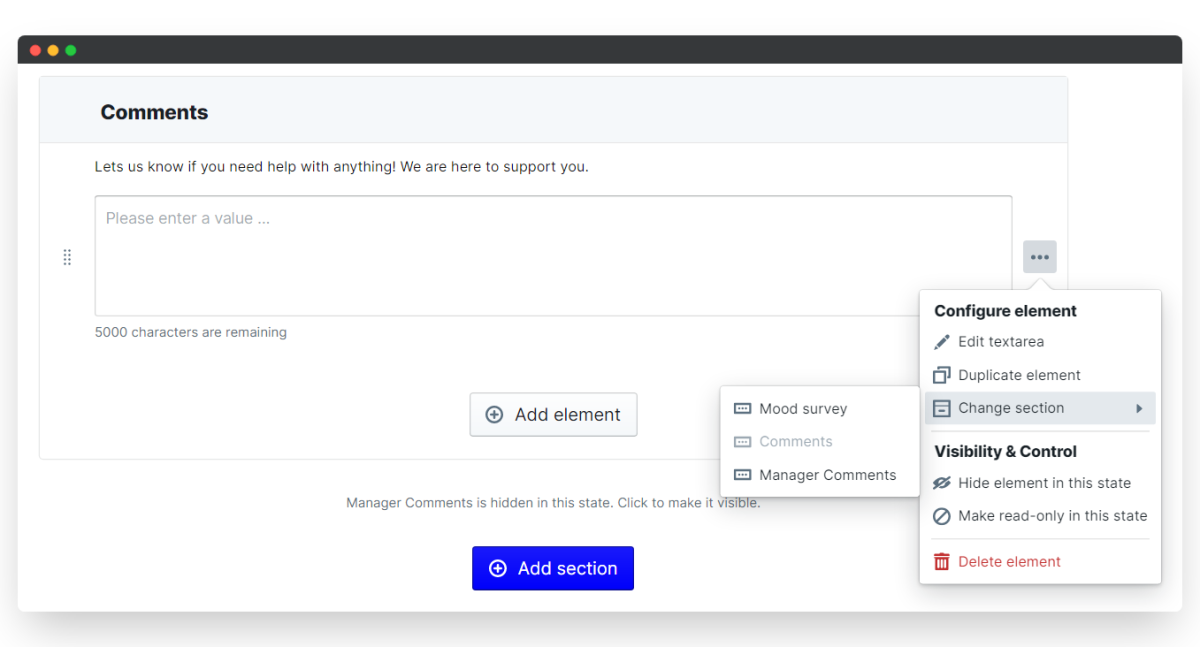
- To move an element to a different section, hover over the right-hand side and click the three dots that appear.
- Select Change section and choose the new section you want the element to belong to.
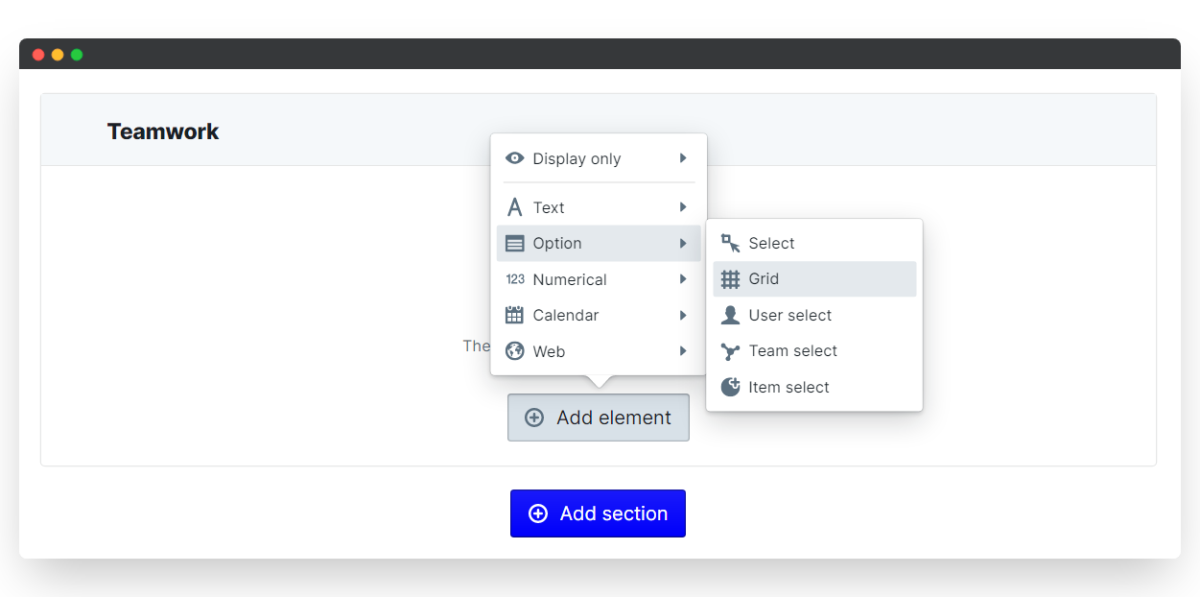
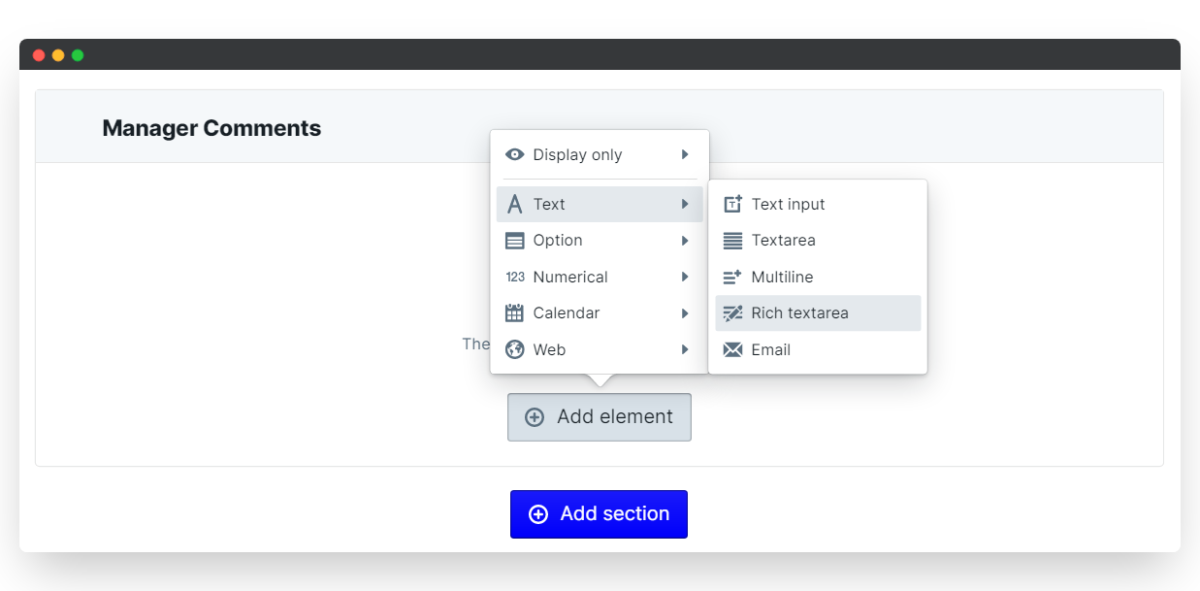
iv. Create new elements and sections
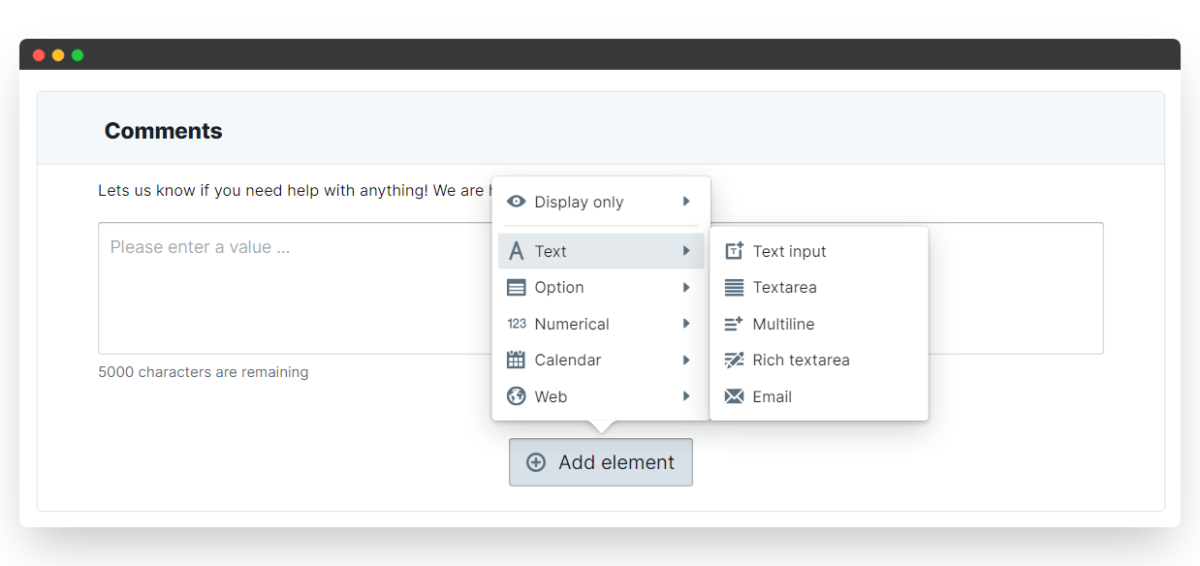
- At the bottom of each section, click Add element and select the element type you want to insert.
A new element that's useful to add to your first section is a display-only Description or Rich-text area. You can use this to remind users of recurring dates for surveys to be submitted or give instructions on how to complete the survey.
- To add a new section, scroll to the very bottom of your template form and click Add section.
- Then click and drag your new section to where you want it to sit in the survey flow.
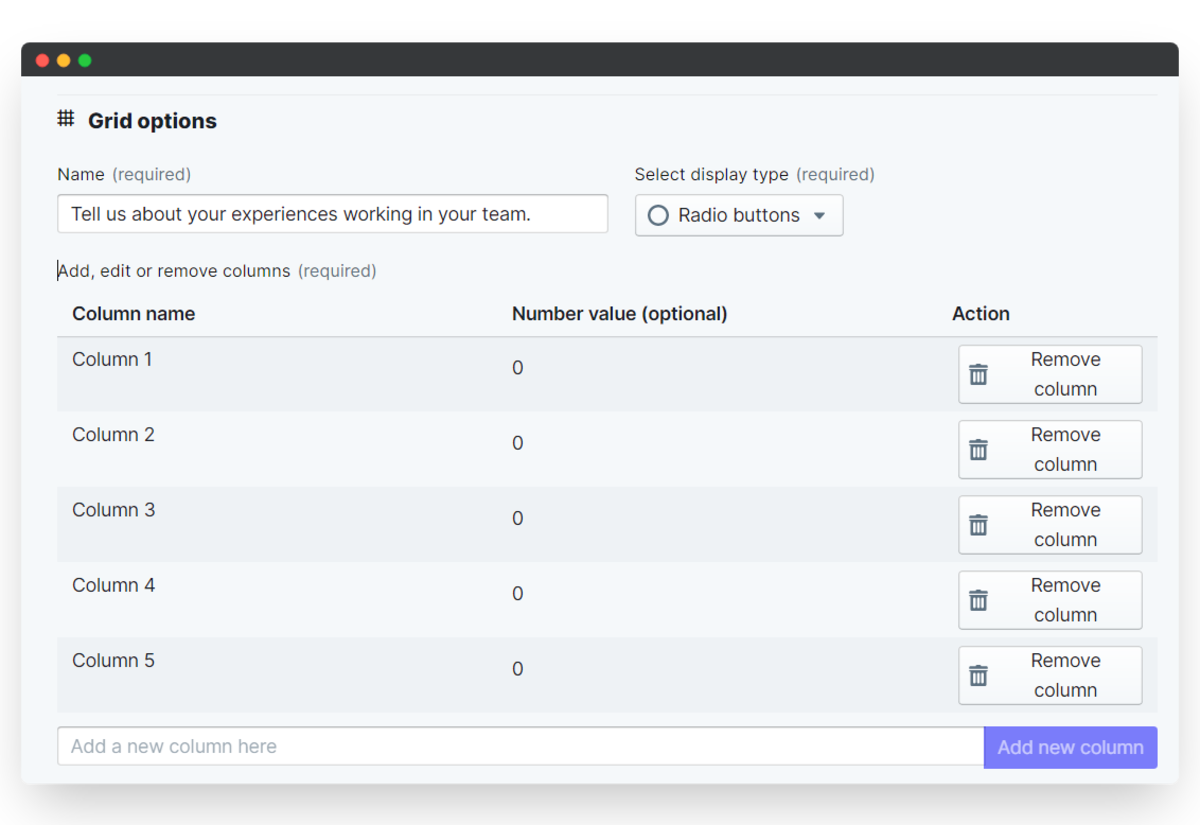
In the example, we add a section with a grid element that will be used to ask the employees questions about their experiences working in a team.
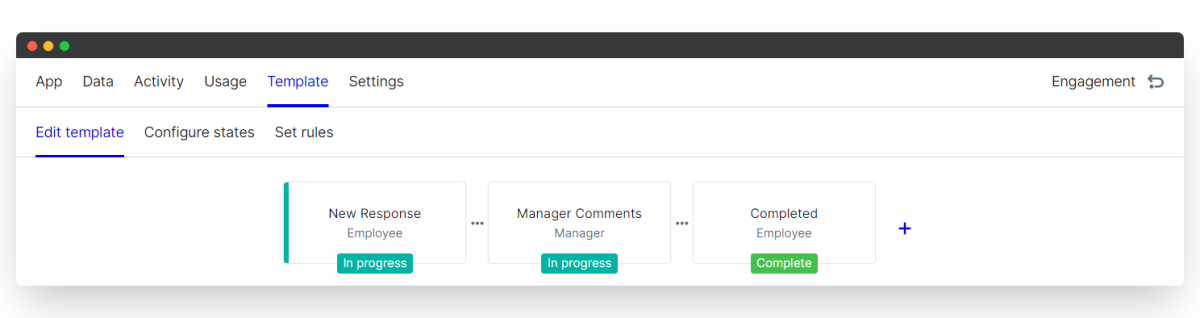
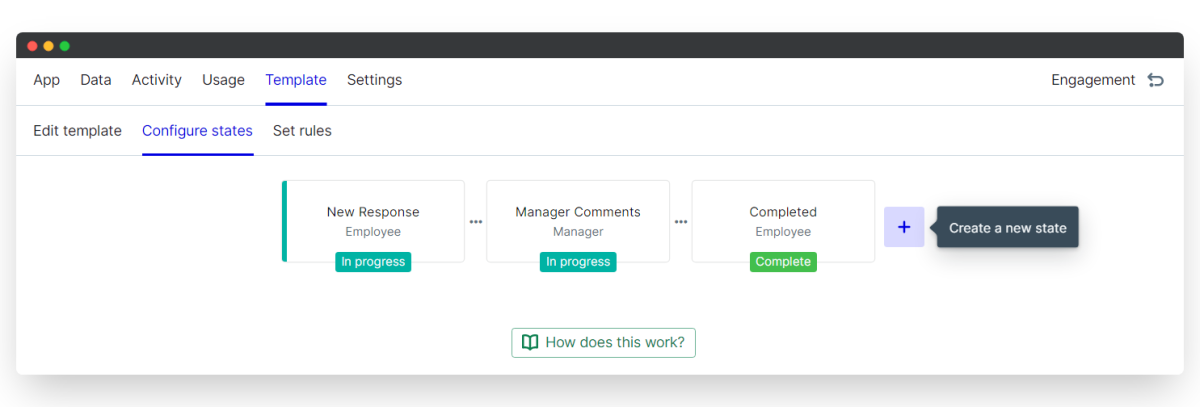
3. Configure the Mood Survey App States
States are the steps in your Mood Survey workflow, and each state has its own participant. Typically a Mood Survey only requires one participant - the employee. However, should you decide to incorporate more participants then they will each need their own state.
There's no limit to the number of states you can add to your survey workflow. Whats more, you can also control the visibility of sections (and individual elements!) in every state, and select whether they are read-only, editable or hidden to the selected state participant.
i. Add a new state
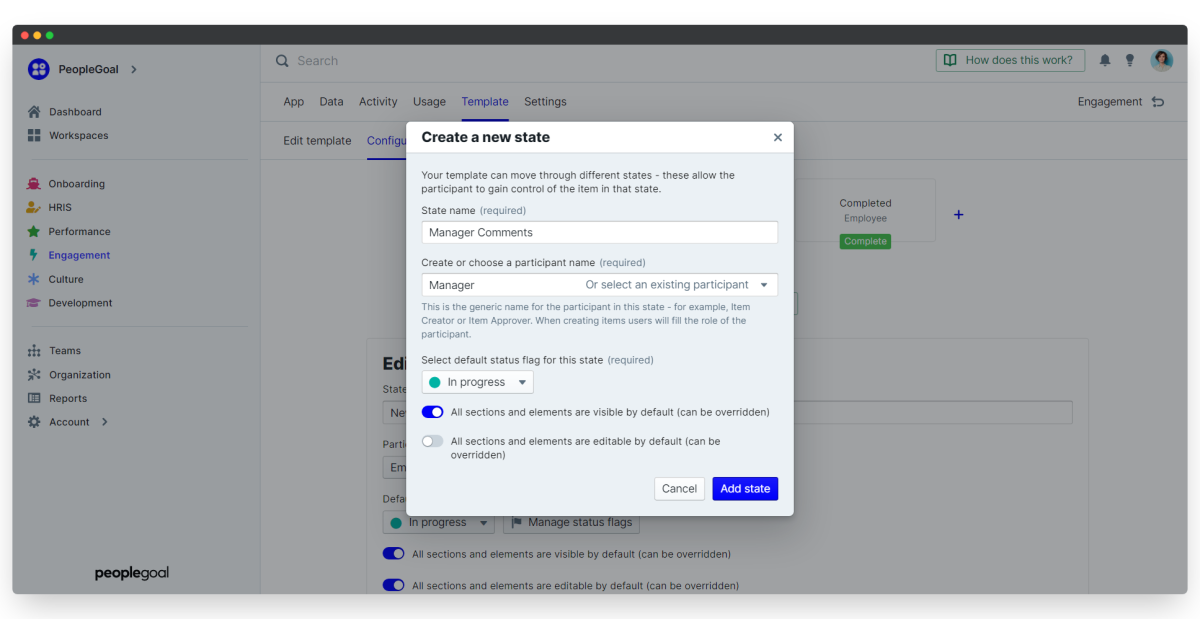
- Click the + button in your workflow builder to create a new state.
- Enter your state name, define the participant, and choose a status flag.
- Toggle on/off whether sections are visible or editable by default (don't worry - you can override this later if you need to).
- Click and drag your state to reorder your survey workflow and you're done!
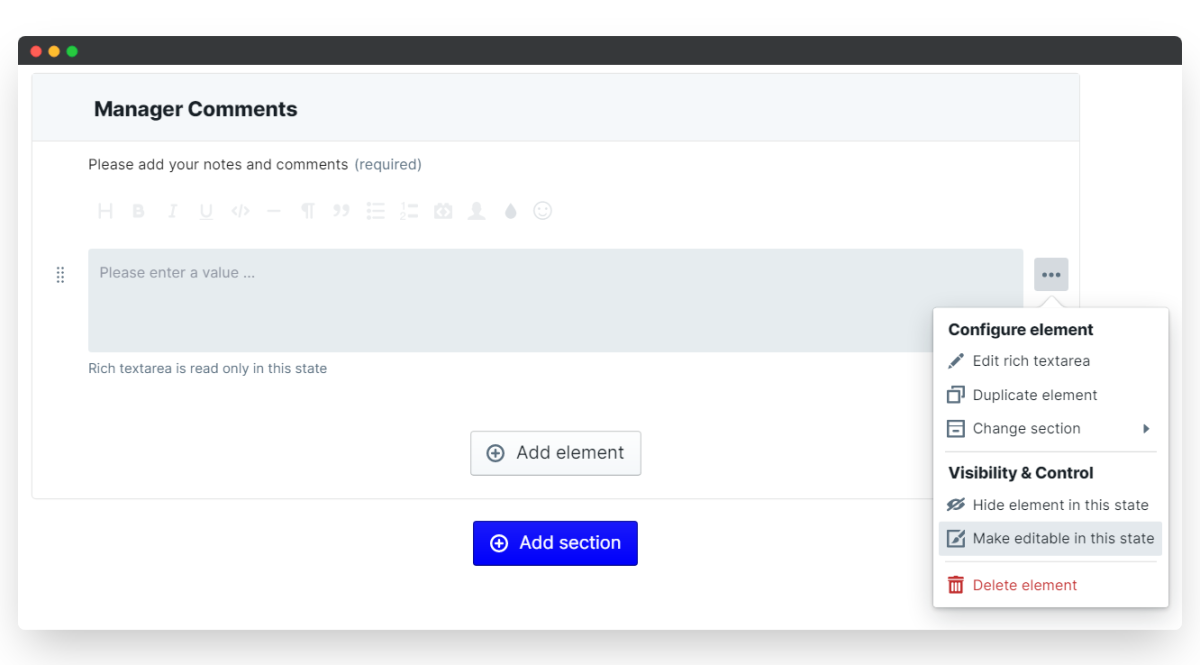
This example demonstrates how we added a section for a Manager to register the responses. We then created a new state, define the Manager participant and allow them to give input on the mood survey. We want full transparency in this survey so it's to be left visible to the employee - the point of this being it will enable us to start a conversation about the employee's wellbeing. Since the Manager needs to be able to read the employee's responses, we set the section to read-only, whilst ensuring the managers state can be edited by them.
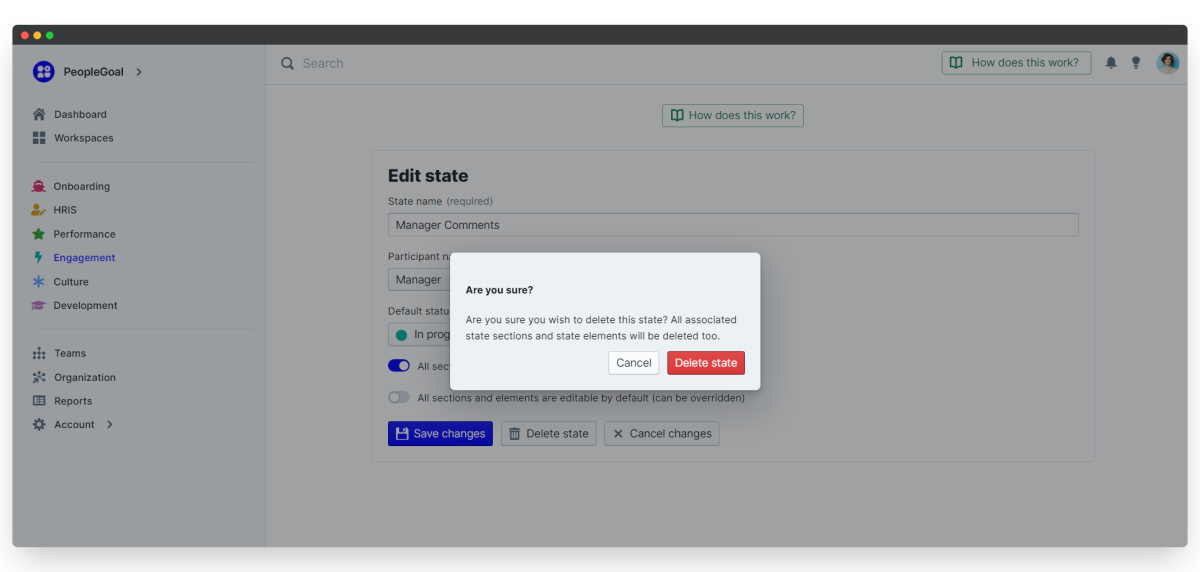
ii. Delete a state
- To take out a state you won't be using, click the Template tab and select Configure states.
- Select the state you want to delete and you'll see the blue highlight bar appear to confirm which state you've selected.
- Click Delete state to remove it completely.
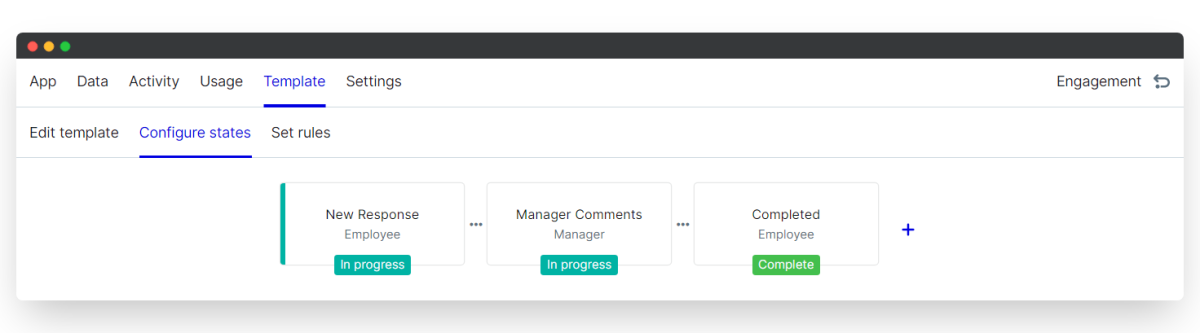
Below we have changed our mind about including the Manager in the survey, so quite simply we'll delete the appropriate state. Since the Manager's comments section is no longer needed we can get rid of this too so that the elements won't pointlessly remain in the survey workflow.
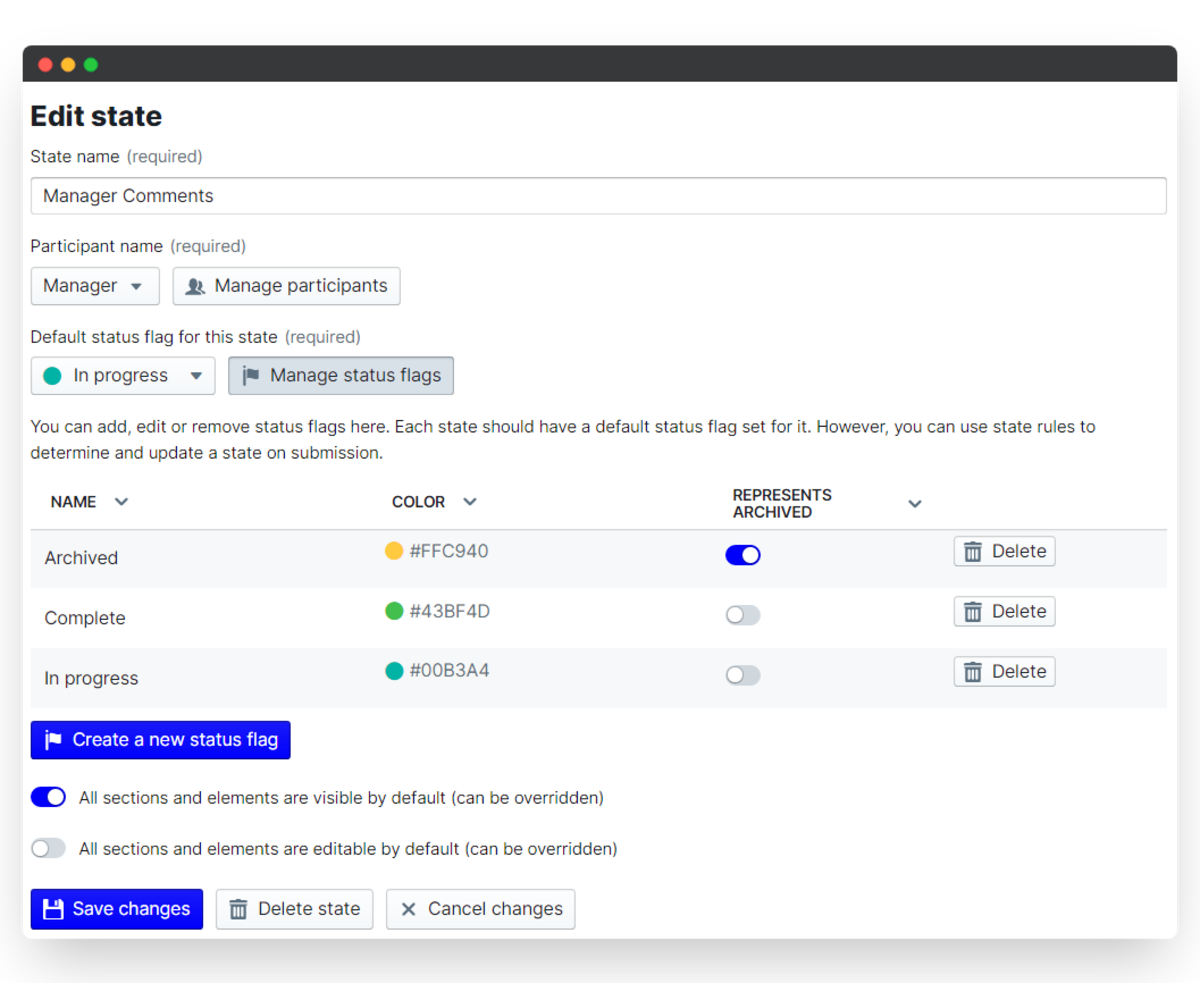
iii. Customize your status flags
Every state has a default status flag that indicates to all participants what stage of the process their item is in. Your Mood Survey app is set up with default status flags which you can customize.
- In the Configure states menu, click on Manage status flags.
- Click a flag title to rename it, and click the color picker to choose a new flag color.
- Click Create a new status flag to add an additional flag.
- Select the state to which you want to assign your flag, choose which flag to give it and click Save changes to update.
It's a good idea to delete any unused status flags so that they don't clutter up your Item filter once your surveys are underway.
As we don't have many states in the survey, we will illustrate how you can alternate the colors of the states. Maybe you want to align them more with the colors of your company? Or possibly like us, you'll use the classic traffic light system of red which implies "Wait! Fill out your form" and green for 'Go... you're all set to carry on with your day". Either way make the choice that aligns best with your needs.
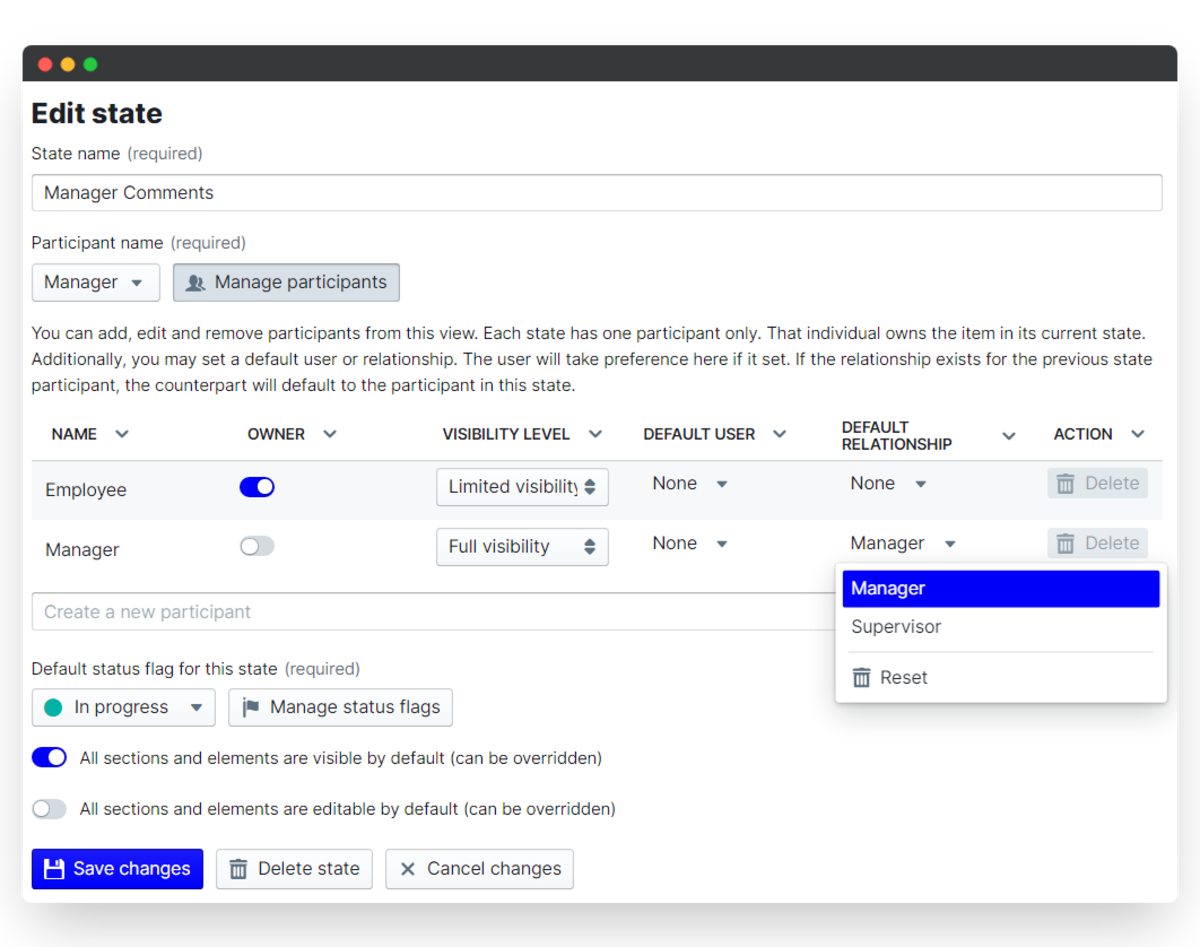
4. Manage your Mood Survey App Participants + Permissions
Participants are the individuals involved in the survey and each state has one participant. If you're going to include a manager state in the mood survey, then you can automate the participants using the relationships configured in your account, or set a default user to be the participant in a state.
Setting up your participants based on relationships means that when an employee's survey is opened, all of the people who need to be involved in the workflow are automatically assigned.
i. Set default relationships and users
- Open up the Configure states menu and select Manage participants.
- For each participant set a default user or default relationship to automate the survey workflow.
- You can also rename the participants to suit your company language.
See how we've set our default relationship for the Manager state to go straight to the employee's Line Manager.
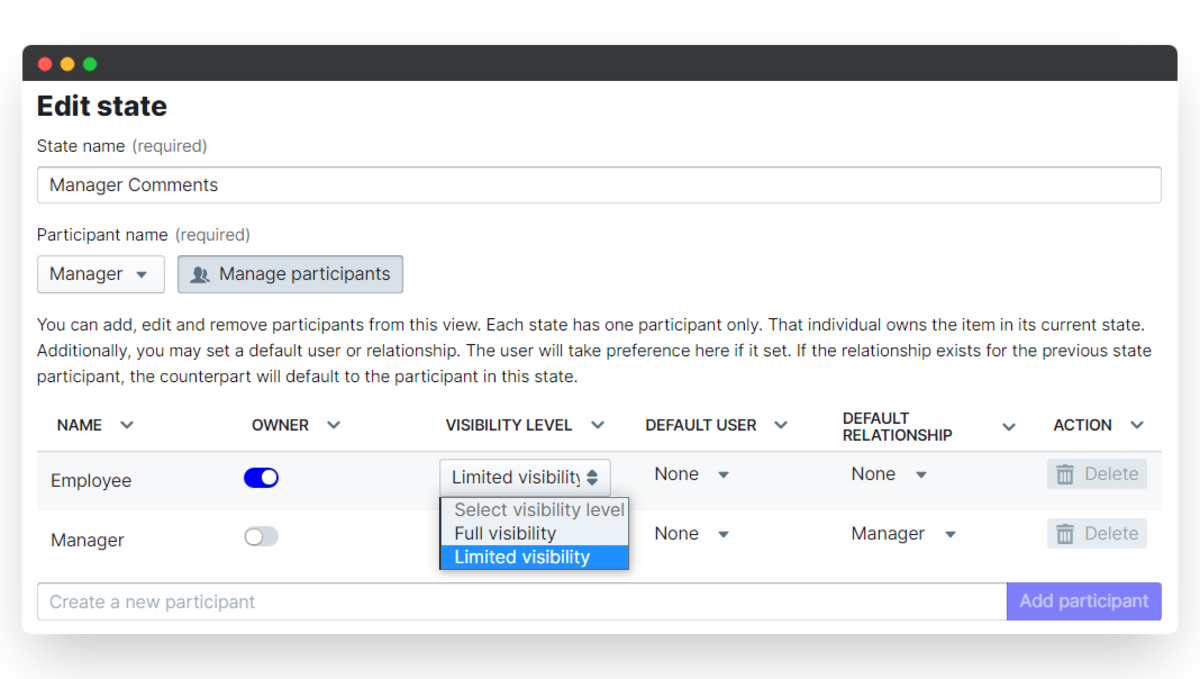
ii. Define the participant's visbility
If you have lots of different participants you need to control who can see the data at every step. Visibility defines whether a participant can see the review only in the state that they own (limited visibility), or in all states (full visibility).
By default, participants can only see the survey when it's in a state that they own. The employee will see their survey when they draft their responses, and again when it comes back to them for the final confirmation - both of these are states where the employee is the participant.
The manager should also have full visibility over the whole process so that they can access an employee's mood survey responses even when the survey is complete. We'll make sure the employee has limited visibility and the manager has full visibility.
- To change a visibility level, click the drop-down next to the participant name and choose Limited or Full visibility.
- Click Save changes to lock in your updates.
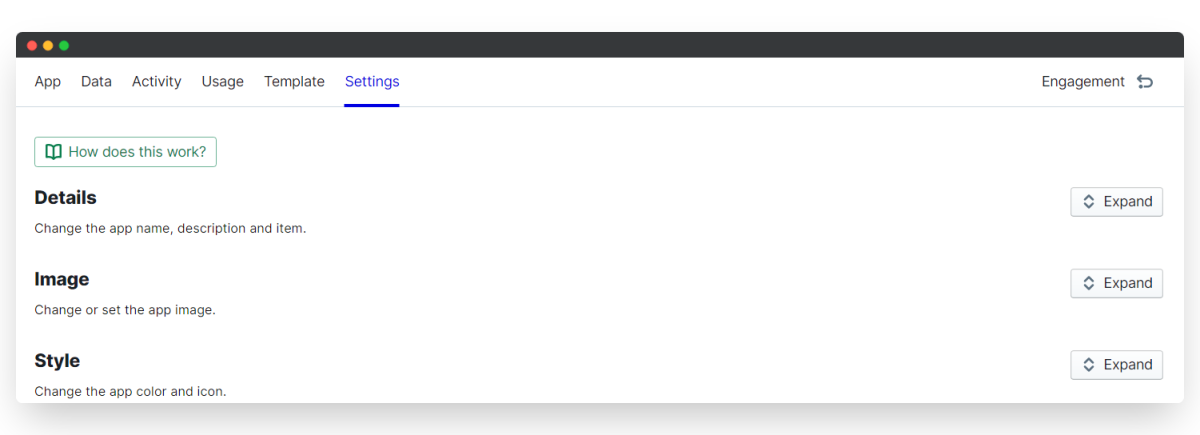
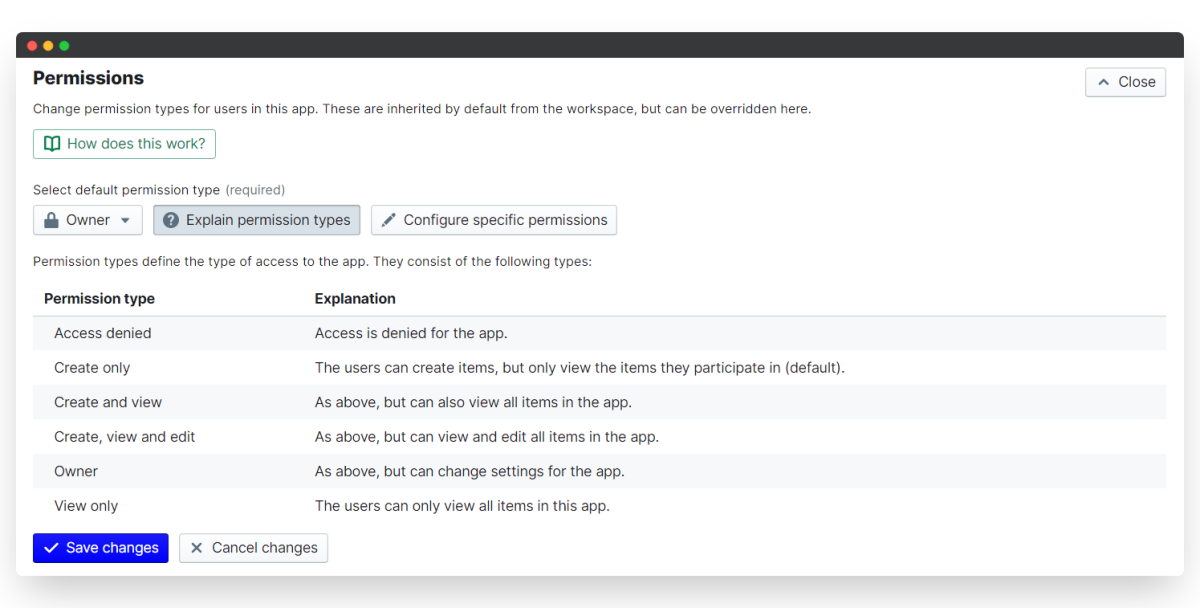
iii. App-wide permissions
Permissions control the access to your app within your PeopleGoal account.
- To set your permissions, click on the Settings menu, then expand the Permissions section.
- Click on Explain permission types to understand the access that each permission gives your account users.
In your Mood Surveys we'd recommend you set the permission to Create only. This means employees can create surveys for themselves but can't see any colleagues' surveys or responses.
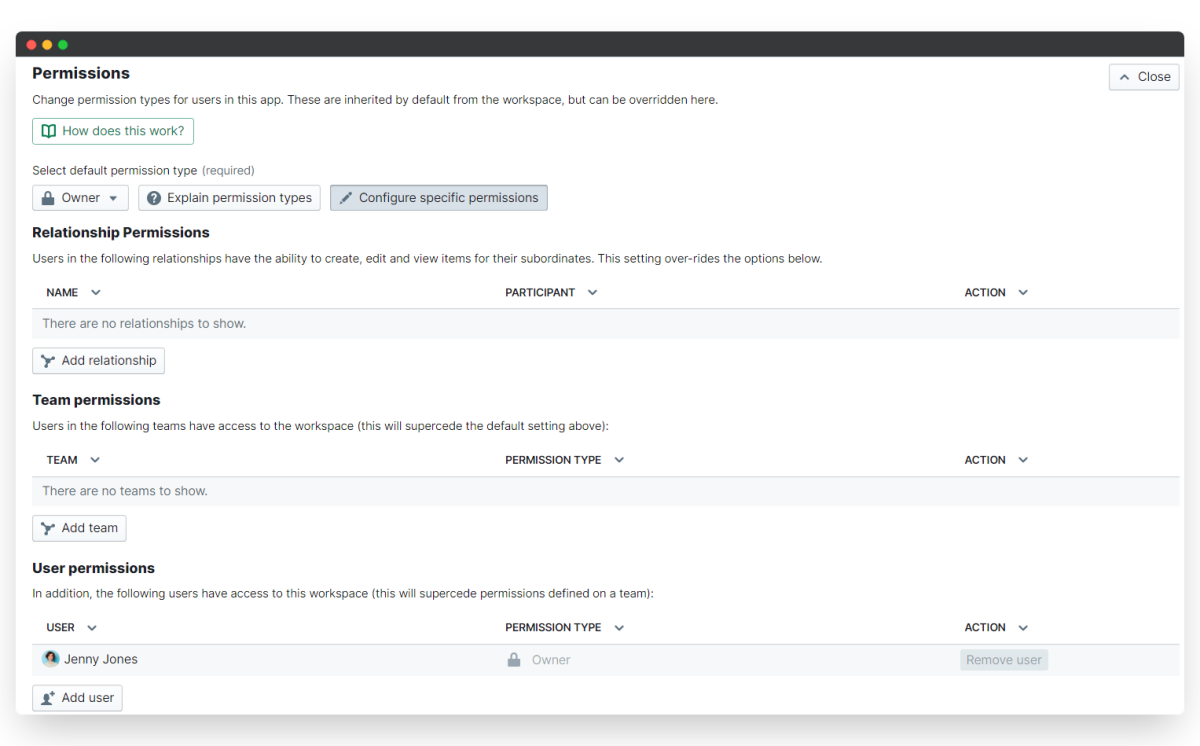
ii. Specific relationship, team and user permissions
The user who installed the Mood Surveys app template has Owner permission by default and can assign specific permissions to other teams or users. Specific team and user permissions replace the default permission type.
- To assign a specific permission, select Configure specific permissions.
- Under "Relationship permissions", add your Manager relationship. This means managers can create and view surveys for their direct reports only.
- Under "User permissions" click Add user.
- Type your colleague's name to add them to the permissions list. In the "Permission type" column, select which permission level to give them.
You might want to give "View only" permission to your C-Suite so that they can see the Mood Surveys for all employees but without being able to change the app settings or edit surveys they're not a participant in.
5. Establish the frequency of your Mood Surveys
How often you collect responses from your employees will influence the validity of your data. For example, if you only ask employees a few questions on how they feel about their work once every 6-months, it is likely this will provide a little insight into the experience but it will be far from the true experience. This is why we suggest you run these quick surveys weekly or bi-weekly to have the best chance of attaining a full and impactful representation of your employees' thoughts and feelings towards working in your organization.
Setting up recurring surveys is easy and once put in place, you won't have to look at it again. Making this process automated is highly recommended and makes the process a million times easier.
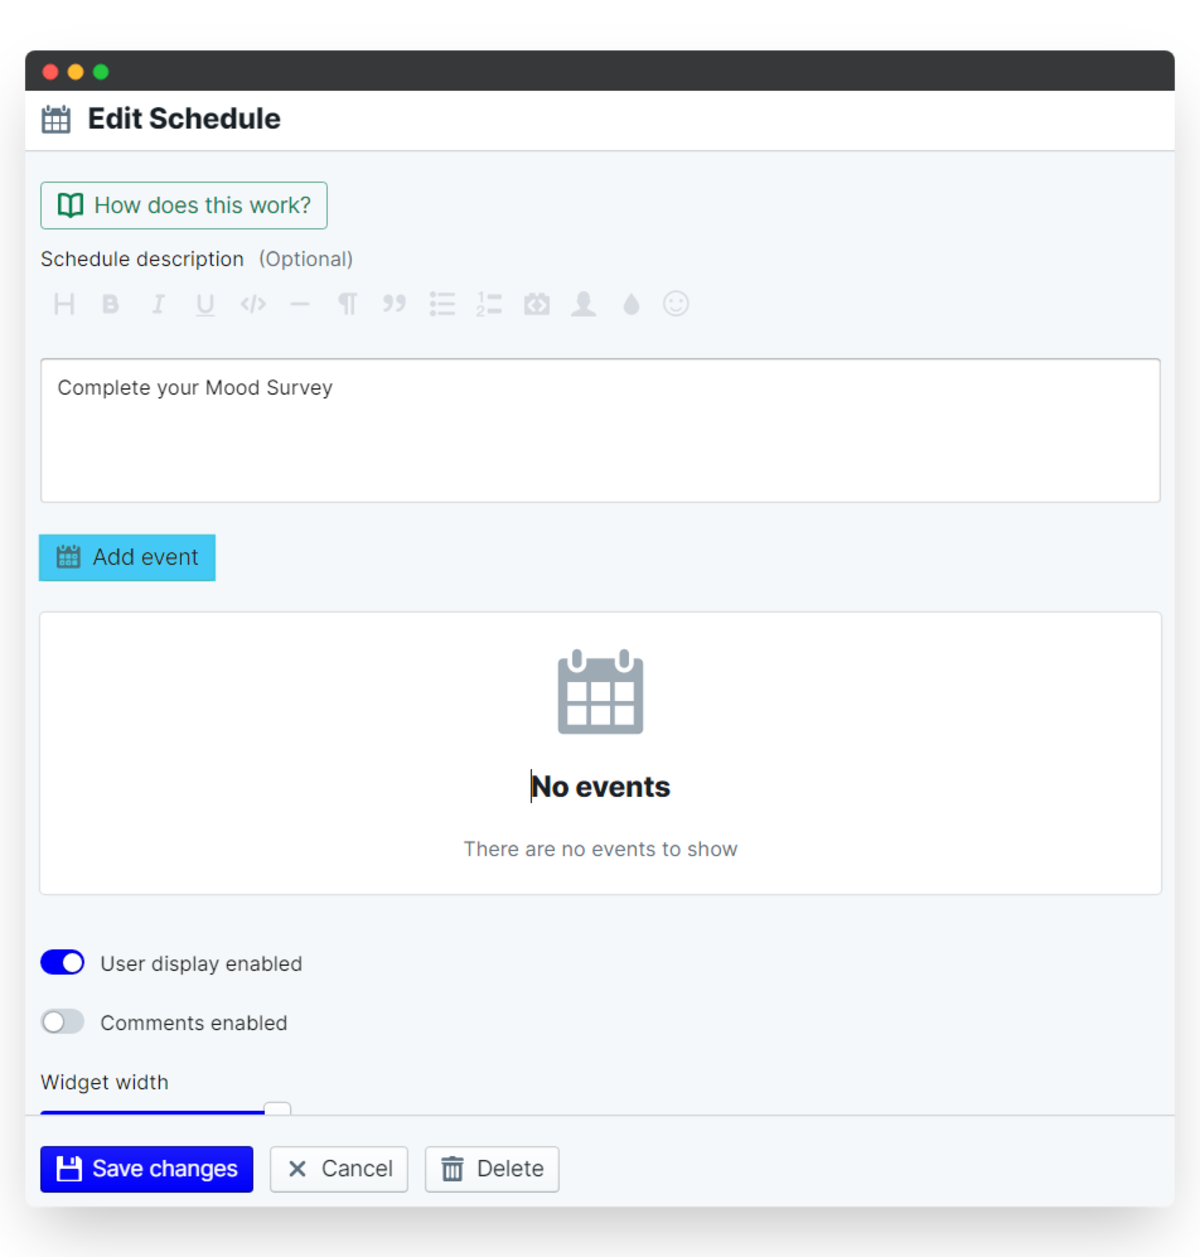
i. Schedule recurring surveys
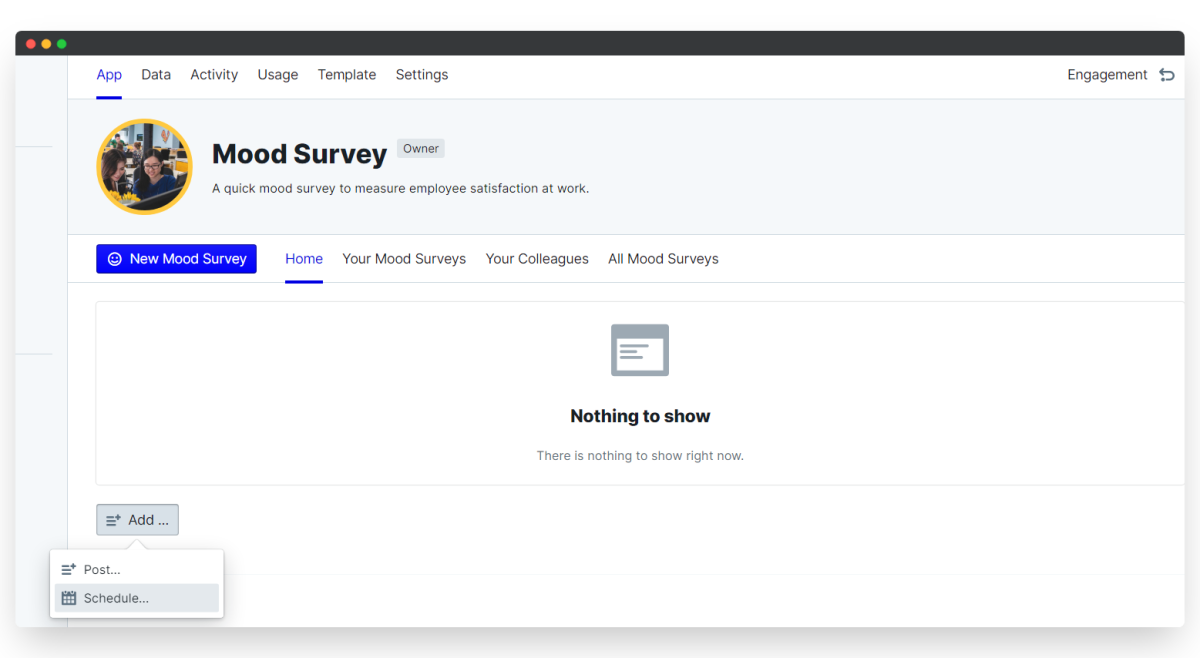
- To automate the creation and distribution of surveys, click on Add... from the Mood Survey app page.
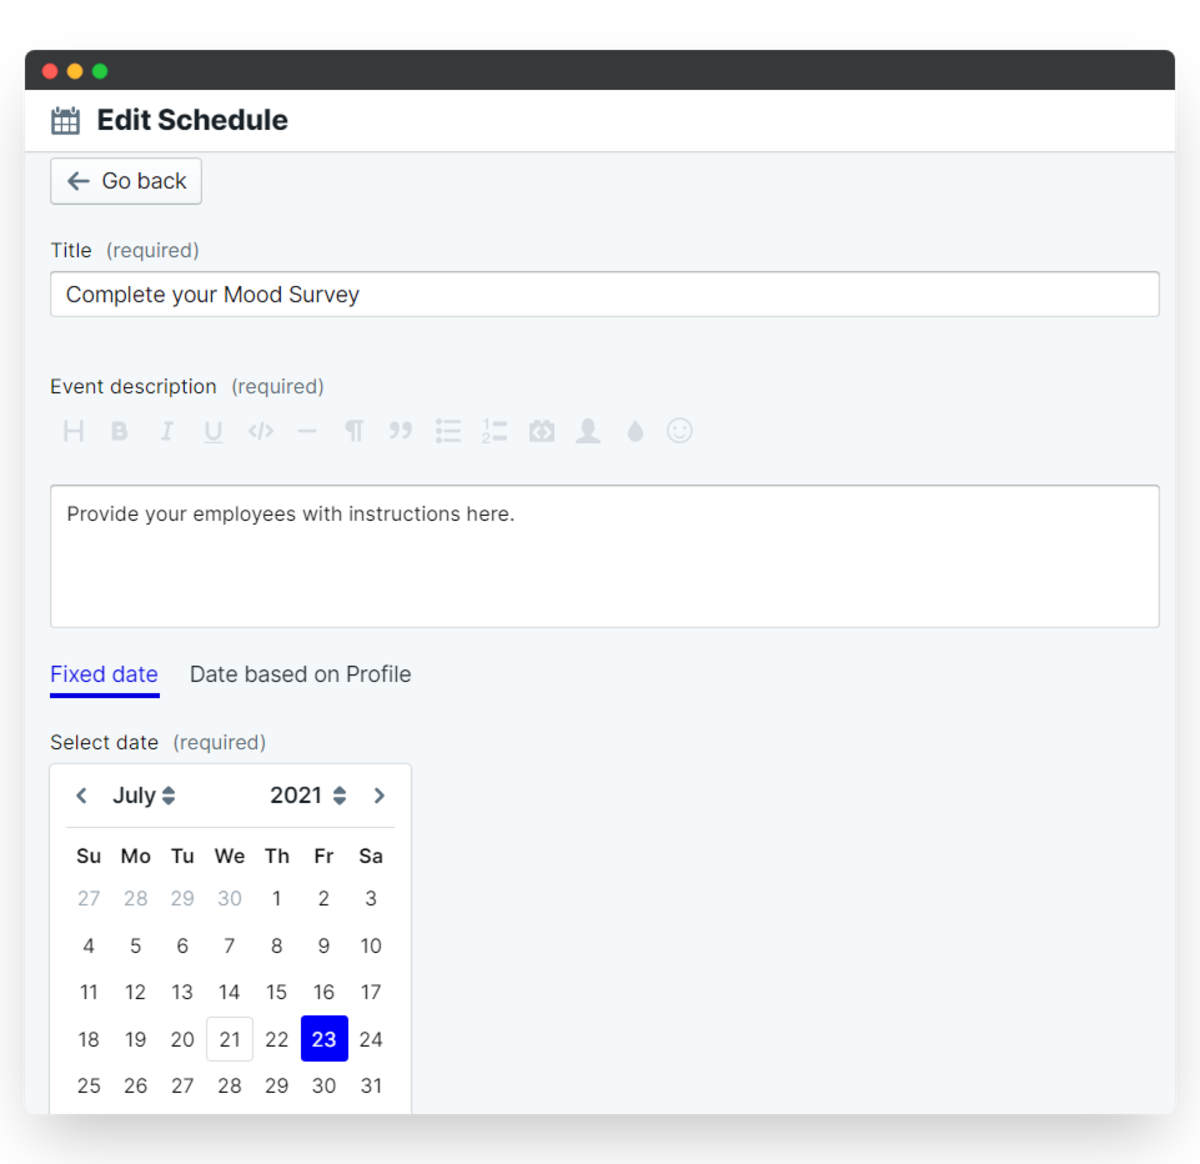
- Then select Schedule... and in the top right corner of the box that appears above click on the pencil icon. From this next menu you can enter some details about the Survey in the Schedule description.
- Click on Add event and from here you can provide further details. If you want to start the surveys from today then leave the calendar as is. You may want to select a specific time for the surveys to be distributed; to do this change the time in the boxes below the calendar.
- Set the Number of days prior to the event for reminder notification to 0 so that employees are notified on the day.
- Then toggle on Event recurs and change the settings to how often you want the survey to repeat (we've gone with every two weeks).
- It's also important to toggle on to Automatically create new Mood Survey and set the required participant, i.e the employee.
- Always make sure to click Save changes as you come out of each of these menus. You don't want to forget this!

6. Creating Reports
Every single data point entered in apps from PeopleGoal are collated and can be used in data analysis. To see the data at work, jump over to the Data tab and marvel at the wonders of the numbers.
From here you can sort and filter any categories you like. Whether you want to know the average response to a specific question about happiness or fatigue, you can play around with the various charts and responses to determine what matters the most to your company. The options are limitless... Jump over to our Reports building article to learn more about building custom reports and charts.
7. Launch your Mood Surveys!
You're ready to roll! All you need to do now is kick-off surveys for your employees. If you've been through step 5 and automated your surveys then you can just sit back and relax.
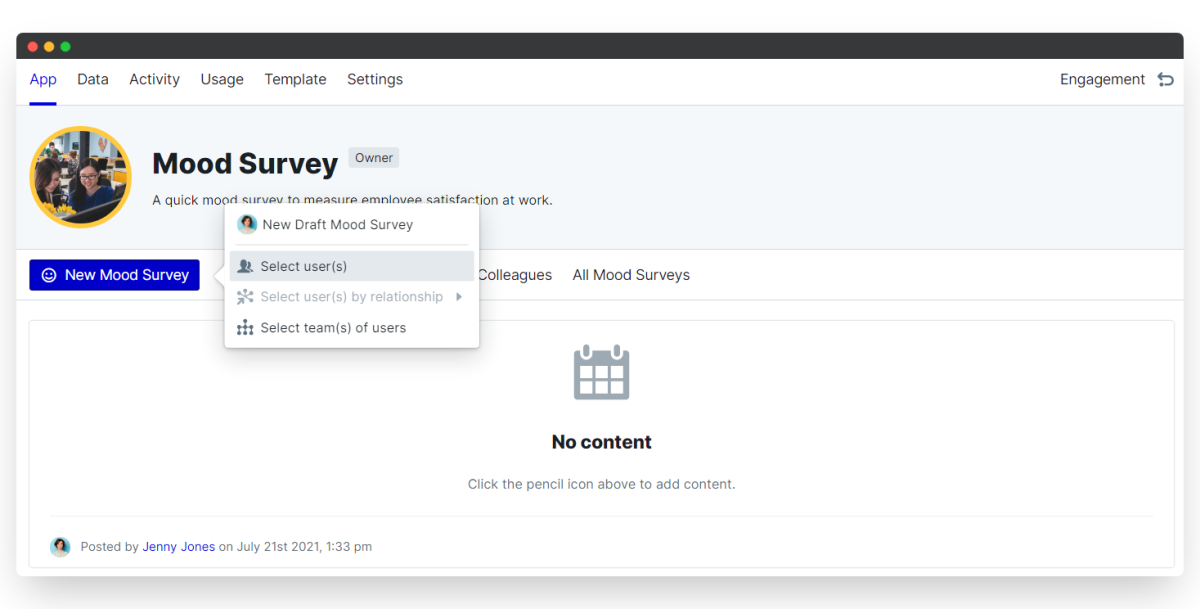
- If not, then from the Mood Surveys workspace, select New Mood Survey and then select the participant(s).
- To start a survey for yourself select your own name.
- To start surveys for individuals, click Select user(s) and search for individual employee names.
- Or, click Select team(s) of users and you can kick off surveys for entire user groups! Tip: select your Company team here to start a survey for everyone in the account.
With your Mood Surveys up and running, take a look at our other apps in the Engagement workspace. We'd recommend implementing a Weekly Pulse Survey to develop a further understanding of how your employees are responding to their work with a regular channel to prompt and grasp their feedback. You may also want to check out Employee Engagement Surveys to better understand your employee's motivations and satisfaction of working in your company. All of this and more can be found in our App Store.
Don't have a PeopleGoal account yet? Book a demo to see our no-code HR workflow builder in action!


PeopleGoal Support Team
Account Management & Implementation Specialists


