
Support Center.
Get Started or Become a Pro. Browse our support articles to learn how to get the best out of PeopleGoal.
How to Create a New Joiner Survey
In the onboarding process it's especially important to determine how the experience of joining an organization can be improved to ensure that new recruits are well engaged with their work. Running a New Joiner survey will allow you to gather valuable feedback from your new hires that you can use to improve onboarding and make sure all new talent hits the ground running.
Taking on the thoughts and opinions of new recruits is the best way to generate a truly helpful reflection of what is or isn't well-received by new employees in their experience of onboarding.
PeopleGoal provides the means for creating an effortless and automated New Joiner Survey. Our pre-built template can be put to use immediately after downloading, or alternatively follow these instructions to learn how you can easily customize your survey using our simple, no-code workflow builder.
Take a look at these steps below to find out more about how you can install and launch a New Joiner survey in under five minutes:
1. Install your New Joiner Survey app template
2. Customize the app template (optional)
3. Configure the app states (optional)
4. Manage your app participants
Let's get started.
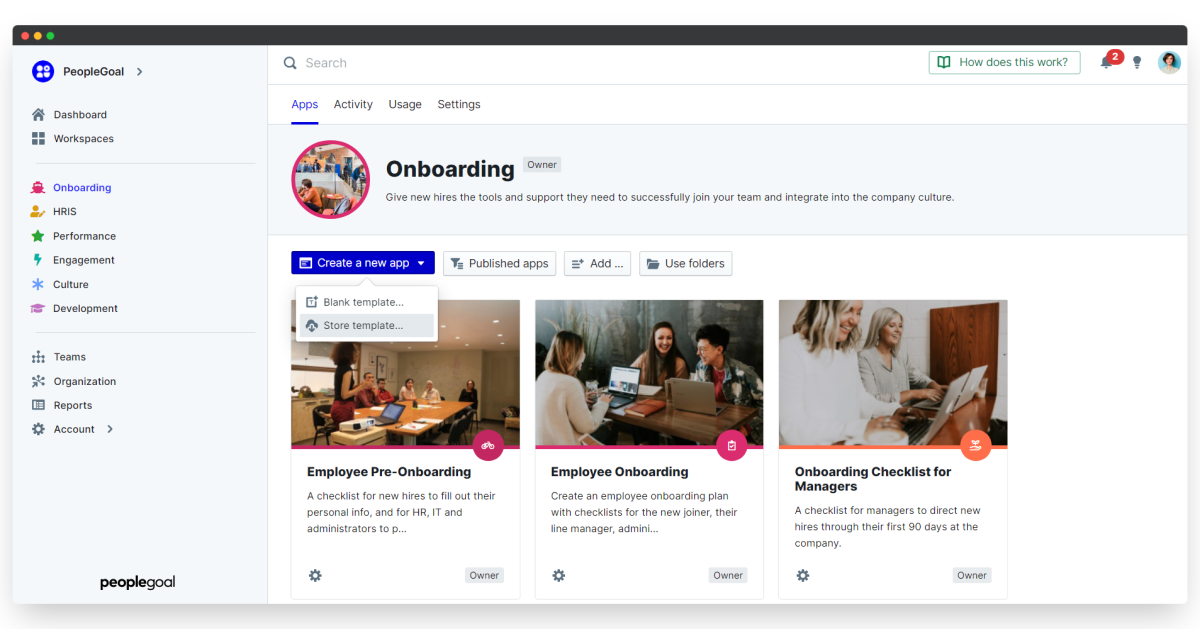
1. Install your New Joiner Survey App Template
- Open up the Onboarding workspace, or any workspace you have already installed.
- Click Create a new app, then select Store template.
- Select the New Joiner Survey app and click Add this to your account.
We'll take a few seconds to add this to your account. You'll then be taken straight to the app to get started.

All the pre-built survey questions and states are installed and ready to go so you can get started with surveys right away! To skip the customization, jump down to step 4 and set up your app participants and permissions.
2. Customize the New Joiner Survey App Template
Should you wish to configure the review to add your own questions and states, click the Template menu, then Edit template.

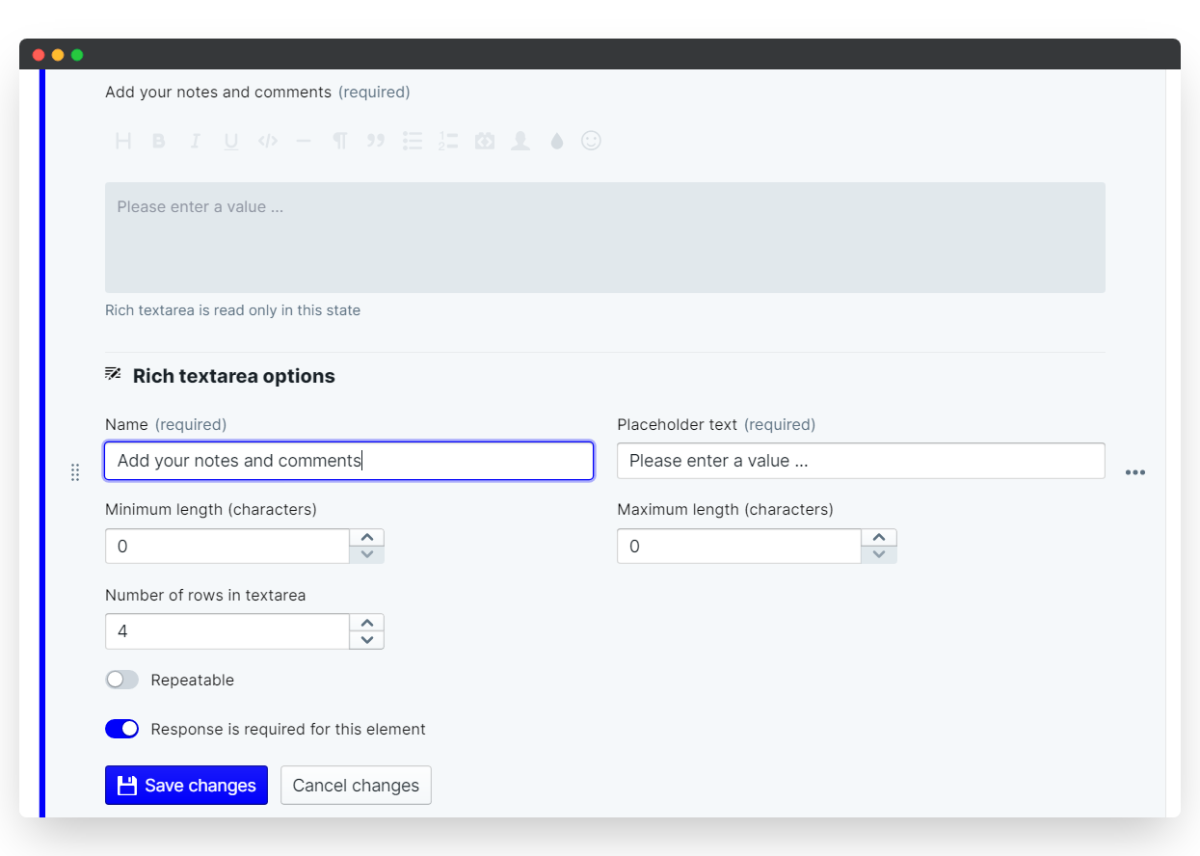
i. Edit existing elements
Elements are individual form fields that allow you to prompt the user to give specific information. You have the ability to change each element to suit your unique process and company needs.
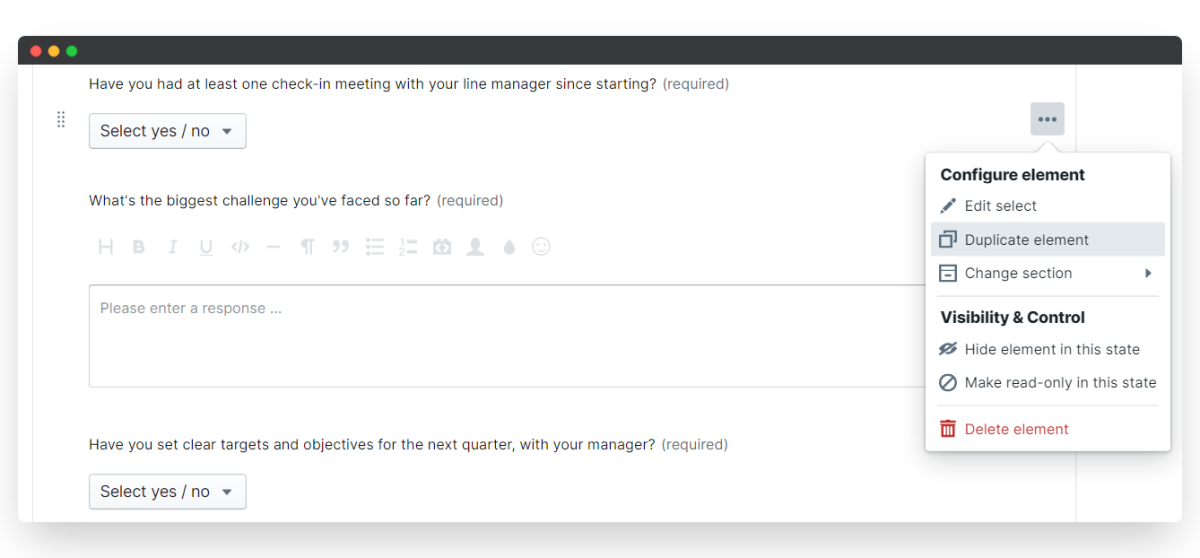
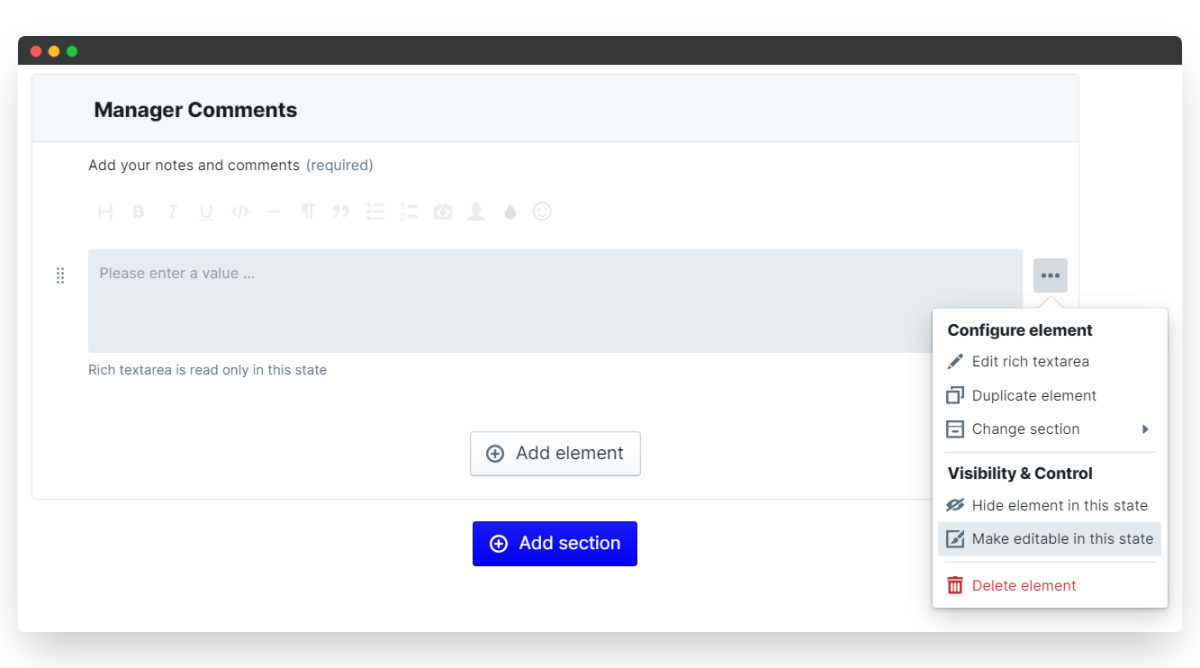
- To change a field, hover over the right-hand side of the element and click on the three dots that appear.
- Below Configure element, click Edit text input (your element will have a name such as "Text area", "Select", "File upload" etc). This will open up the element editor.
- Customize the element however you like. You can alter the instructions, placeholder text, number of rows available and even the length of responses.
- Here you also have the ability to toggle whether employees are required to give a response or not.
- Be sure that after making all of your changes to select Save changes to update the element. This goes for EVERYTHING you want to change.

The example below demonstrates how we edit one of the multiple choice questions to display a new question - prompting users about how the company goals align with their own. We also edit the display type from presenting a list of options instead of a dropdown bar. Additionally, response to the question is made optional.
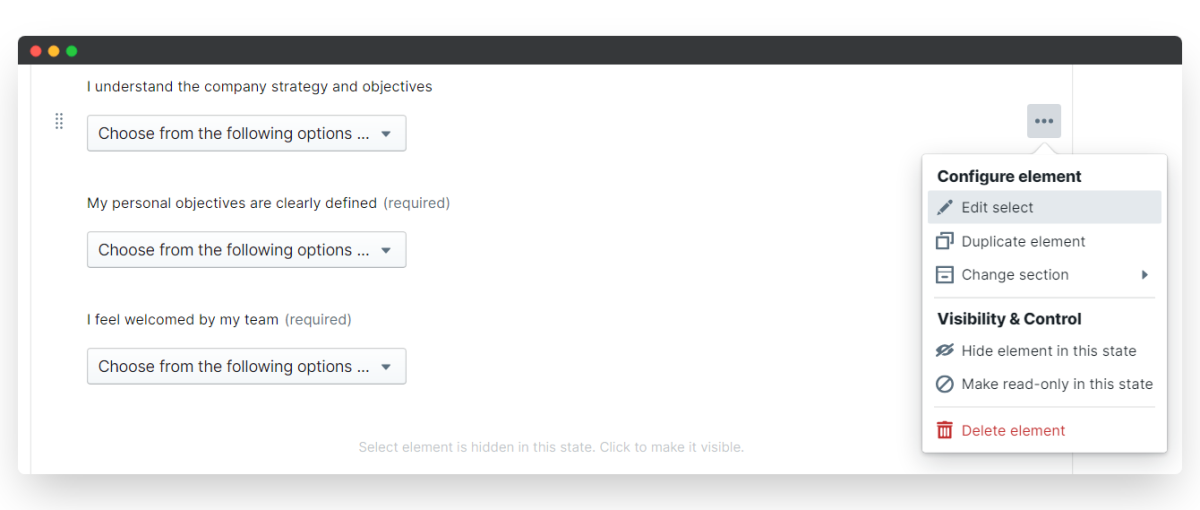
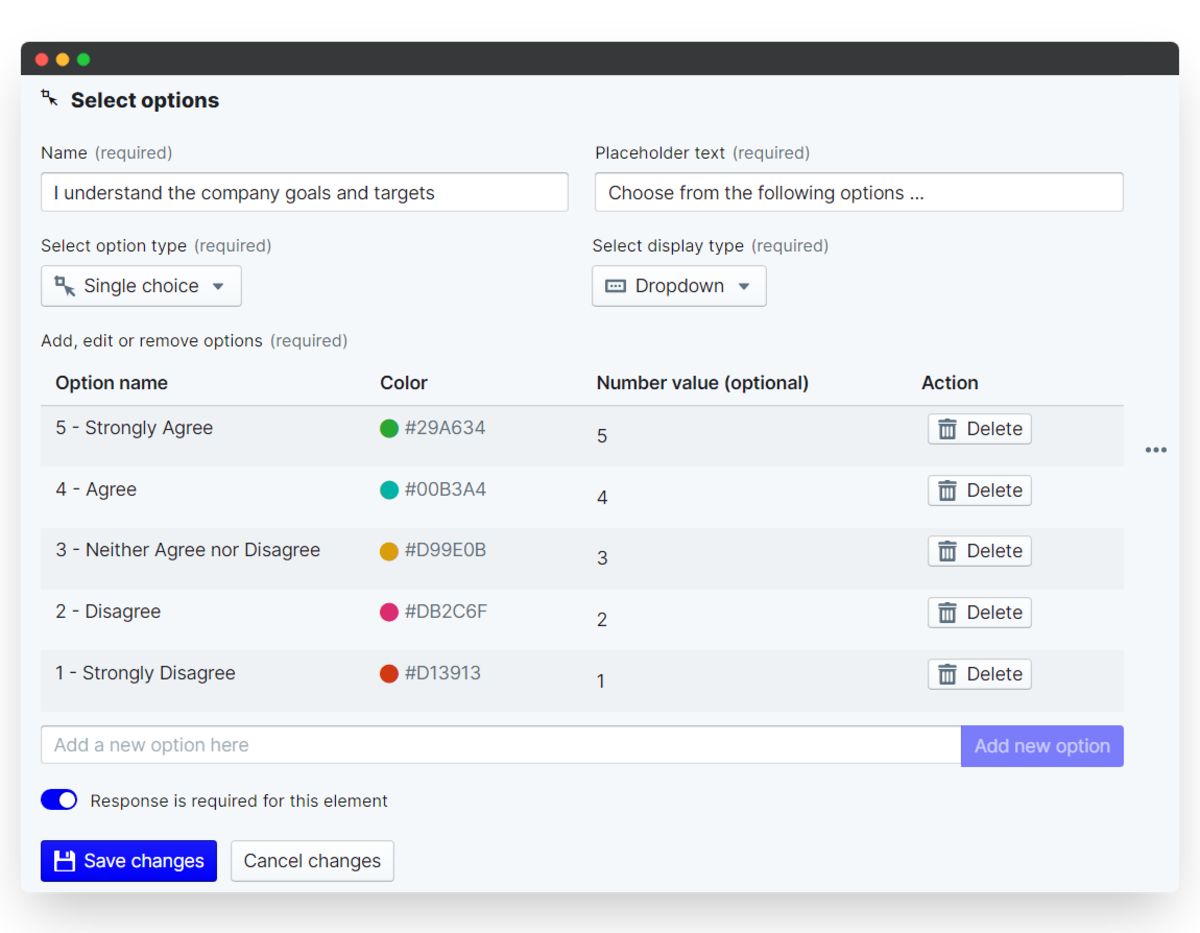
Note that each element is unique, so if for example you change the rating set on one element you'll need to change any other questions to match this. Don't worry, it's quick and easy to duplicate an element once you're happy with its setup.
ii. Duplicate elements
- Hover over the right-hand side of the element and click on the three dots that appear.
- Select Duplicate element and an exact copy will be created below.
- Edit the duplicated element to change the relevant text.
iii. Reorder elements and sections
Reordering is very straightforward - simply click and drag to change the element or section order.
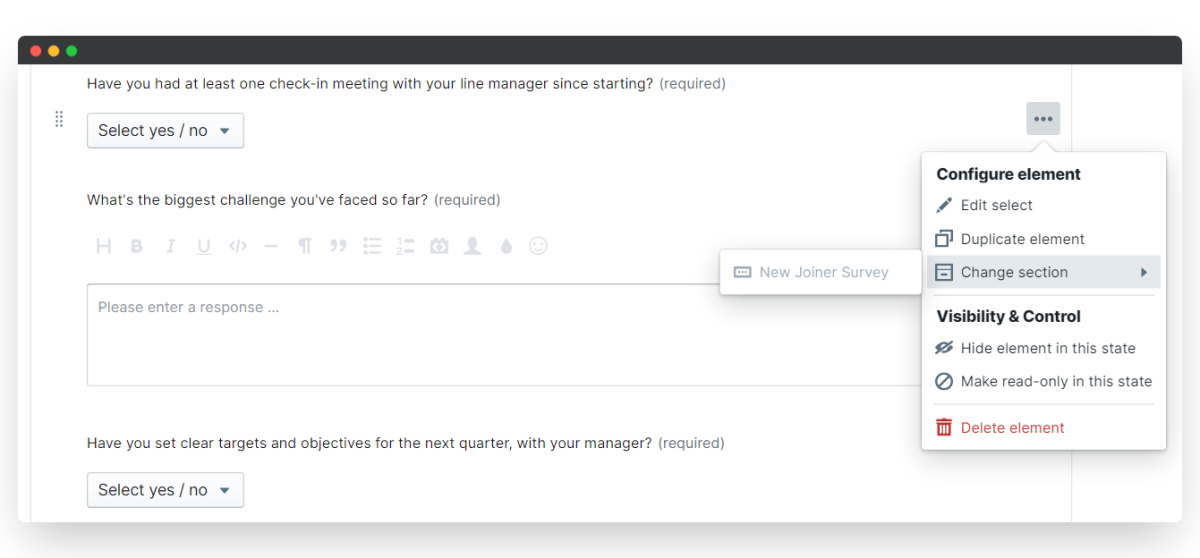
- Hover over the left-hand side of the element (or section title) to click and drag your element or section to its new location.
- To move an element to a different section, hover over the right-hand side and click the three dots that appear.
- Select Change section and choose the new section you want the element to belong to.
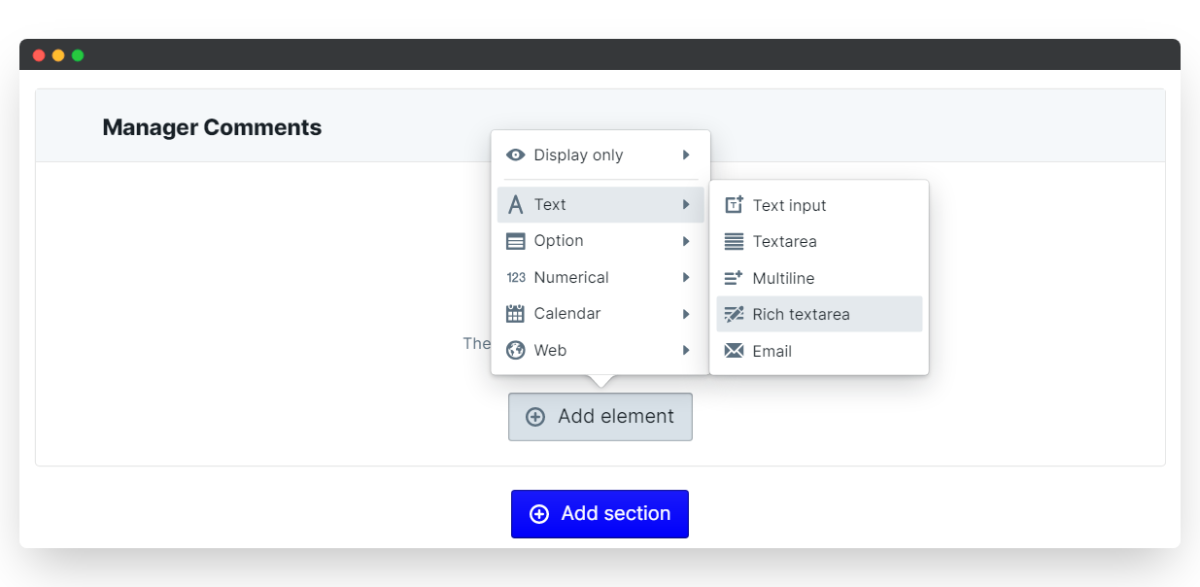
iv. Create new elements and sections
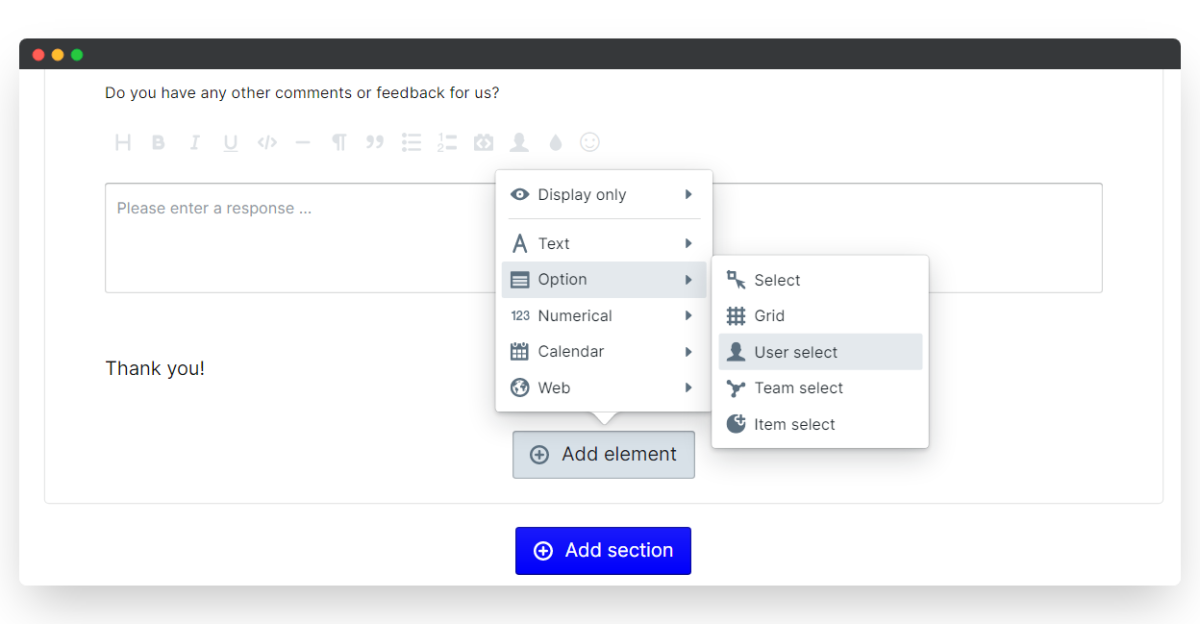
- At the bottom of each section, click Add element and select the element type you want to insert.
- To add a new section, scroll to the very bottom of your template form and click Add section.
- Then click and drag your new section to where you want it to sit in the survey flow.
In the example, you can see we've added a new element that gives employees the option to state if there is anyone in the company they would like to get to know better. When creating a new element, hover over Option and click User select. You can alter the text to prompt the employee to select any individuals they feel they haven't gotten to know yet.
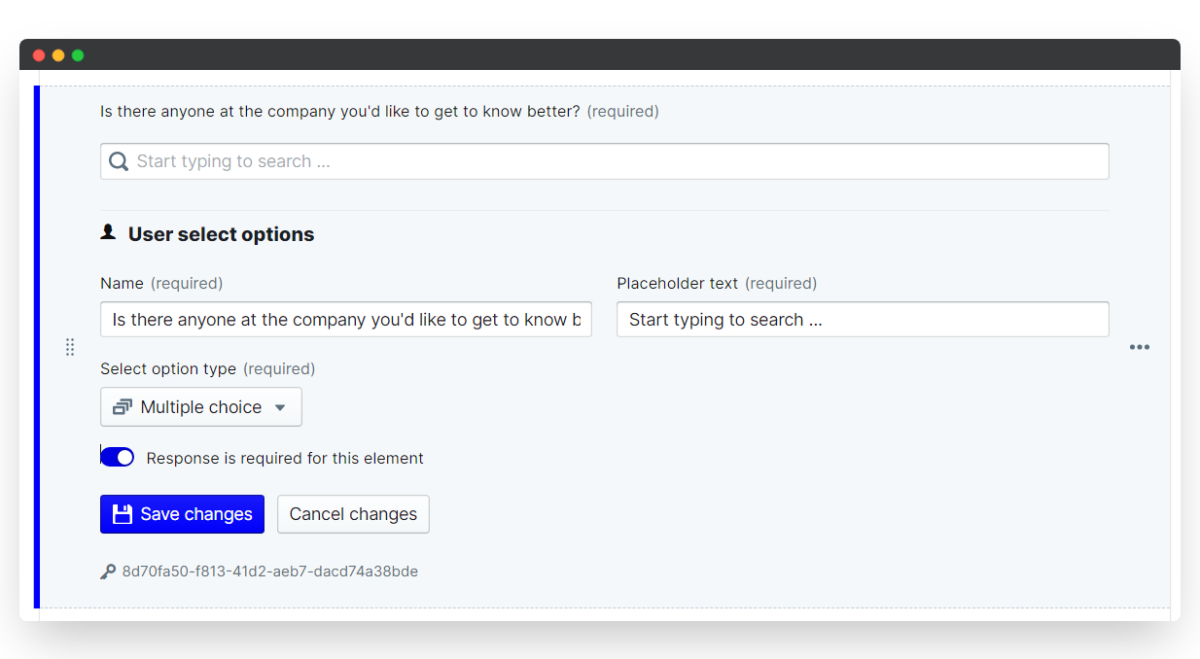
If you've used the Onboarding Checklist app then their onboarding process may have gone swimmingly, in which case we can set the response to optional for this element. This data can be used to indicate if any further introductions are necessary, enabling the new employee to feel they are a valued team member.
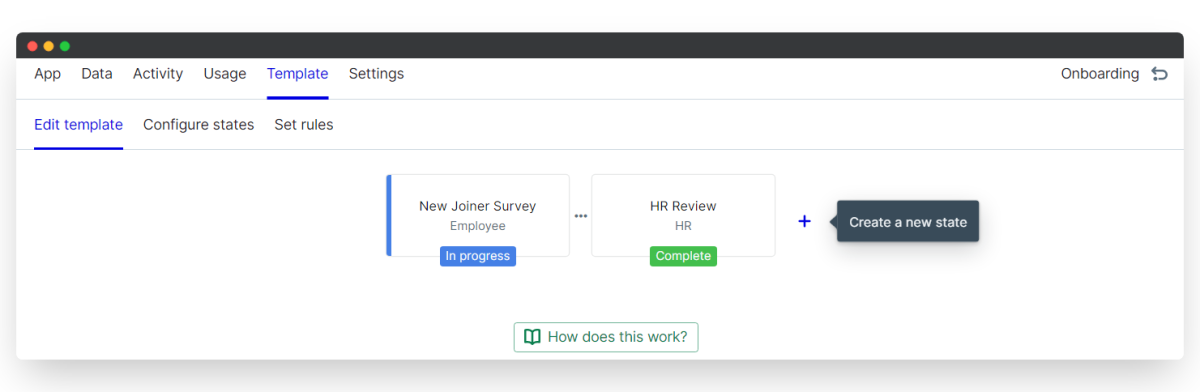
3. Configure the New Joiner Survey States
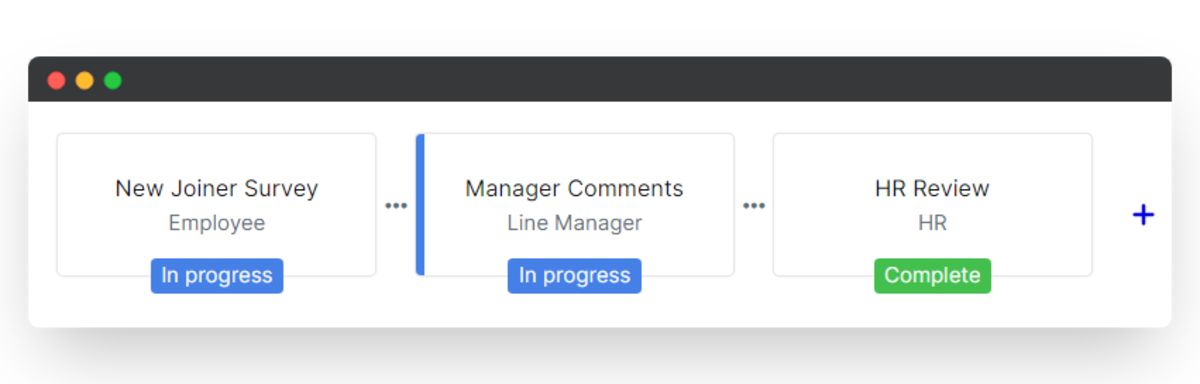
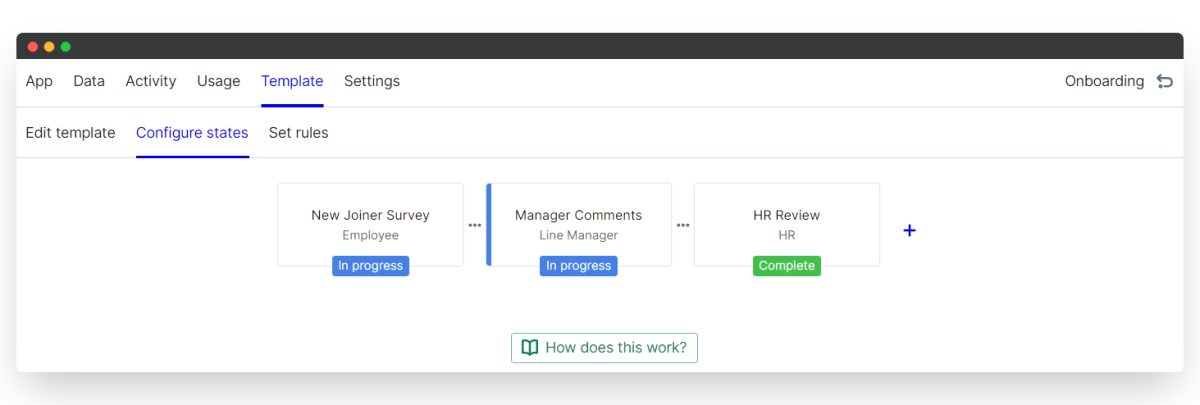
Typically a New Joiner survey will only involve the employee and HR for privacy reasons. As a result, there are just the two states configured in the pre-built template.
If you wish to incorporate more individuals in the survey workflow, this can be achieved by adding additional states. Each participant will have their own state, representing their interaction with the survey. Additionally, it is possible to control the visibility of sections (and individual elements) in every state. These can be set to read-only, editable or hidden for the selected state participant.
i. Add a new state
- From the Edit template page, click the + button to create a new state.
- Type in your state name, define the participant role and choose a status flag.
- Next, toggle on/off whether sections are visible or editable by default (this can be changed at a later point if necessary).
- Click and drag your state to reorder your workflow and you have successfully added a new state!
Typically the surveys are not shared beyond the employee and HR. However, if you wish to create an open survey then you may want to add a state for the line manager or hiring manager. As seen in this example, we've added a state for the line manager so that they can check the responses and better understand how the employee feels about their start to work for the organization. We've also added a section for the manager's responses so that it's separate from the employee part of the survey.

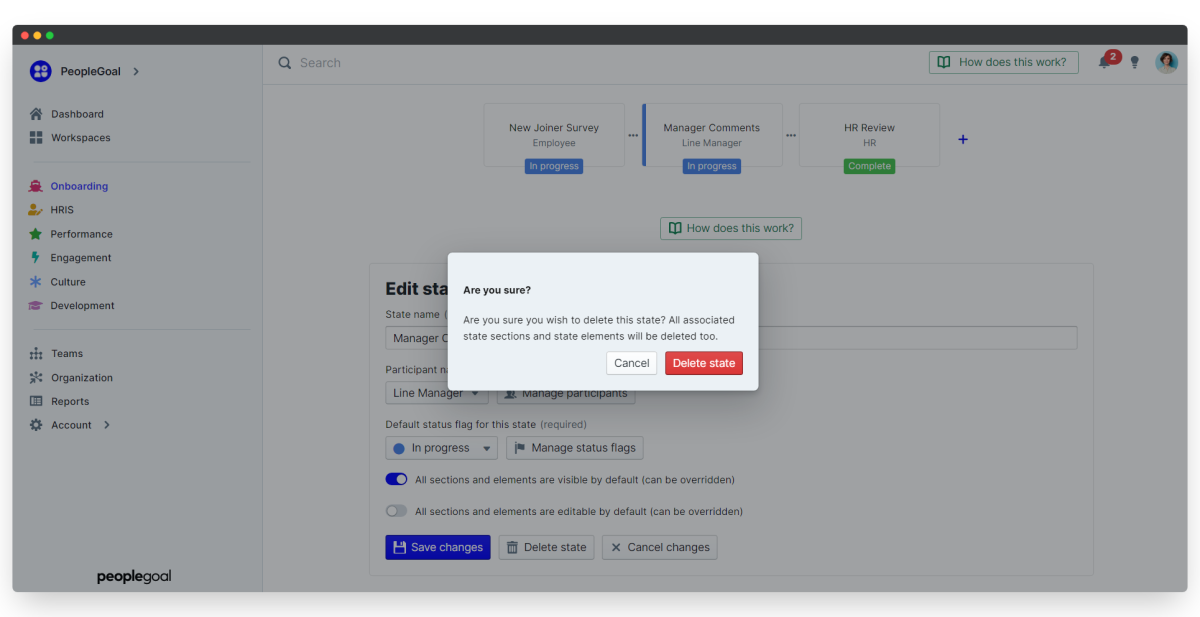
ii. Delete a state
You can remove any states that you do not need to use.
- Click the Template tab and select Configure states.
- Select the state you wish to delete and a blue highlight bar will appear, confirming which state you have selected.
- Click Delete state to remove it.
Our example simply demonstrates how the line manager state, created in the last step, can easily be removed if desired.
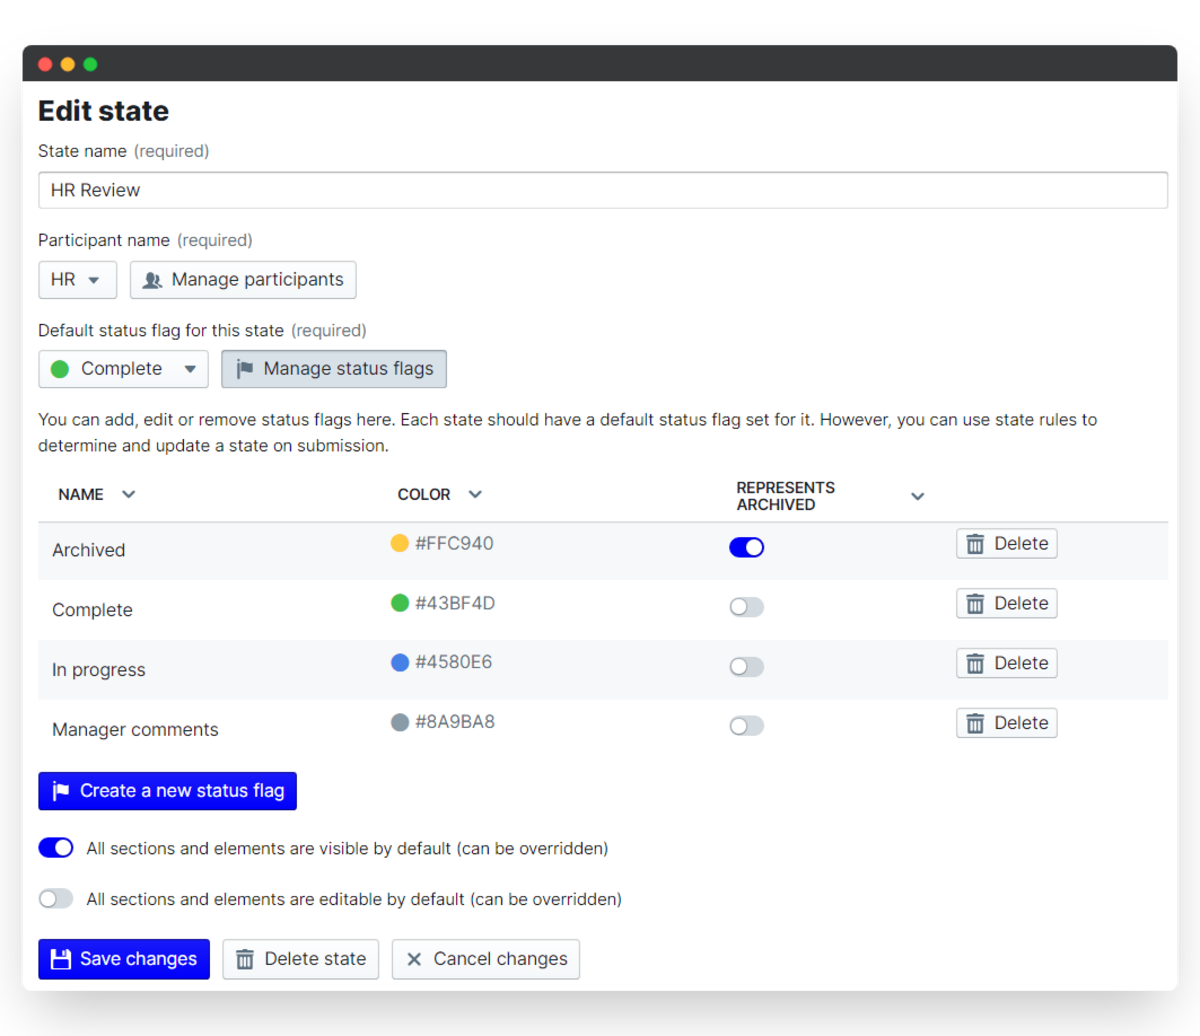
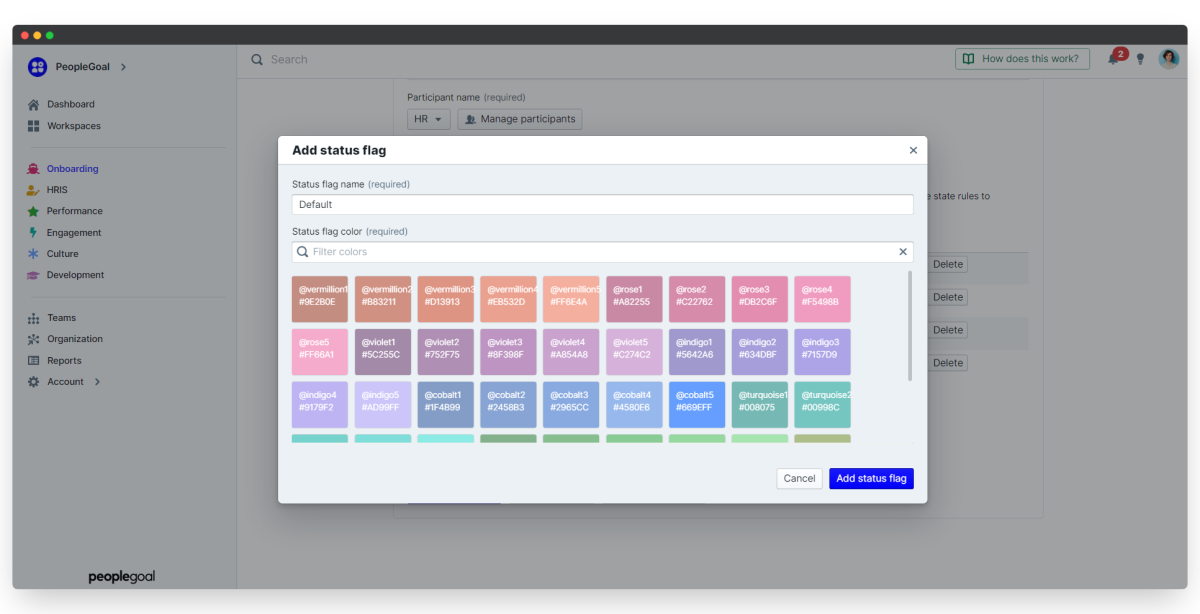
iii. Customize your status flags
Each state has a default status flag which indicates to participants what stage of the process their item is in. The New Joiner Survey app is pre-built with default status flags, which you can alter.
- From the Configure states menu, click on Manage status flags.
- Click a flag title to rename it and click the color picker to choose a new flag color.
- Click Create a new status flag to add an additional flag.
- Select the state to which you want to assign a flag, choose which flag to give it and click Save changes to update.
It's advisable to delete status flags that are unused so that they don't clutter up your item filter once you start onboarding employees. In this example, there is no need for the Rejected and Draft flags so they are deleted.
4. Manage your New Joiner Survey participants
Participants are the users who will be involved in the app workflow. For New Joiner surveys the participants are the Employee and the HR Reviewer (as well as the Line Manager if you've added them to the process above). You can automate the participants by assigning Relationships and default users to the Configure states menu.
i. Set default relationships and users
- Open up the Configure states menu and select Manage participants.
- For each participant set a default user or default relationship to automate the survey workflow.
- If you like, you can even rename the participants to suit your company language.
Below you can see how we set the default user for the HR review to Jenny Jones, our HR Director. She'll then be able to use all of this data to develop the process for the next batch of onboarders.
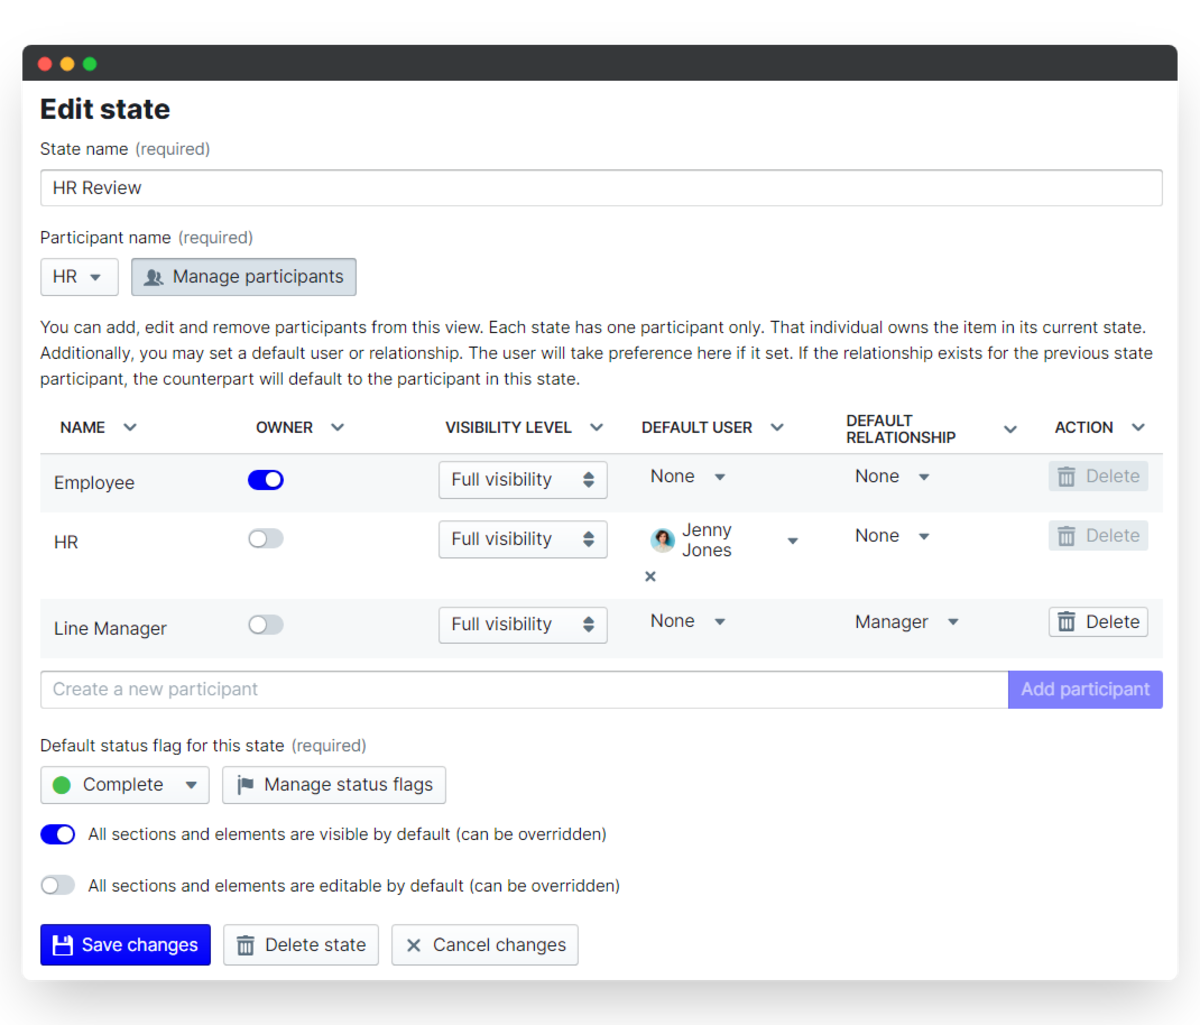
ii. Define the participant's visibility
Depending on whether you add any additional states will determine how you may want to approach visibility for your survey. Our template gives the two participants full visibility, but it's really straightforward to change this.
- Having selected Manage participants in the Configure states menun, click on the dropdown menu under "Visibility level" and select your desired visibility for each participant.
- Limited visibility will restrict the user so that they can only see information from the states that they are participating in.
- Click Save changes to confirm your updates.

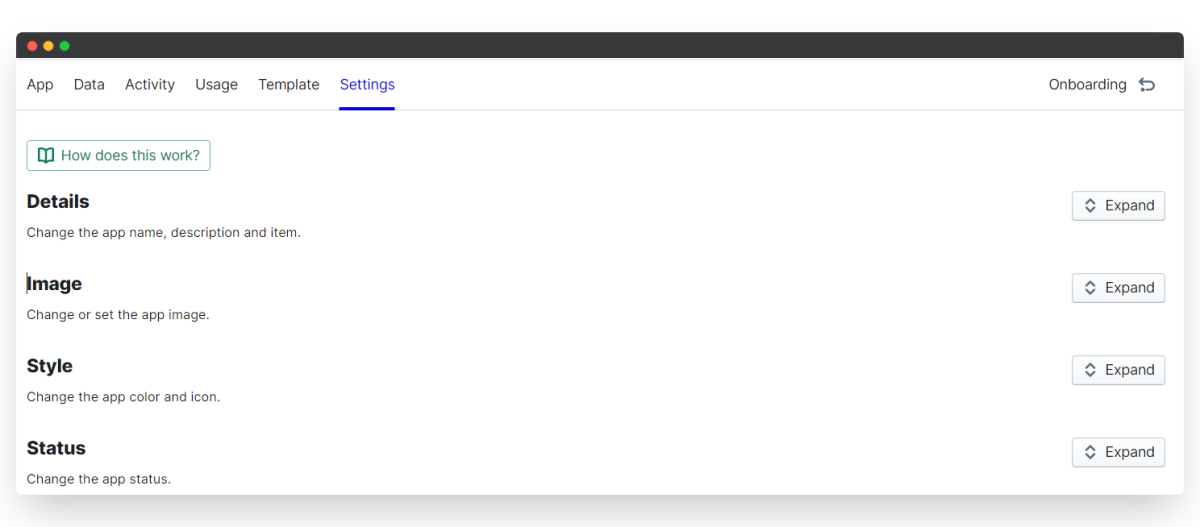
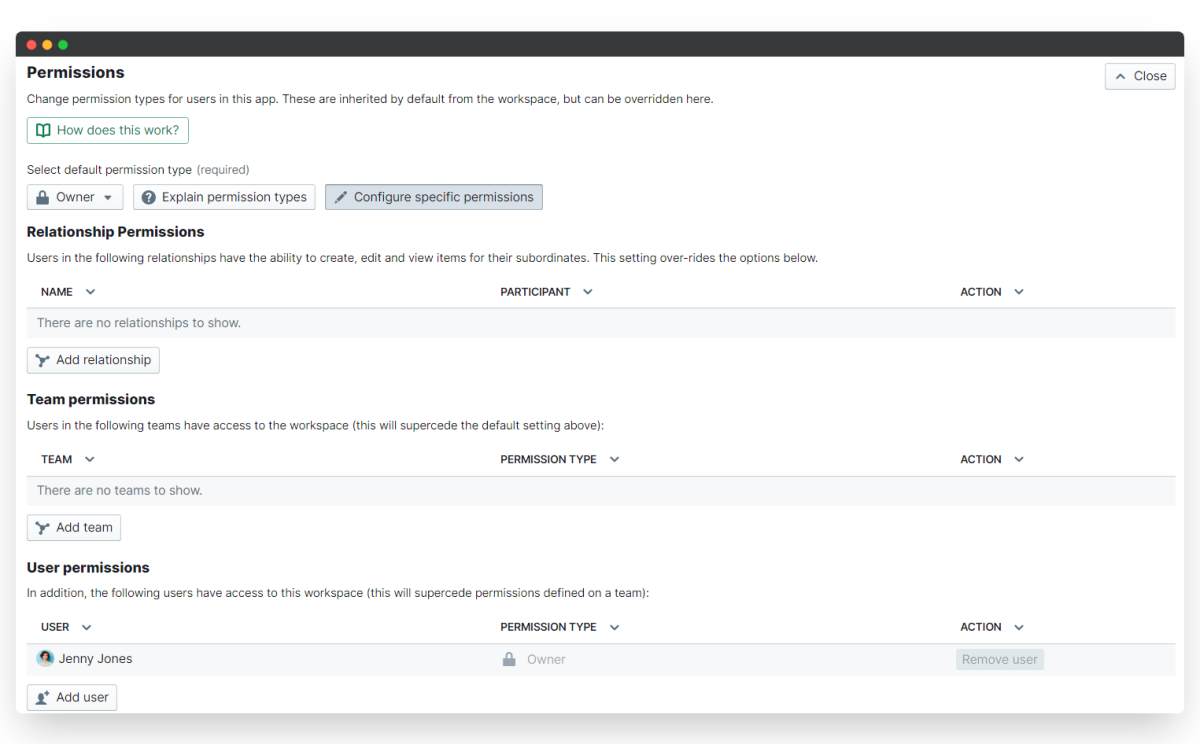
5. Set the New Joiner Survey permissions
Permissions control access to your app within your PeopleGoal account. Different levels of access will determine to what extent users can create/edit surveys.
- Set your permission by clicking on the Settings menu, then expanding the Permissions section. - Click on Explain permission types to understand the access that each permission gives your account users.
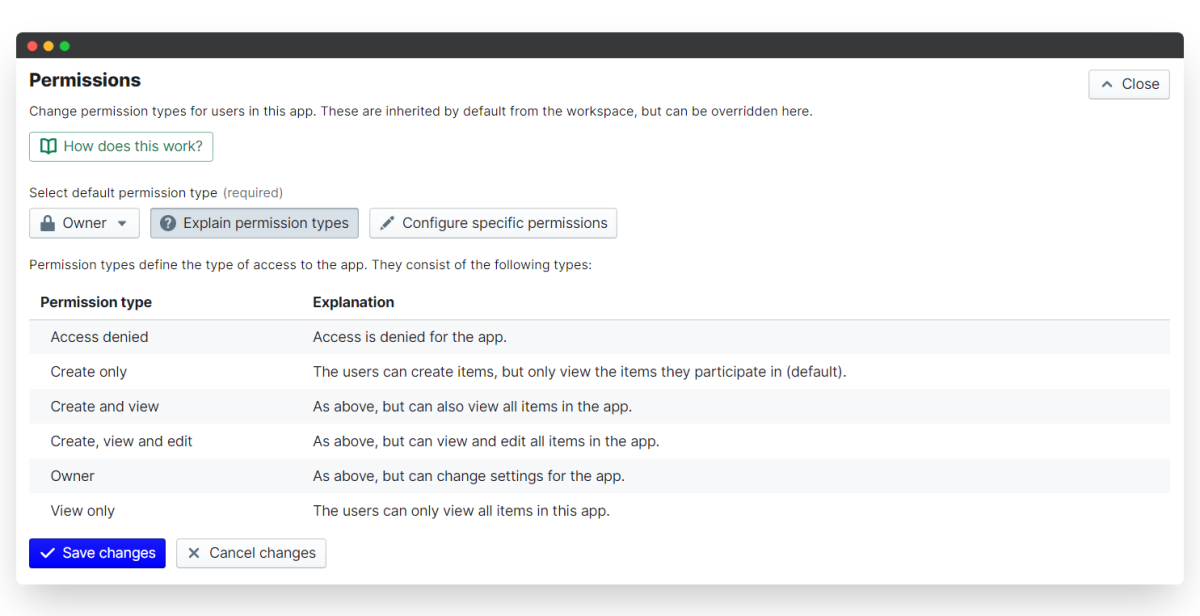
i. App-wide permissions
For New Joiner Surveys, we'd recommend that you set the permission to Create only. This enables employees to create surveys for themselves but without being able to see any colleague's surveys.
ii. Specific user permissions
The user who installed the Onboarding app template has Owner permission by default. Any specific team and user permissions then replace the default permission type.
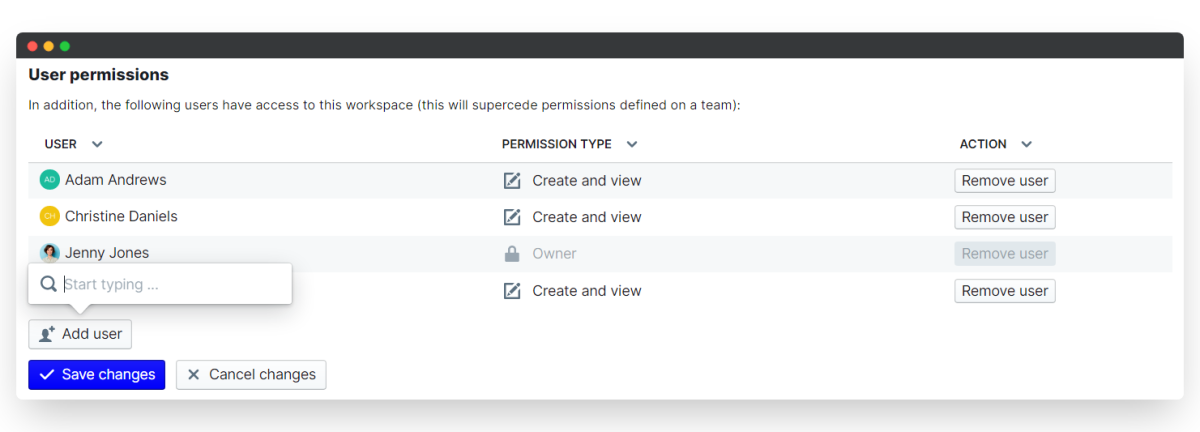
- Assign specific permissions by selecting Configure specific permissions.
- Under "User permissions" click Add user.
- Type your colleague's name to add them to the permission list. In the "Permission type" column, select which permission level to give them.
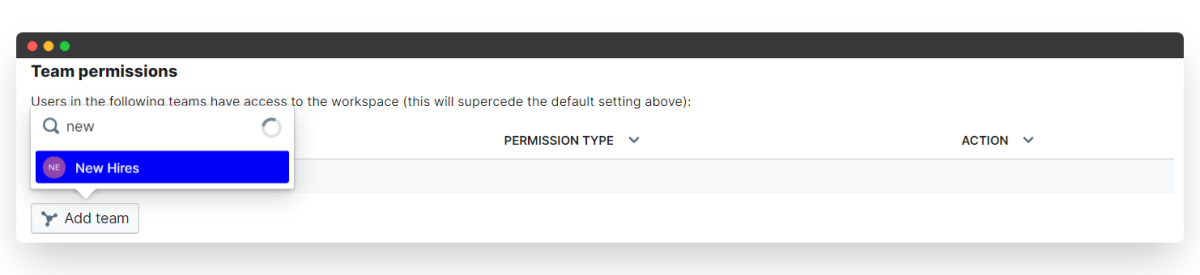
iii. Specific team permissions
You can limit the access to your New Joiner Survey apps by only allowing certain teams to see the app. This is especially relevant in Onboarding, where your new hires will likely only need to access the apps for the first 3-6 months of their role.
- To set this up, first create a New Hires team in the Teams module and add all new employees to this team every time they join.
- On the New Joiner Survey app, click back in to your Settings and expand Permissions.
- Set the default permission to "Access denied" to hide this app from most users.
- Select Configure specific permissions.
- Under "Team permissions" add your New Joiner team and give them "Create only" access.
6. Launch your New Joiner Surveys!
High five! Now you just need to start onboarding some employees and when the time comes assign them surveys. It may be easier for you to create the surveys for individuals when the time comes, or you can set up a schedule to automatically create new surveys.
i. Create a New Joiner survey for an employee
- Click on the New Joiner Survey menu and then New Joiner Survey.
- Click Select user(s) and search for individual employee names.
- Or if onboarding a cohort, click Select team(s) of users and you can kick off surveys for entire groups of users!
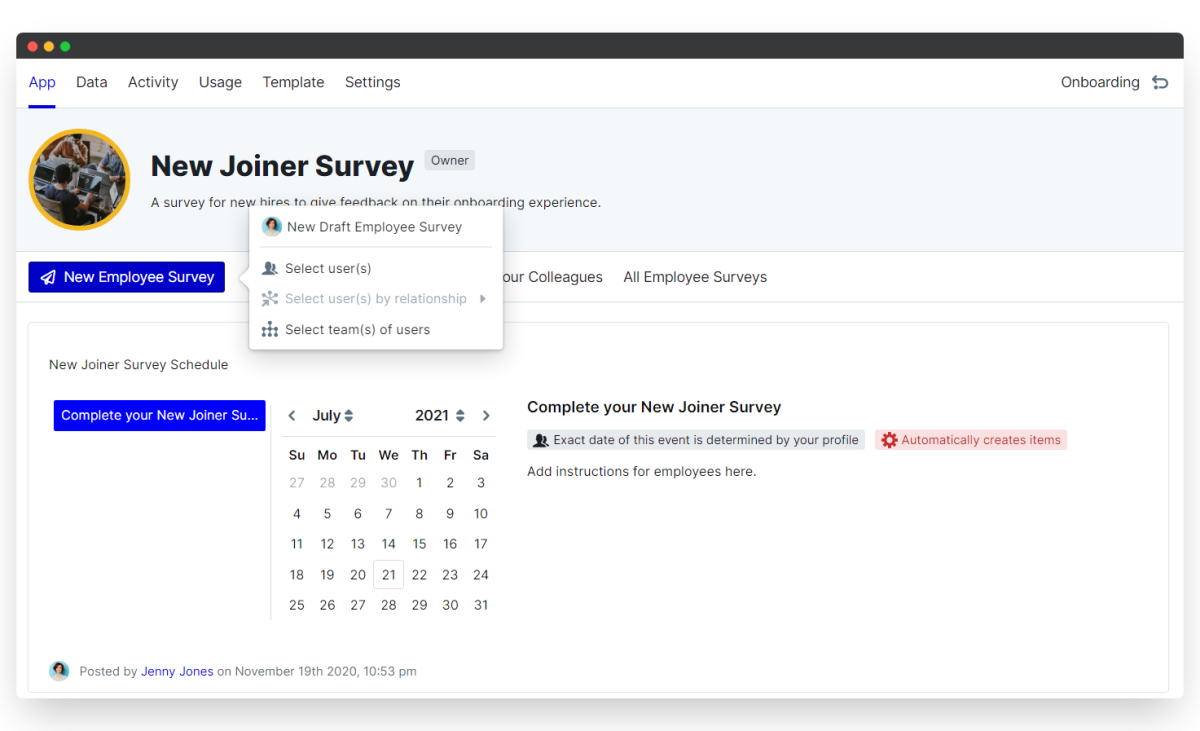
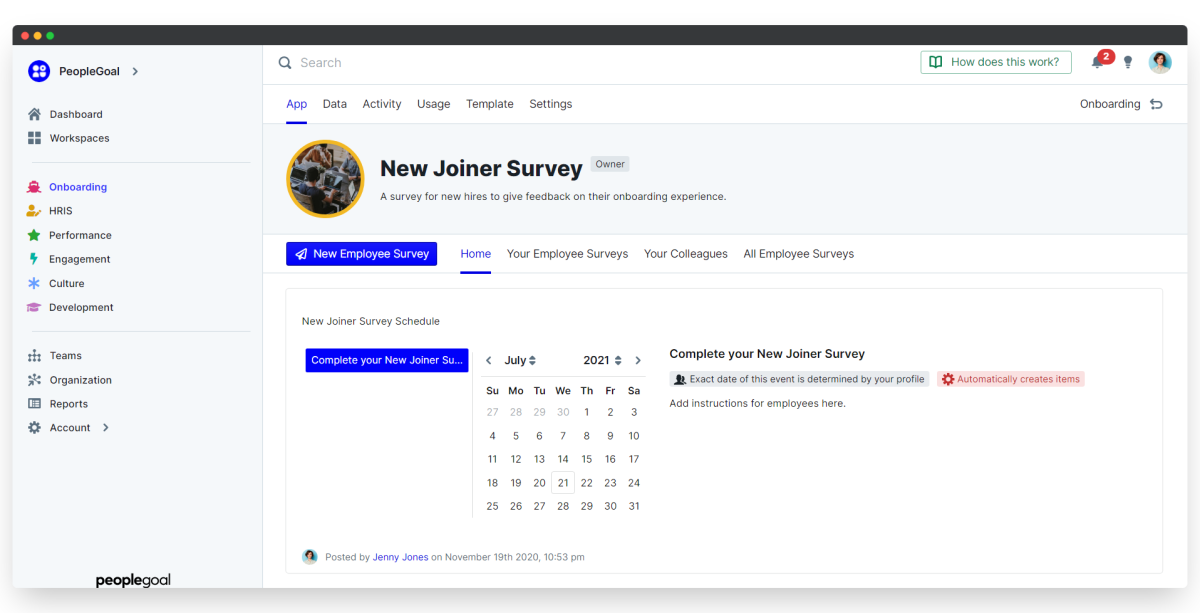
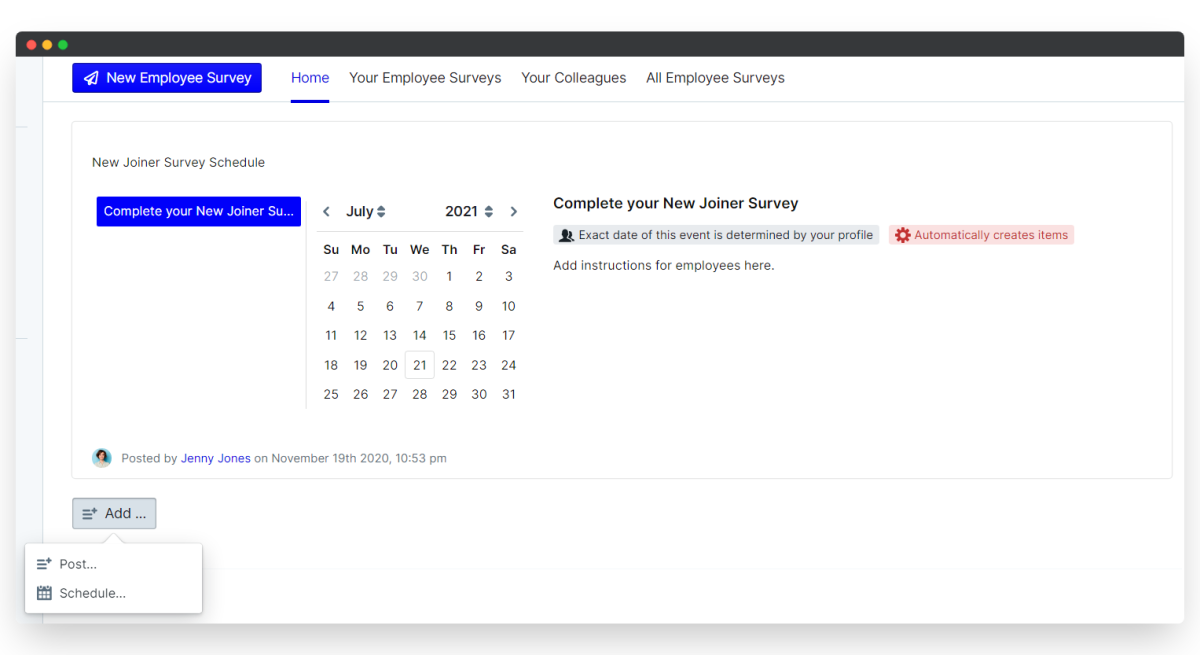
ii. Schedule a New Joiner Survey
Scheduling a New Joiner survey can be useful to indicate to new employees how long they have to wait until they are no longer considered a newbie. Setting a specific date for the survey also gives them something to work towards.
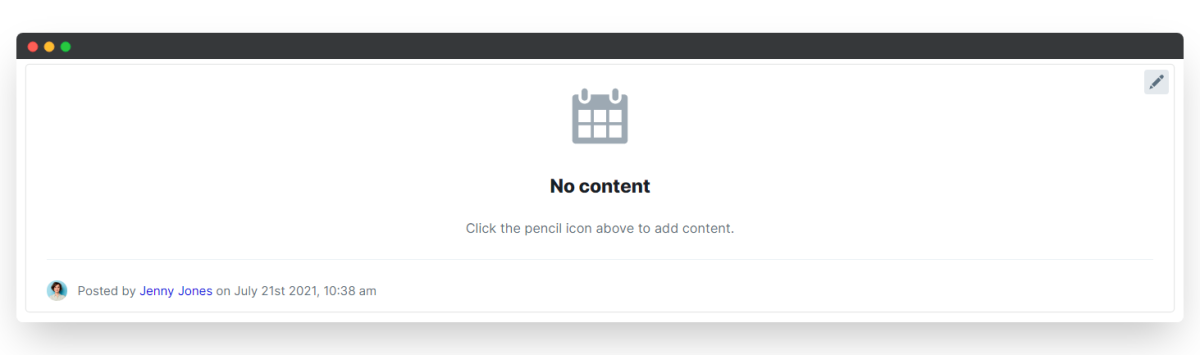
- From the app homepage, select Add..., then click Schedule.... This will create a content box above the New Joiner Survey button.
- Hover over the right side of the box and click on the pencil icon.
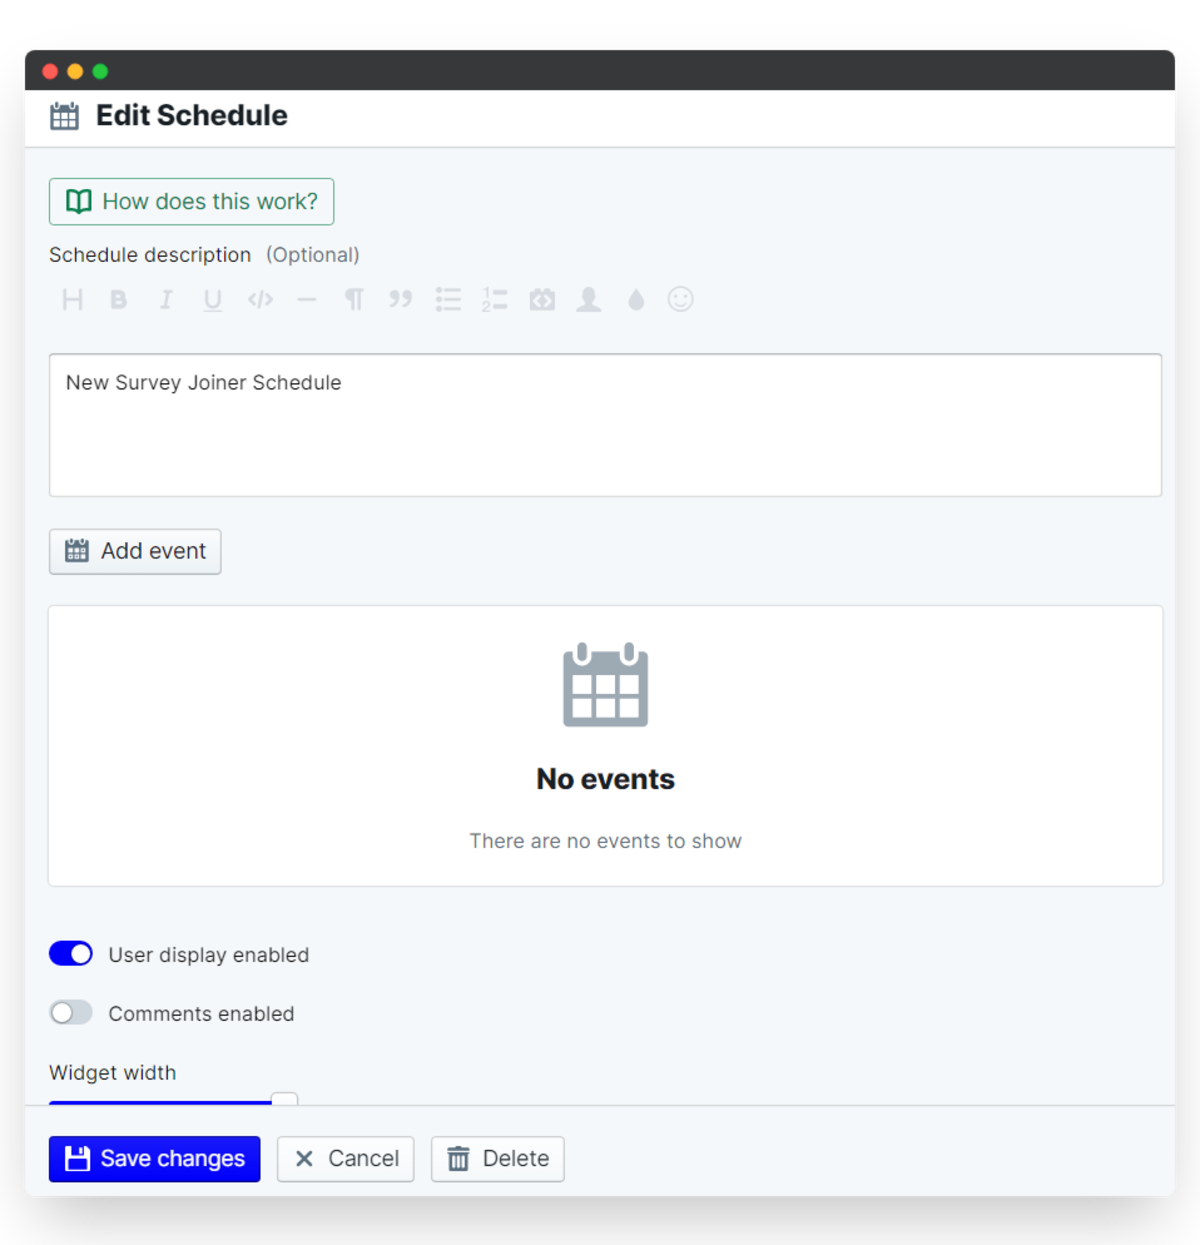
- Here you can enter information for the schedule description that can be displayed on the dashboard. Select the "Show on dashboard" toggle to enable this.
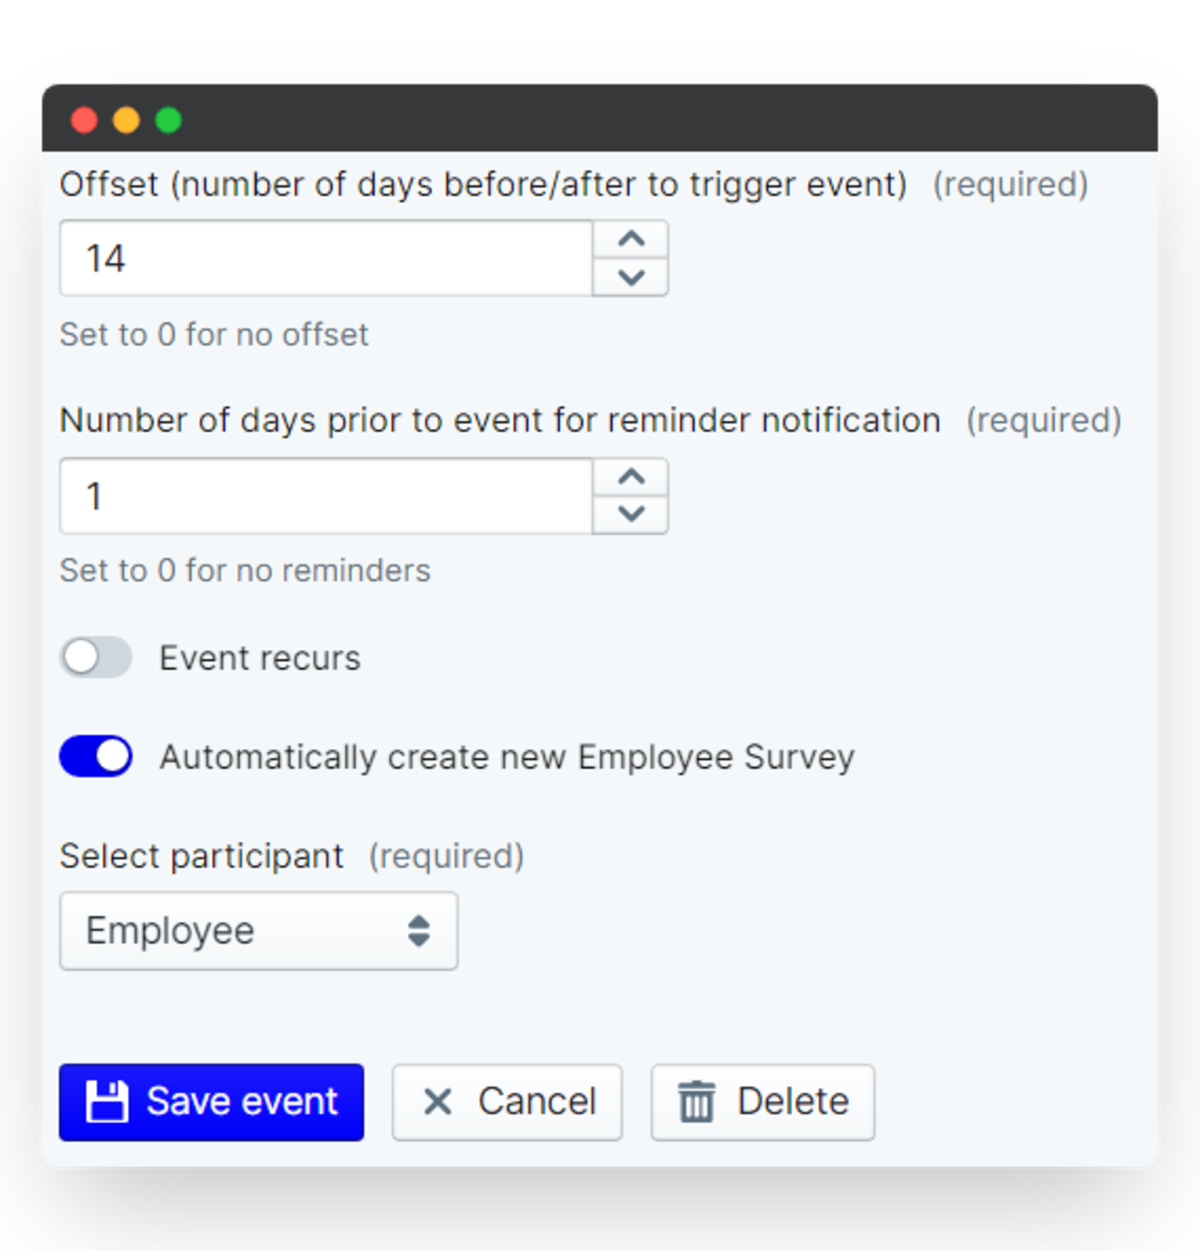
- Then click on Add event and write in the relevant information. Here you can set the date for the survey to be dispatched and you can also set a reminder notification.
- Or, select Date based on profile to schedule your survey based on the new hire's start date.
- Select your date element, and in the "Offset" field set how many days before/after the date field you want the survey to be created. For instance, if you want to run it 2 weeks after the employee has joined, type in 14.
- Here you can also select to have the survey automatically created for the employee, which will set up a draft survey and email them a link to complete it.
- Be sure to select Save changes before leaving each page!

Next steps: set up your custom New Joiner Survey analytics and reports
At PeopleGoal we recognize that every company has its unique way of working, with your specific metrics that are significant to your intentions towards analyzing your onboarding process. That's why we capture every single data point from your joiner surveys app in the Data table, to help you to build custom reports and automated charts. Head over to our Reports building article to learn how to create custom reports and analytics tracking.
Now you've got your New Joiner Surveys up and running (and hopefully your Onboarding Checklists, take some time to learn more about the other apps you can install from the App Store. We'd recommend installing the Engagement workspace to set up weekly pulse surveys, mood surveys or employee engagement surveys. All of which will enable you to monitor the employee experience of working in your company, beyond the initial stages of joining.
Don't have a PeopleGoal account yet? Book a demo to see our no-code HR workflow builder in action!


PeopleGoal Support Team
Account Management & Implementation Specialists


