
Support Center.
Get Started or Become a Pro. Browse our support articles to learn how to get the best out of PeopleGoal.
How to Create an Employee Onboarding Process
The employee onboarding process is crucial for any organization that wishes to establish a workforce that is engaged and therefore committed to the organization. One study suggests that 88% of companies experience high rates of employee turnover as a result of a poor onboarding process. At PeopleGoal, we provide you with the tools to ensure that each employee develops a full understanding of their role; preparing them to get stuck straight in with fulfilling their responsibilities.
In this tutorial, we will go through a step-by-step demonstration of how to create an employee onboarding process. We recognize that every organization has its own culture and are run with their unique set of ideals. Consequently, the onboarding process must be suitable to align new recruits with these concepts.
This article will provide an overview of the process that can be applied to either the Pre-Onboarding or Onboarding checklists.
Follow the steps below and you'll be able to install and create your own Employee Onboarding Process in next to no time:
1. Install your Employee Onboarding workspace
2. Customize your Employee Onboarding Checklists (optional)
3. Configure the Onboarding States (optional)
4. Manage your Onboarding Checklist participants
5. Set the Checklist permissions
6. Launch your Employee Onboarding process
Without further ado, let's begin!
1. Install your Employee Onboarding Workspace
- From your dashboard click Workspaces on the vertical menu on the left.
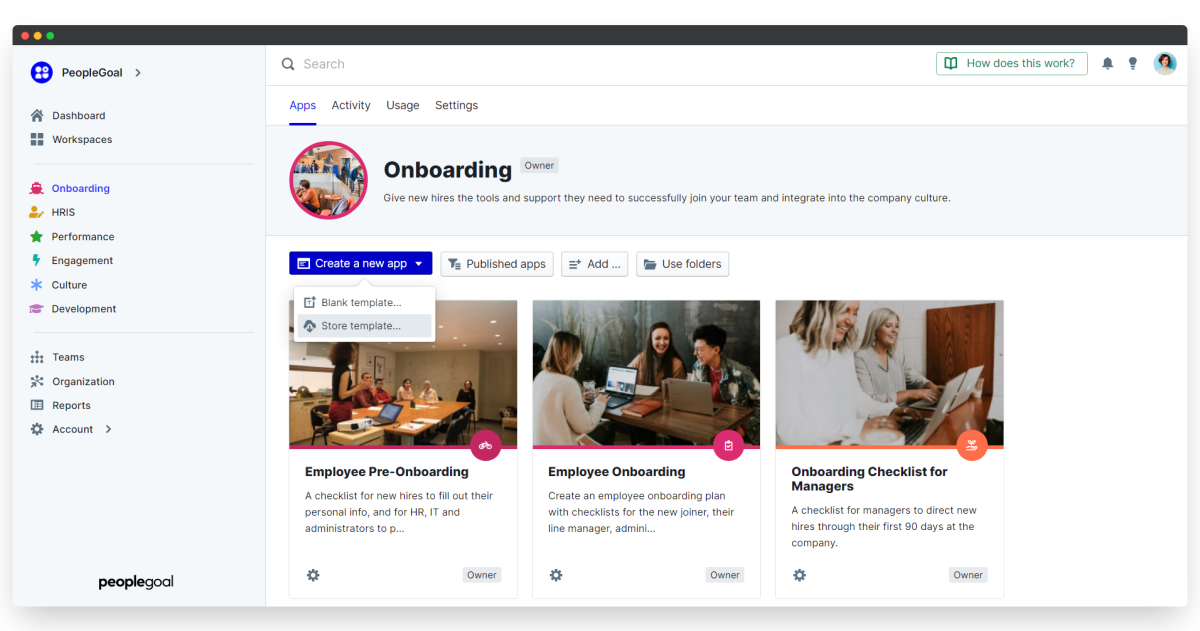
- From the workspaces page, click Create a new workspace.
- Select Store template.
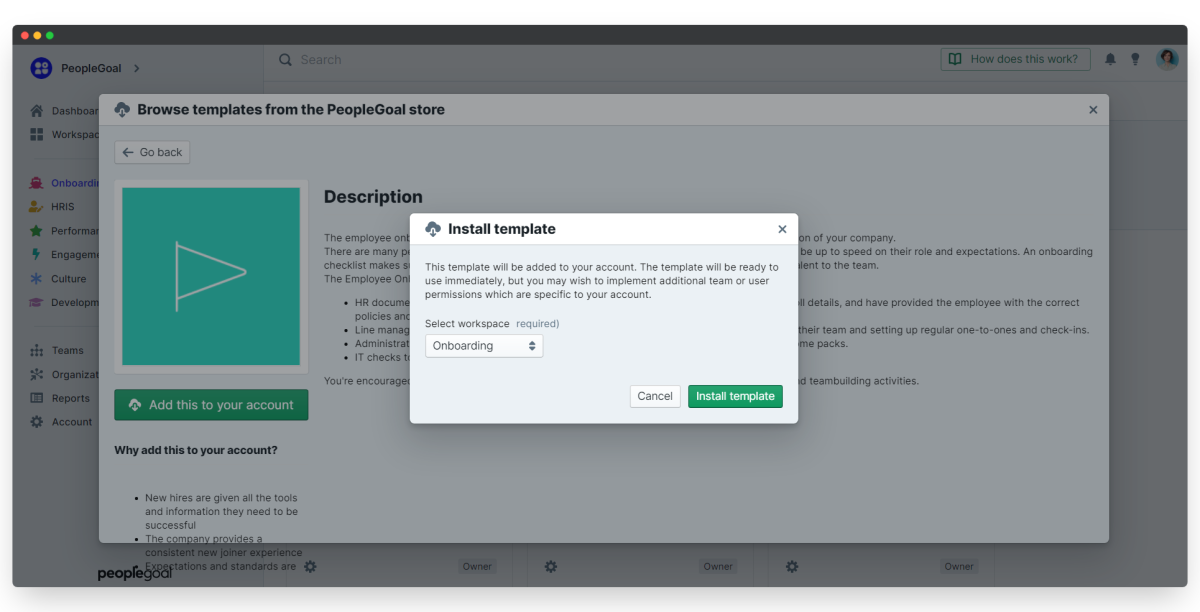
- Type in Onboarding and click Add this to your account. This will then add the Onboarding workspace to your account's Workspaces page, with the three onboarding apps ready to go.
After the workspace has installed, click the Onboarding tab in your Workspaces page. You are then able to go ahead and edit whichever of the three Onboarding apps you want to use.
On installation, all of the templates have already been set up with pre-built questions and states ready for use. If you don't require any further customization then skip ahead to step 4.
2. Customize your Onboarding Checklist(s)
- Should you wish to configure the Pre-Onboarding or Onboarding Checklist to add your own questions and states, select the relevant app to open.
- Click the Template menu tab, then Edit template.
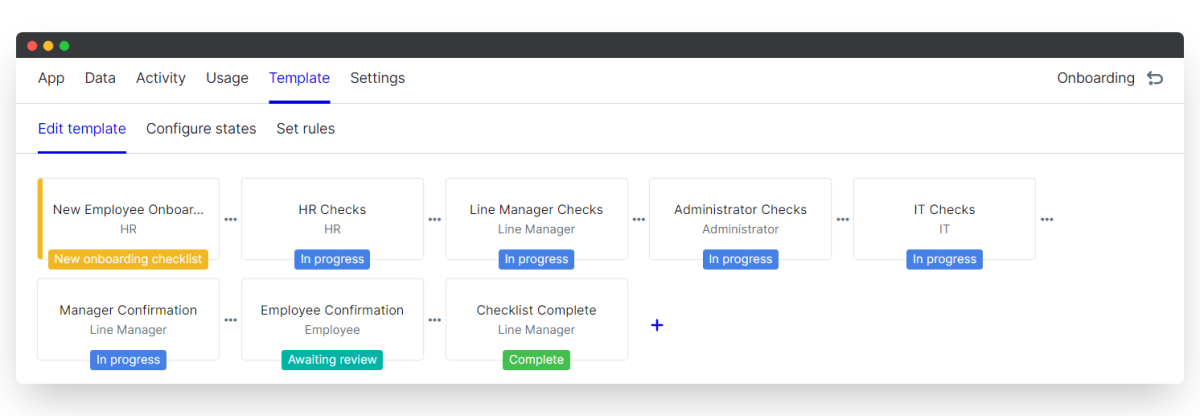
The template is currently set up with a series of states that will prompt the onboarding process along with the relevant participants to provide the needed information or checks for your new hire. For example, in the first state the employee is prompted to give some personal details such as name, email address, postal address and so on.
For each step in the process, you may want to review and edit the specific questions/checks to be made for the new employee. These instructions apply to each state in the process; it's completely up to you to determine which, if any, you wish to customize or reconfigure.
i. Edit existing elements
Elements are individual form fields that allow you to prompt the user to give specific information. You have the ability to change each element to suit your unique process and company needs.
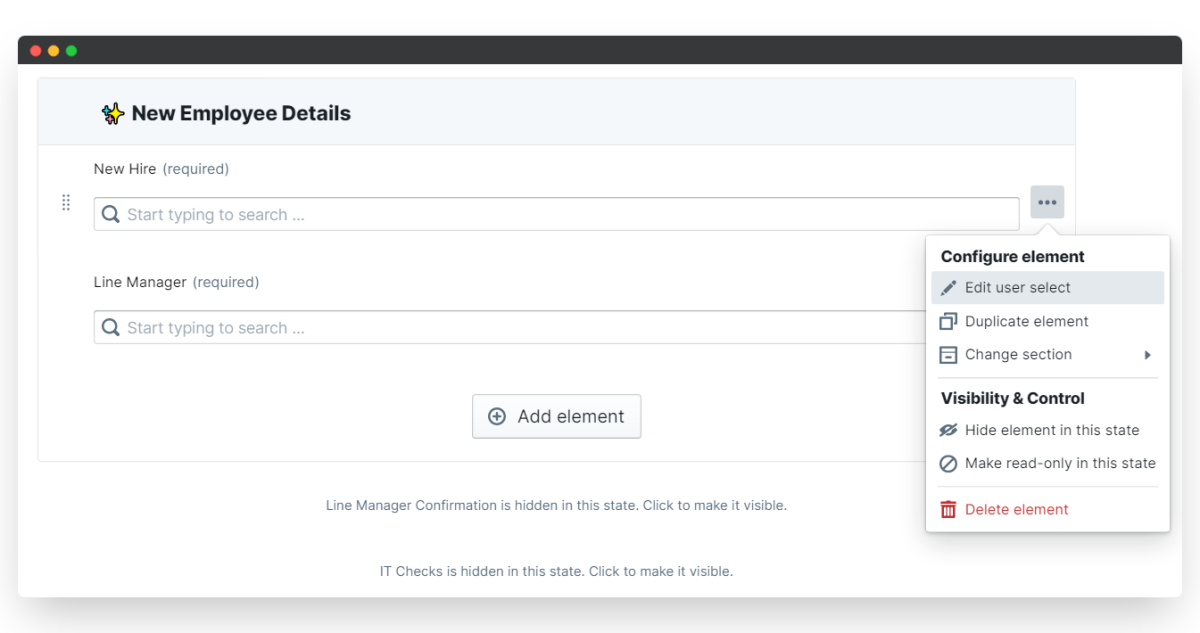
- To change a field, hover over the right-hand side of the element and click on the three dots that appear.
- Below Configure element, click Edit text input (your element will have a name such as "Text input", "Multiline", "File upload" etc). This will open up the element editor.
- Customize the element however you like. You can alter the instructions, placeholder text, number of rows available and even the length of responses. Here you also have the ability to toggle whether employees are required to give a response or not.
- Be sure that after making all of your changes to select Save changes to update the element.
In this example, the company has offices based in multiple countries so we are changing the "Employee: Postal Address" element to have include an extra line for this information. The checklist can be completely reconfigured to include any information that is relevant to your organization.
Note that any changes made are only applied to that specific element. This means that if you change the size of the respondent's text area, this will not affect other elements. If you want the altered text area to be set across multiple elements, there is an option to duplicate an element once you've got it set to how you want it.
ii. Duplicate elements
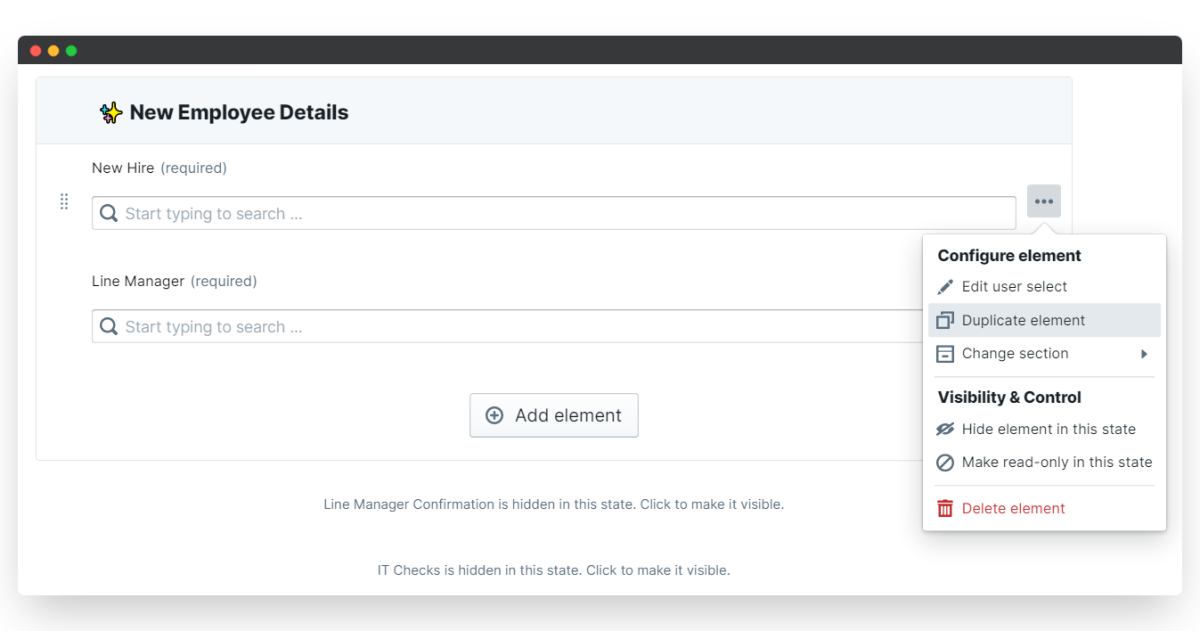
- Hover over the right-hand side of the element and click on the three dots that appear.
- Select Duplicate element and an exact copy will be created below.
- Edit the duplicated element to change the relevant text.
iii. Reorder elements and sections
- Reordering is very straightforward - simply click and drag to change the element or section order.
- Hover over the left-hand side of the element (or section title) to click and drag your element or section to its new location.
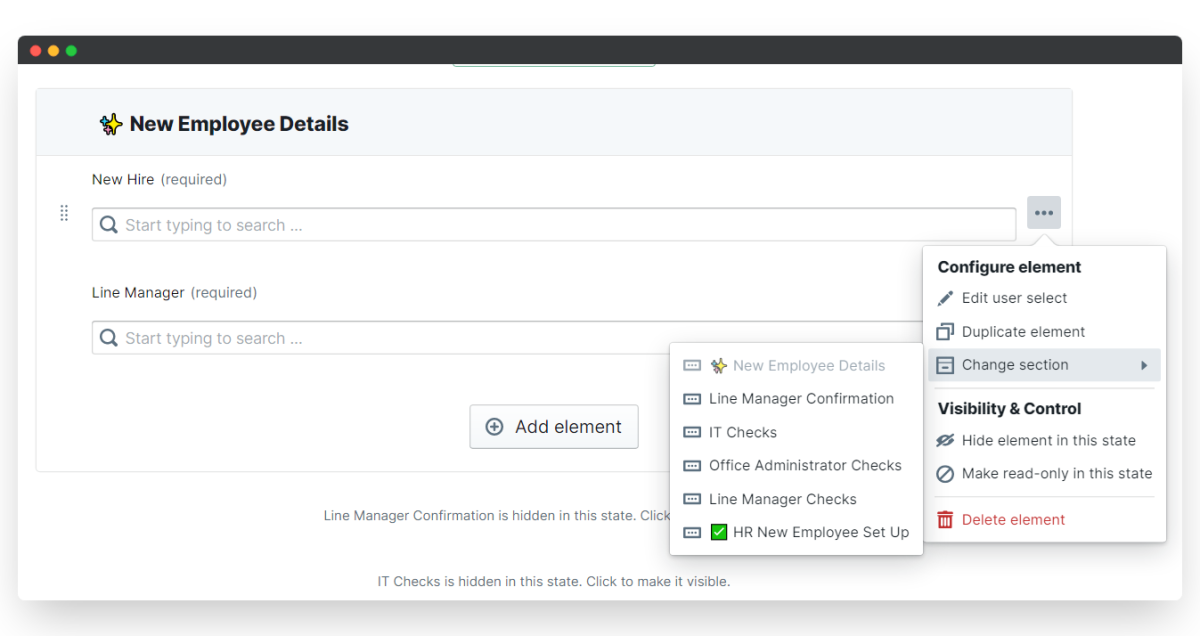
- To move an element to a different section, hover over the right-hand side and click the three dots that appear.
- Select Change section and choose the new section you want the element to belong to.
iv. Create new elements and sections
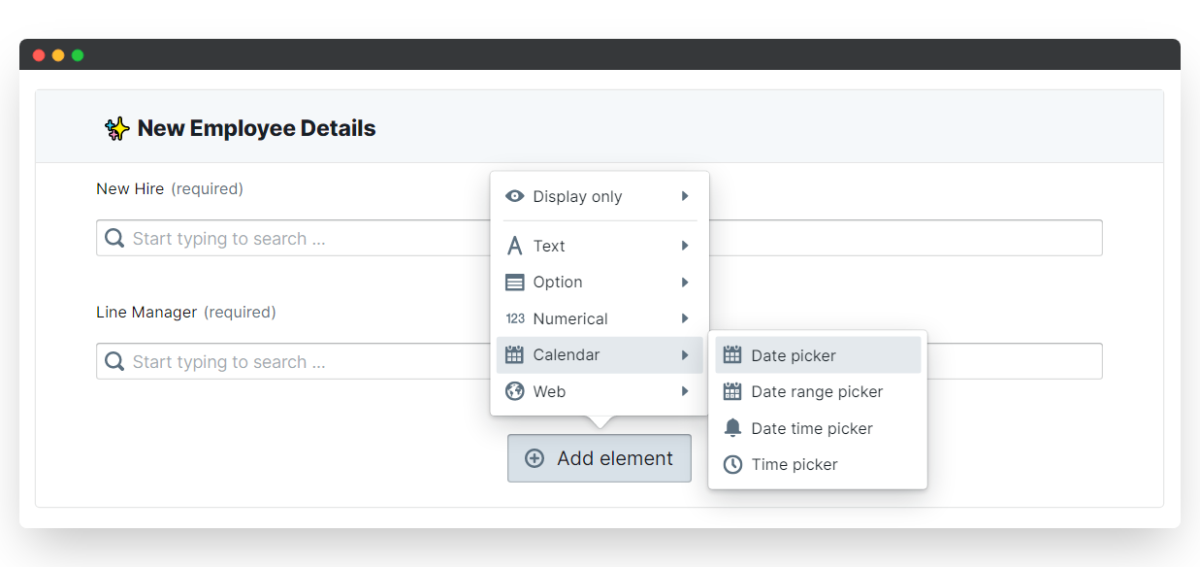
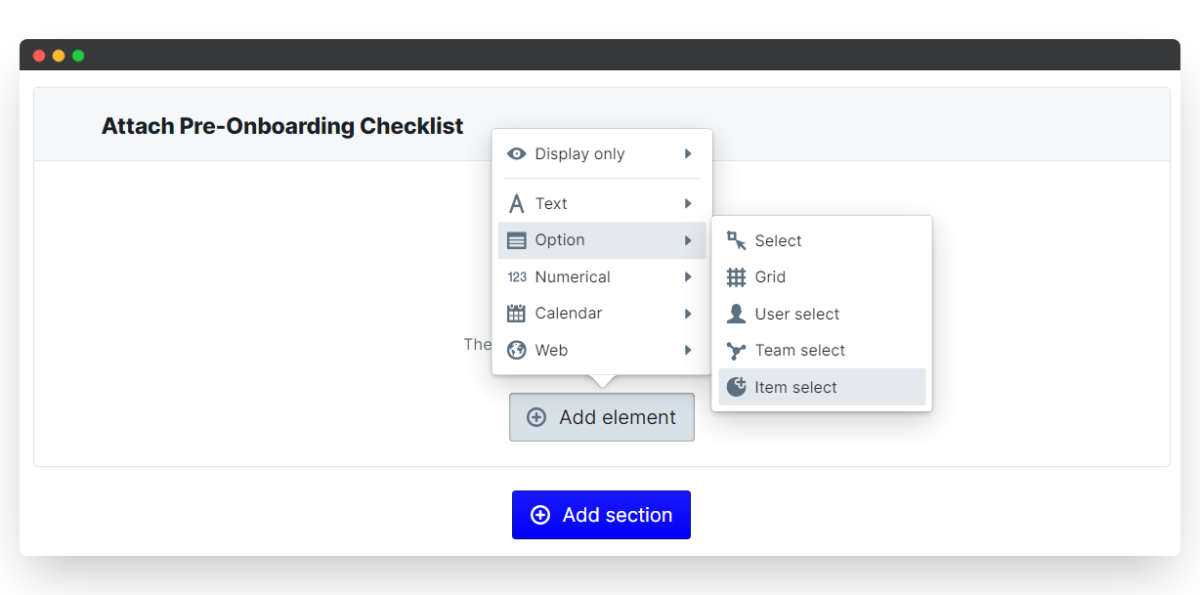
- At the bottom of each section, click Add element and select the element type you want to insert.
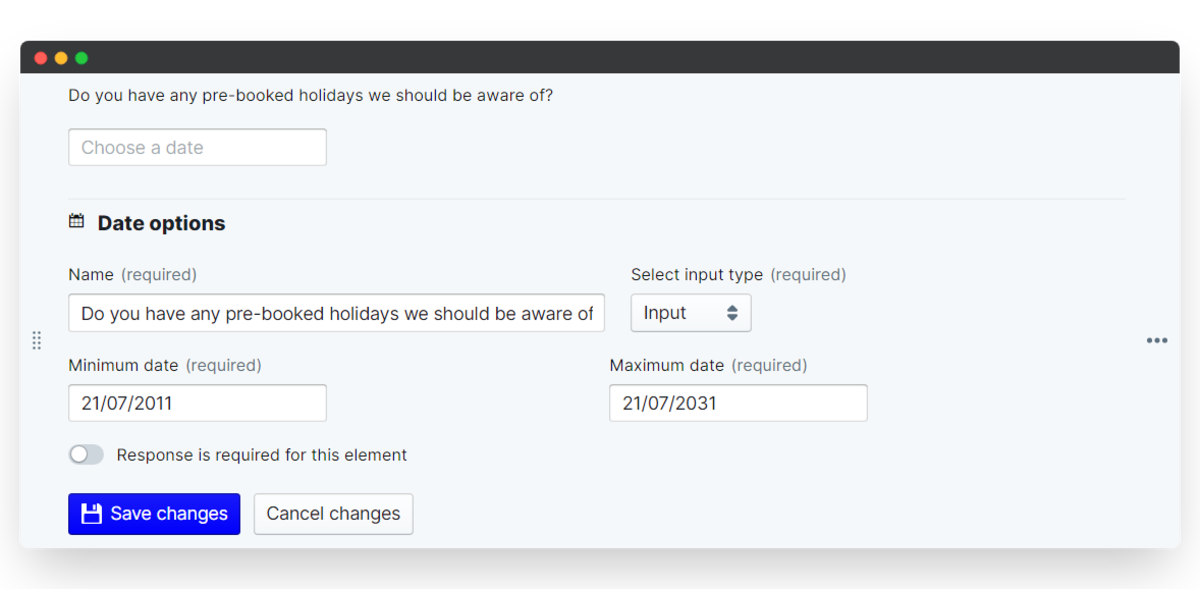
A new element that might be useful to add is a Date range picker in Calendar. You could use this to determine if a new employee has any pre-booked holidays or periods of absence that would affect their onboarding.
- To add a new section, scroll to the very bottom of your template form and click Add section.
- Then click and drag your new section to where you want it to sit in the checklist flow.
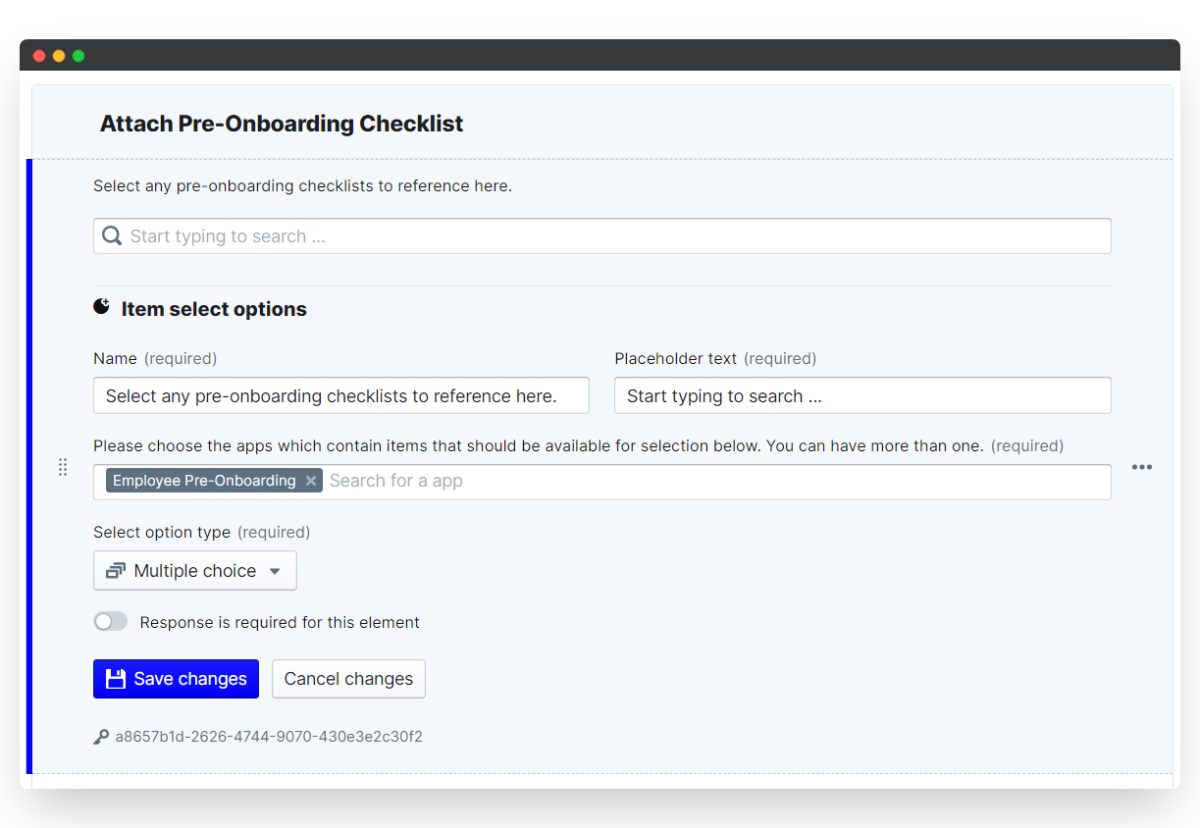
This example demonstrates how you might create a new section to reference a Pre-Onboarding Checklist within the Onboarding Checklist app. After creating the new section, we select Option and click Item select. We change the name of the section to inform users that they can link the two checklists for later reference. This section has been set to optional, as it may not always be necessary to include. This tool is useful if there is information from another app that can be incorporated into the Checklist, particularly as it saves having to fill out the same information twice.
3. Configure the Onboarding States
Within your onboarding process you will likely have a variety of managers or individuals who are required to participate in making checks. This is where the use of states provides the steps in your onboarding workflow. Each state has its own participant and these enable the onboarding process to develop.
The states set in the pre-built template require input from pre-determined individuals. Each state's participant will be prompted to input their specific information. There are then confirmation states to ensure that the necessary information reaches the correct participant.
You can add as many states as you like to your onboarding workflow, enabling each stakeholder to participate and allowing you to create a complex process with ease. Additionally, it is possible to control the visibility of sections (and individual elements) in every state. These can be set to read-only, editable or hidden for the selected state participant.
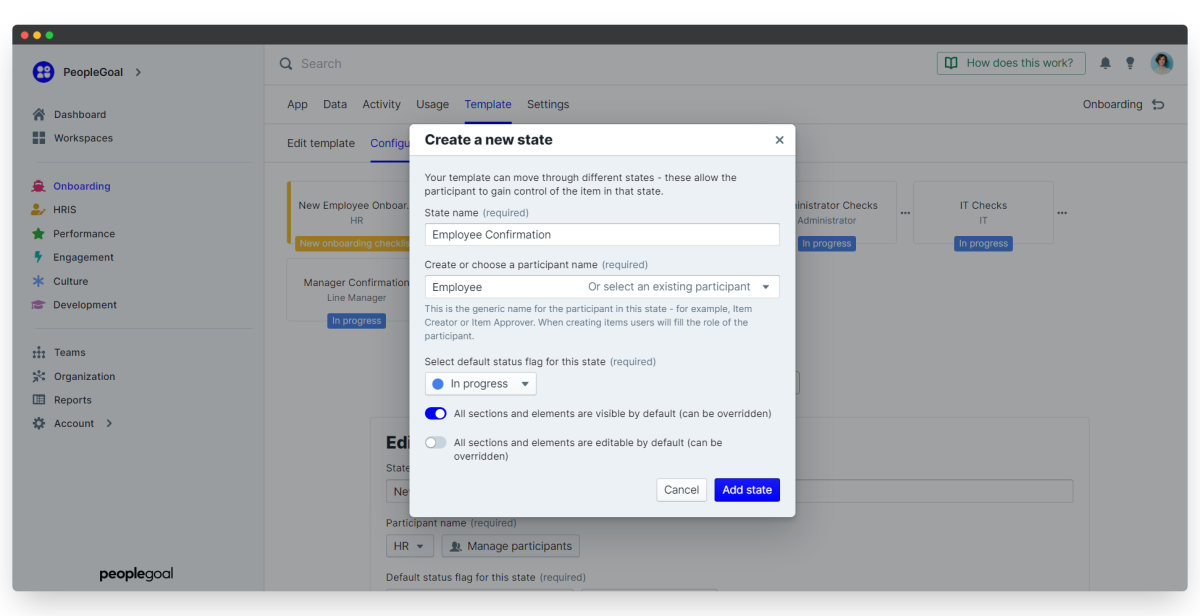
i. Add a new state
- From the Edit template page, click the + to create a new state.
- Type in your state name, define the participant role and choose a status flag.
- Toggle on/off whether sections are visible or editable by default (this can be changed at a later point if necessary).
- Click and drag your state to reorder your workflow and you have successfully added a new state!
When onboarding a new employee it is important to maintain an open channel of communication with them. This way, they have the best opportunity to understand what is going to be expected of them in their role. Furthermore, it should make them feel valued and well-considered by peers and colleagues.
For this reason in the example, you can see how we have added a new Employee Confirmation state in the Employee Onboarding template. This will fit in as the penultimate state in the workflow, providing the employee with read-only access and therefore greater clarity on the checks made by each department in the process of onboarding them.
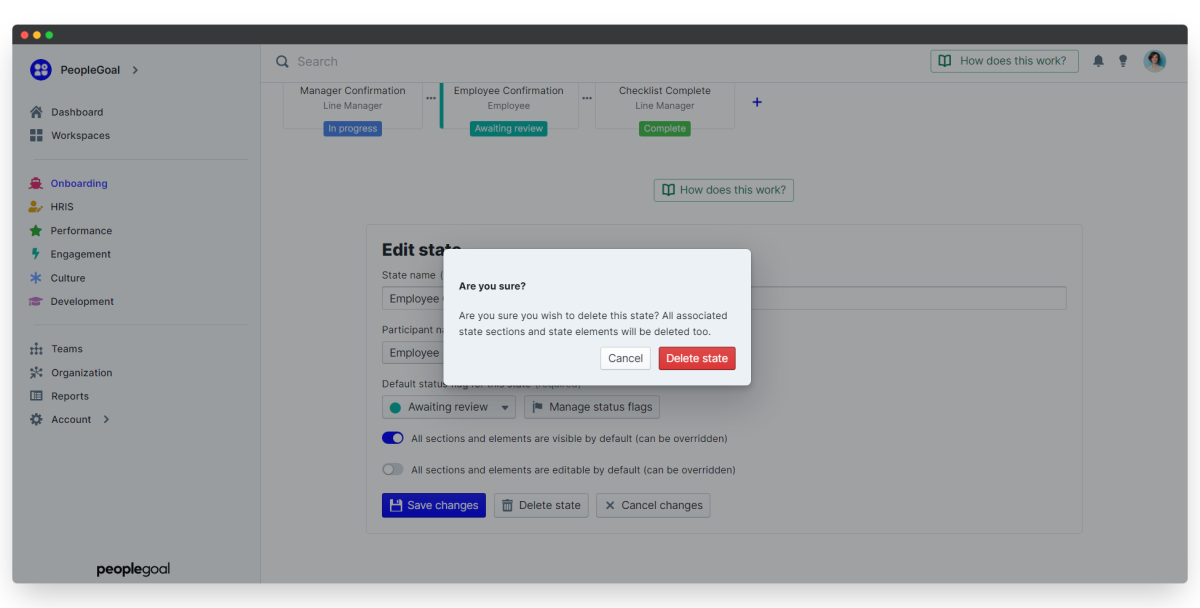
ii. Delete a state
- To remove any states that you do not need to use, click the Template tab and select Configure states.
- Select the state you wish to delete and a blue highlight bar will appear, confirming which state you have selected.
- Click Delete state to remove it.
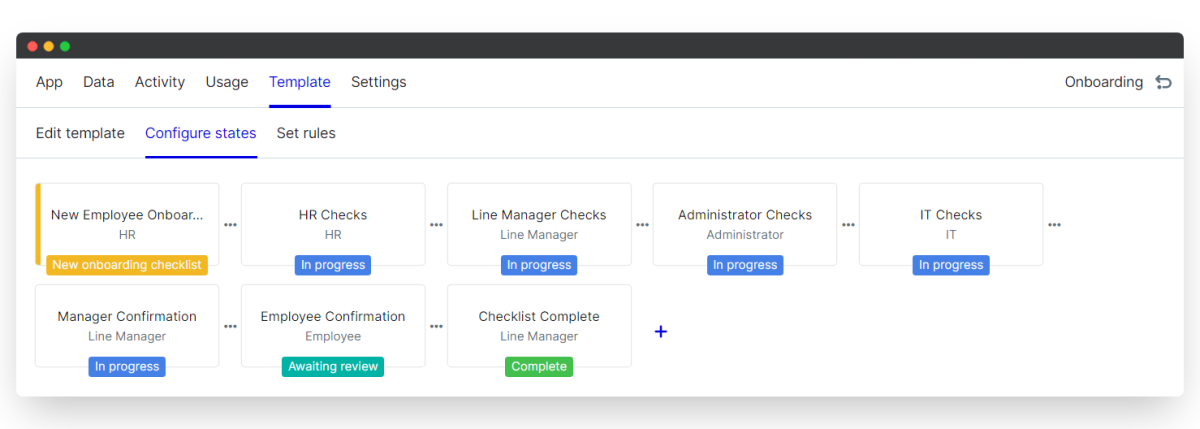
In this example, our team has moved to working completely remotely and so there is no longer a need for the office administrator checks. Some responsibilities may be delegated to HR or the line manager but as you can see the Administrator Checks State is no longer required in the workflow and so can be deleted. We'll also delete the Administrator Checks section in the template as those questions no longer need to be answered.
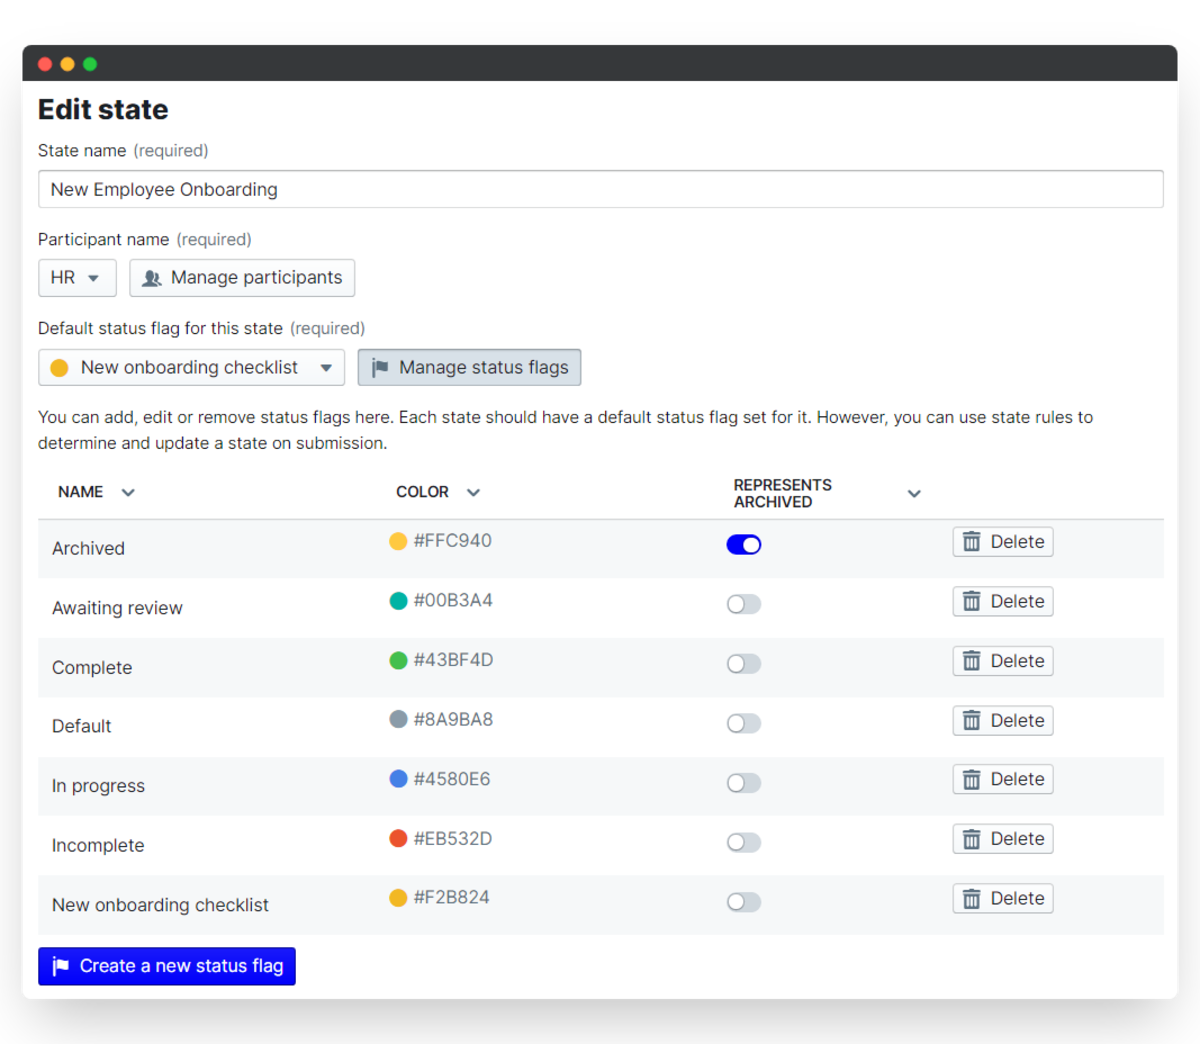
iii. Customize your status flags
Each state has a default status flag which indicates to participants what stage of the process their item is in. Your Onboarding apps are pre-built with default status flags, which you can alter.
- From the Configure states menu, click on Manage status flags
- Click a flag title to rename it and click the color picker to choose a new flag color.
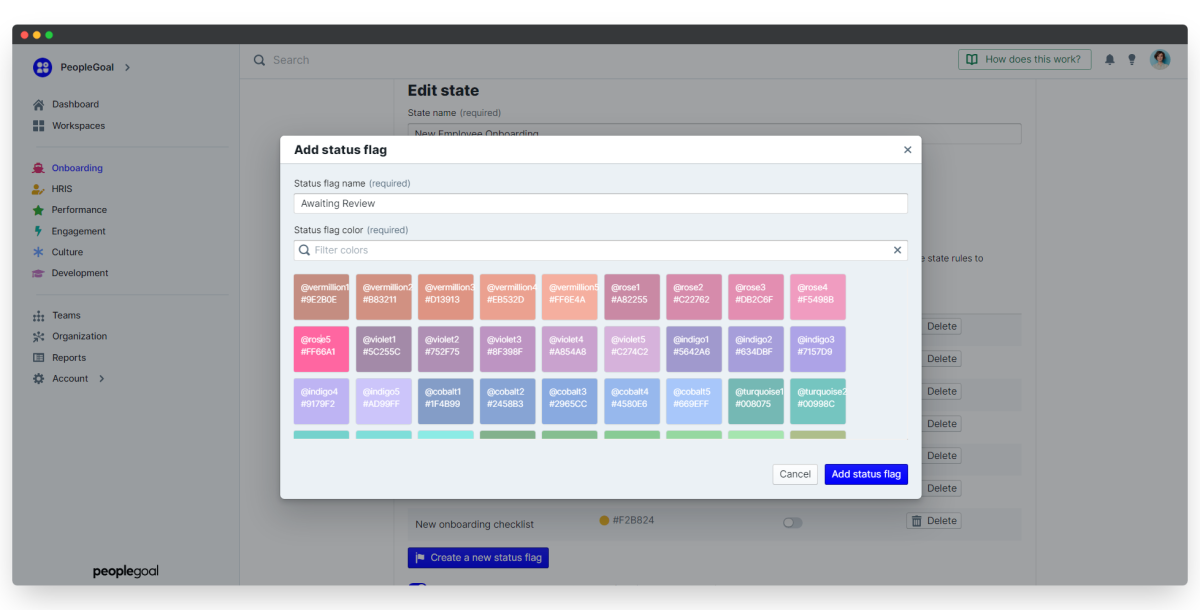
- Click Create a new status flag to add an additional flag.
- Select the state that want to assign a flag, choose which flag to give it and click Save changes to update.
In the example, we have added a new flag "Awaiting review" that can be applied to the later confirmation states in the Onboarding App. With this new status flag, the employee and all others involved in the process will be made aware that the checklist is almost complete. It's also advisable to delete status flags that are unused so that they don't clutter up your item filter once you start onboarding employees.
4. Manage your Onboarding Checklist participants
Within each onboarding process there will be a whole host of participants involved to make the relevant checks or provide information. The Onboarding Apps allow you to manage precisely which participants you intend to include in your workflow. Depending on which department or team your new recruit is joining will determine which managers or individuals are required to participate in the checks.
It is possible to automate this process through your account's Relationships. This is particularly helpful to automatically populate an employee's line manager or hiring manager in the onboarding workflow. If you have individuals from HR, IT and Admin who will routinely take on responsibility for onboarding employees, you can also assign them as default users. Setting up your participants beforehand means that when an employee's checklist is opened, all of the people who need to be involved in the workflow are automatically assigned.
i. Set default relationships and users
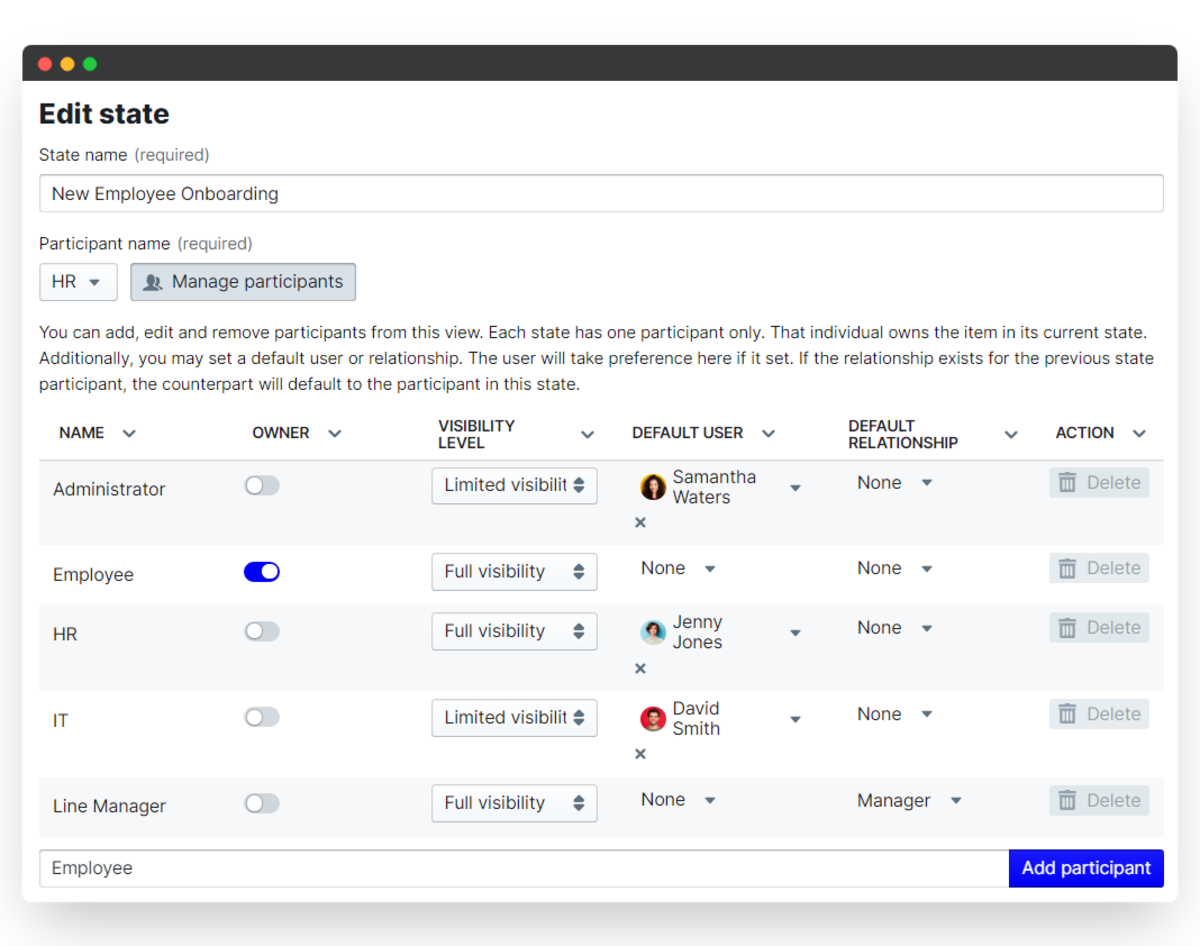
- Open up the Configure states menu and select Manage participants.
- If applicable, for each participant that is routinely involved in a particular state in the Onboarding Checklist, set a Default user or Default relationship to automate the checklist workflow.
- You can also edit the the name for participants to suit your own company language.
In this example, we assign the default user for the Administrator and IT Checks to the relevant employees. We also alter the default relationship of the Line Manager to be Manager.
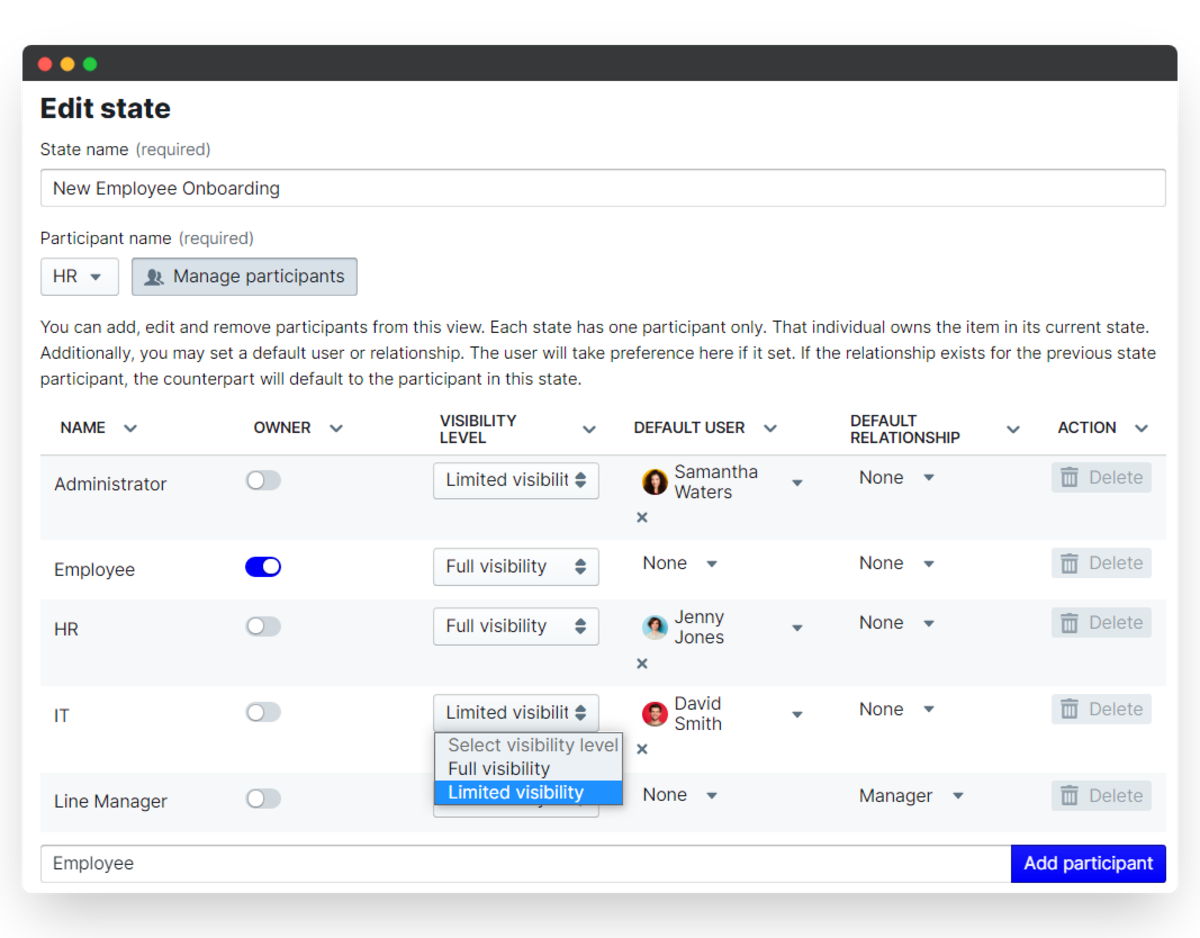
ii. Define the participant's visibility
Typically only certain individuals involved in the process of onboarding need to be able to see each step. This is why the template is set up as default - with only particular participants (new employee, hiring manager, line manager) set to Full visibility.
The onboarding employee can edit the boxes relevant to them, then after the manager or other individuals have commented on the employee's checklist they can see a summary of the whole process.
Likewise, the Line Manager can see all of the comments made by the employee without being able to edit them. They then have access to the specific text area to make their comments in response.
As the checklist may contain sensitive information, those who do not need to see this are prevented from doing so. By setting Limited visibility under "Visibility level" for the necessary participants, we are able to protect this information.
Click Save changes to confirm your updates.
5. Set the Onboarding Checklist permissions
Permissions control access to your app within your PeopleGoal team. Different levels of access will determine to what extent users can create/ edit checklists.
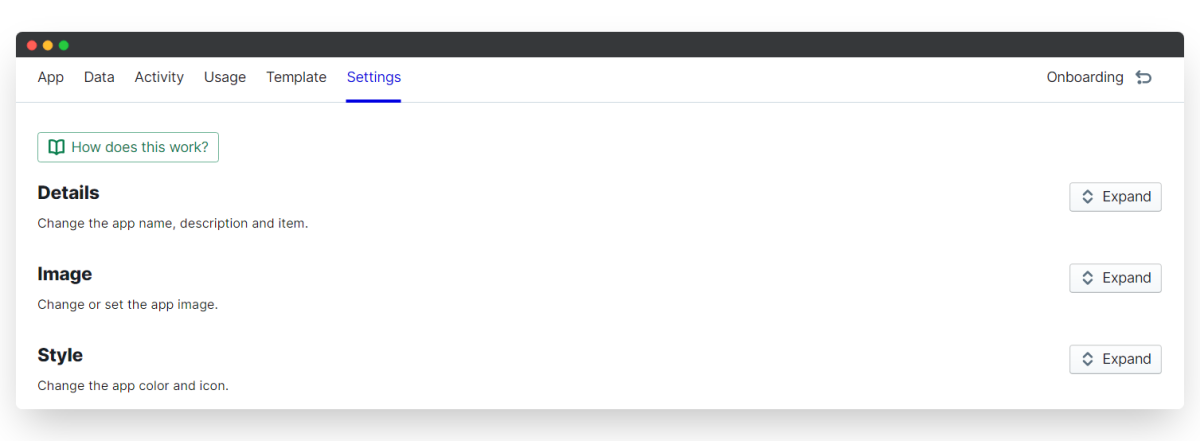
- Set your permission by clicking on the Settings menu.
- Expand the Permissions section.
- Click on Explain permission types to understand the access that each permission gives your account users.
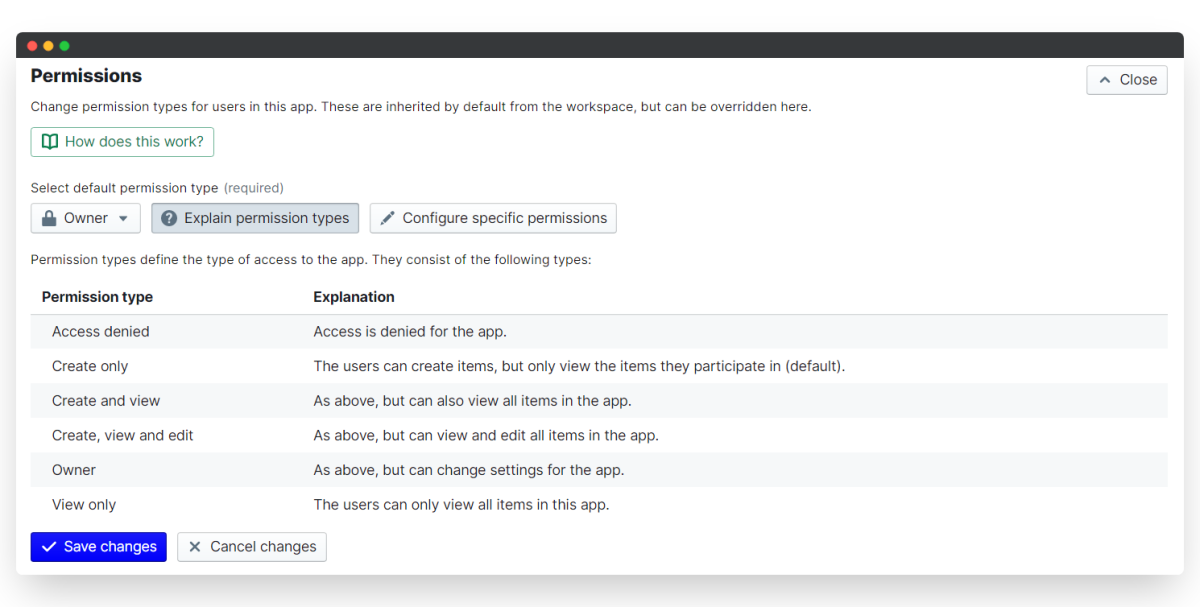
i. App-wide permissions
For Onboarding Checklists, we'd recommend that you set the permission to Access Denied. This means that account-wide, users can't access the Onboarding workspace. We'll then set up specific team and user permissions so that only new joiners can access the onboarding apps.
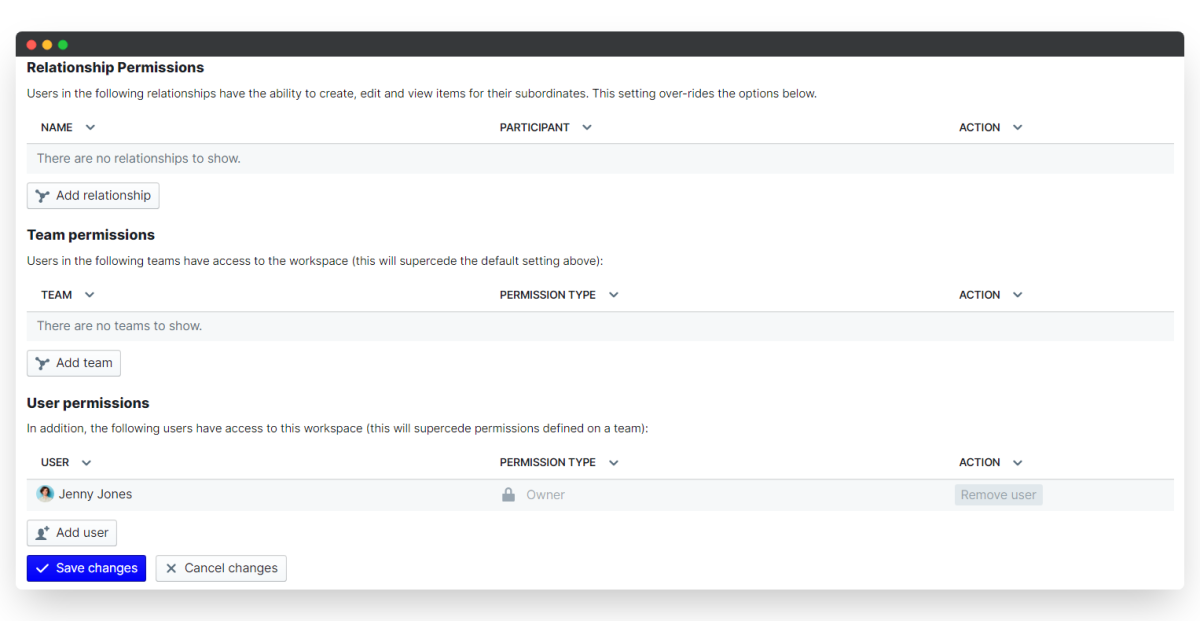
ii. Specific user permissions
The user who installed the Onboarding app template has Owner permission by default. Any specific team and user permissions then replace the default permission type.
- Assign specific permissions by selecting Configure specific permissions.
- Under "User permissions" click Add user.
- Type your colleague's name to add them to the permission list. In the "Permission type" column, select which permission level to give them.
iii. Specific team permissions
- Under "Team permissions", select your New Joiner team (you should Create this team ahead of time).
- In the "Permissions type" column, select the Create only permission.
You can then simply add new hires to the New Joiners team for as long as they need to complete Onboarding, and remove them from the team when their onboarding process is complete.
6. Launch your Onboarding Process!
Nice one! With all of your questions, participants and permissions in order, you're all set to start your onboarding process.
Note that in starting any onboarding process, if you do not have automated participants then you will need to open the new checklist and select the relevant managers/state participants. Learn how to do this in part i. below.
i. Start a new onboarding process
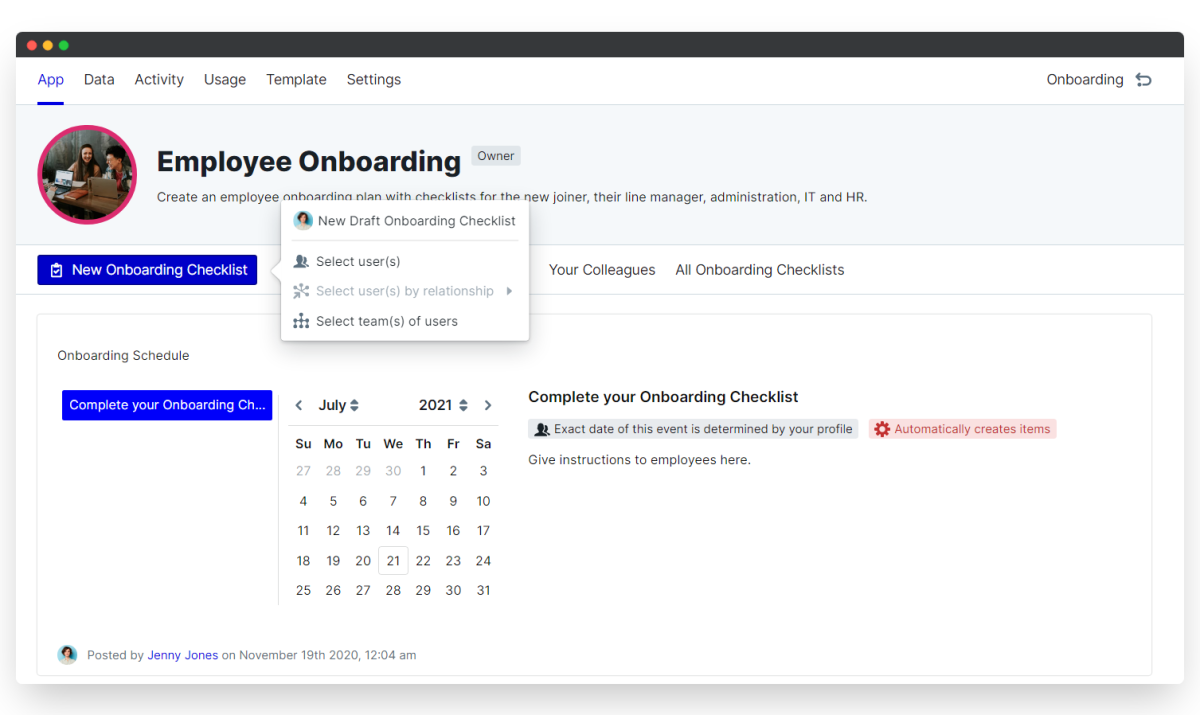
- To start a new onboarding process, click on either Employee Pre-onboarding or Employee Onboarding and then select New Pre-/Onboarding Checklist.
- Click Select user(s) and search for the name of the new recruit.
- If you have set up an automated process then your employees will be able to get started with the process right away.
- Alternatively, if your process has not been automated then you will need to open the new checklist and select the relevant people for each state. See the example below, where we manually allocate each state to the necessary employee.
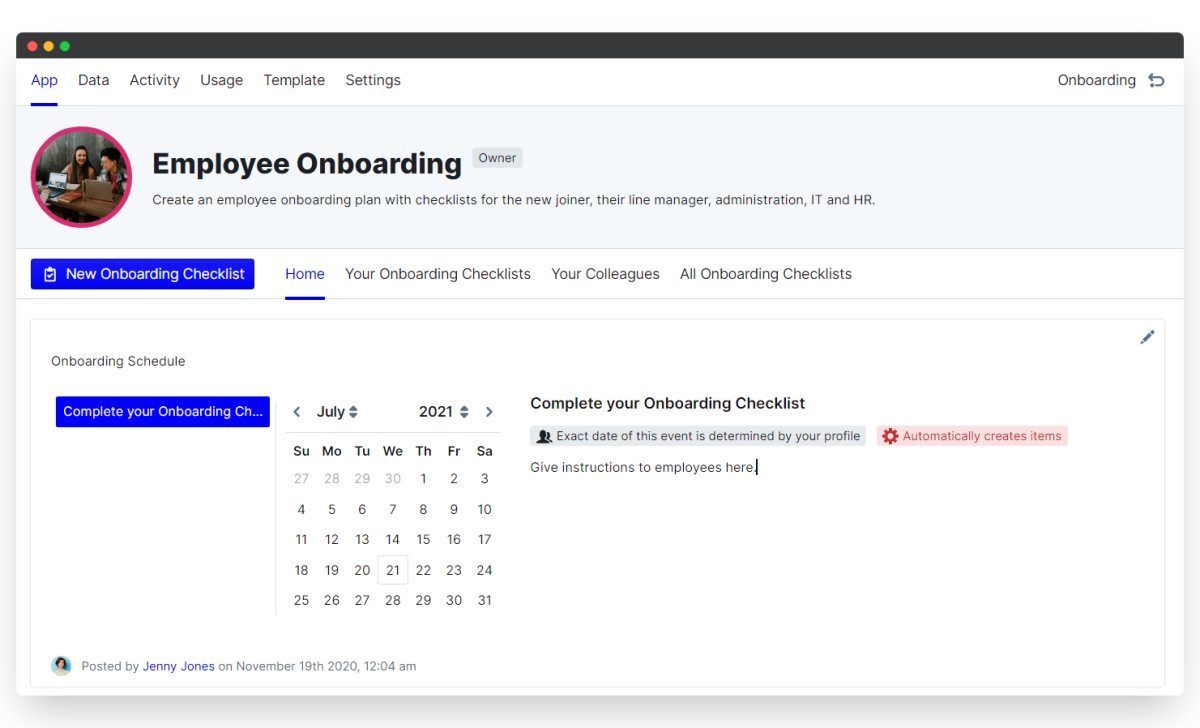
ii. Schedule an onboarding process
Scheduling an onboarding process in advance of an individual joining can be useful to ensure that all the necessary measures have been correctly put in place.
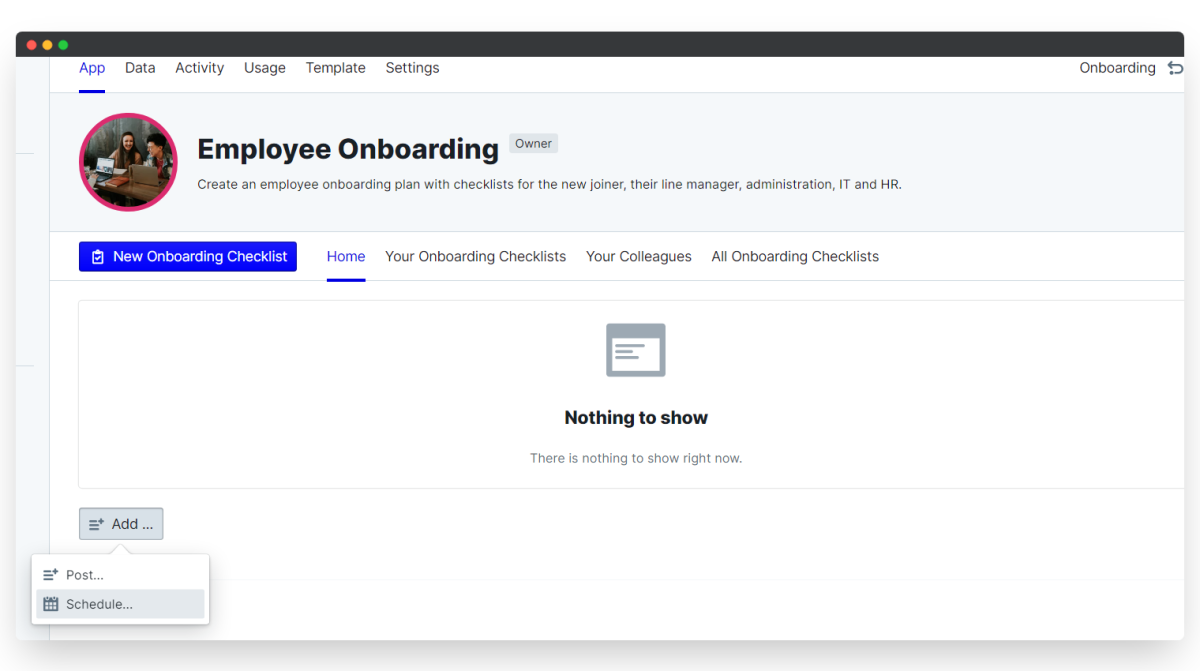
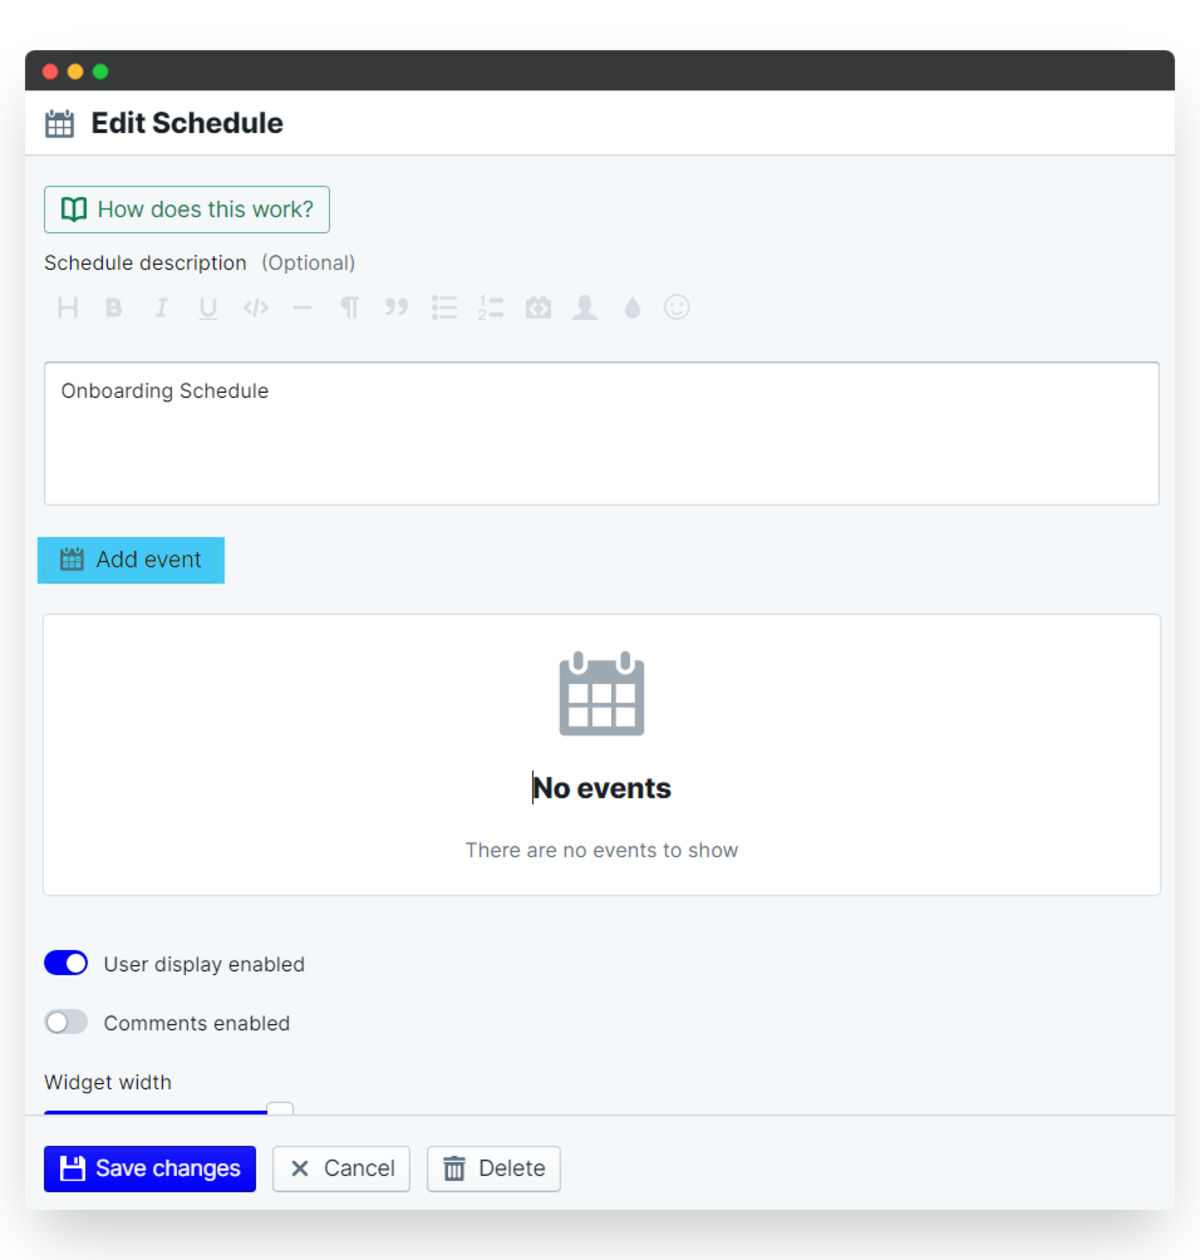
- From the app homepage, select Add..., then click Schedule.... This will create a content box above the New Employee Pre-/Onboarding Checklist button.
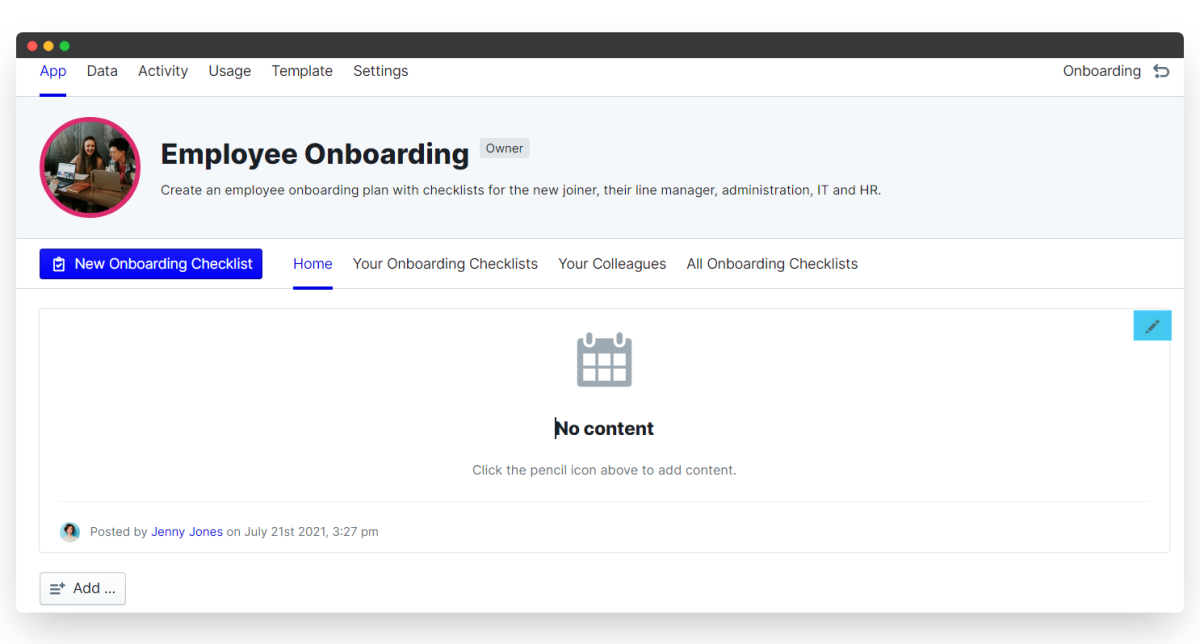
- Hover over the right side of the box and click on the pencil icon.
- Here you can enter information for the schedule description that can be displayed on the dashboard. Select the "Show on dashboard" toggle to enable this.
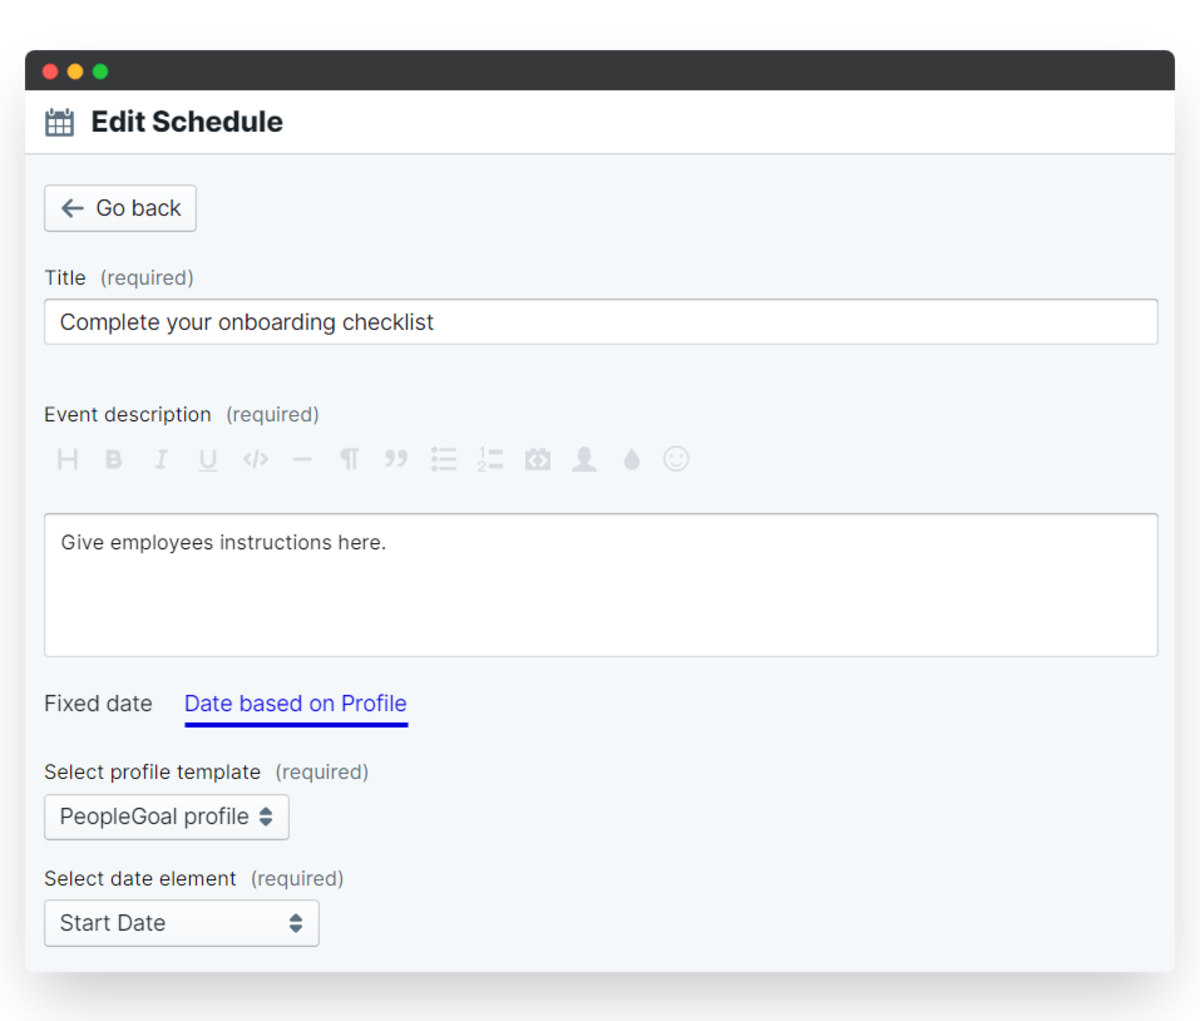
- Then click on Add event and write in the relevant information. Here you can set the date for the Checklist to be dispatched and you can also set a reminder notification.
- You may also want to establish an offset date for a scheduled onboarding process. This can be done by typing in a negative figure into the Offset box. As seen in the example, -7 would set an offset date for a week ahead of an employee officially joining your organization. This is useful if you know when an employee is due to start but you need them to complete the Pre-Onboarding Checklist before they have begun.
- Be sure to select Save changes before leaving each page.

Next steps: Establish feedback from new recruits with a new joiner survey
Launching your onboarding process is not the end of the line. Onboarding is something that you should look to continually develop and improve as your company grows. By gathering and recording the experiences of those who have gone through the onboarding process you will be able to construct a fuller understanding of how informative your process is. A New Joiner Survey will enable you to collect feedback that will be beneficial for both new employees and your company.
From this feedback, you can then learn and improve your process to ensure that new recruits get all the necessary information and have the best experience possible when onboarding. This is crucial for maintaining higher rates of employee retention, as employees who experience a poor onboarding process are far more likely to be disengaged by their work.
So there we have it, you should now be able to go ahead and launch your onboarding process with ease. Having completed this, we recommend taking a look at our other workspaces to really drive better employee performance, engagement and more. We'd recommend installing the Engagement workspace to set up weekly pulse surveys, mood surveys or employee engagement surveys. All of which will enable you to monitor the employee experience of working in your company, beyond the initial stages of joining. You'll find all of these and more in our App Store.
Don't have a PeopleGoal account yet? Book a demo to see our no-code HR workflow builder in action!


PeopleGoal Support Team
Account Management & Implementation Specialists


