
Support Center.
Get Started or Become a Pro. Browse our support articles to learn how to get the best out of PeopleGoal.
Calendar Elements
The calendar elements allow the user to input a specific date, date range, date time or just a time. These are particularly useful when scheduling one-on-one meetings or check-ins with your manager, and for specifying by which date you aim to achieve a certain task or objective. Having a date/time picker, as opposed to inputing the information numerically, is more user-friendly, and a great way to visualize the information.
What's more, you can set rules within PeopleGoal that trigger calendar invitations via email to users based on the date/time inputted into the form. This really useful feature will align user's calendars with the PeopleGoal apps. This is covered at the end of this section.
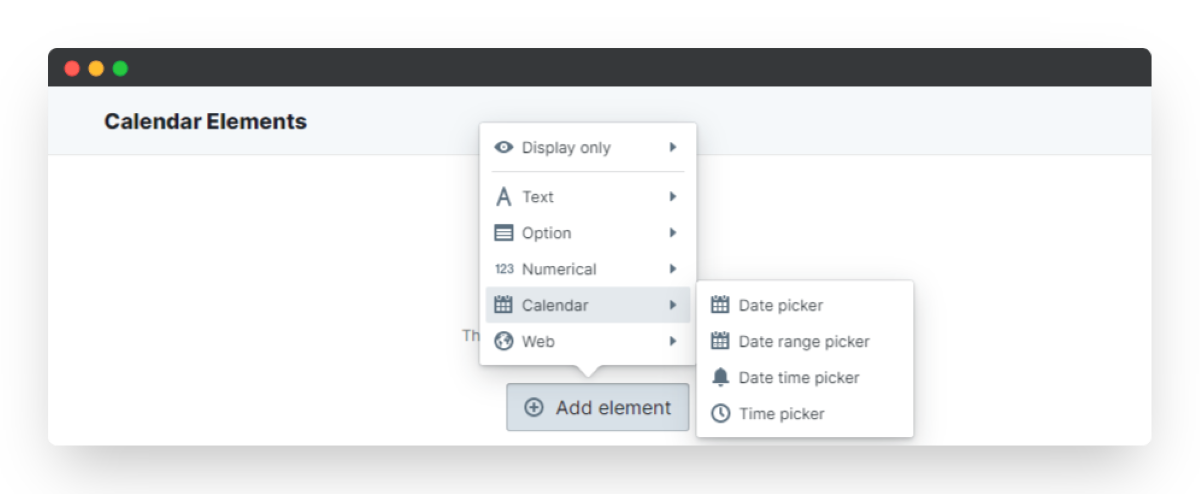
The calendar elements available are:
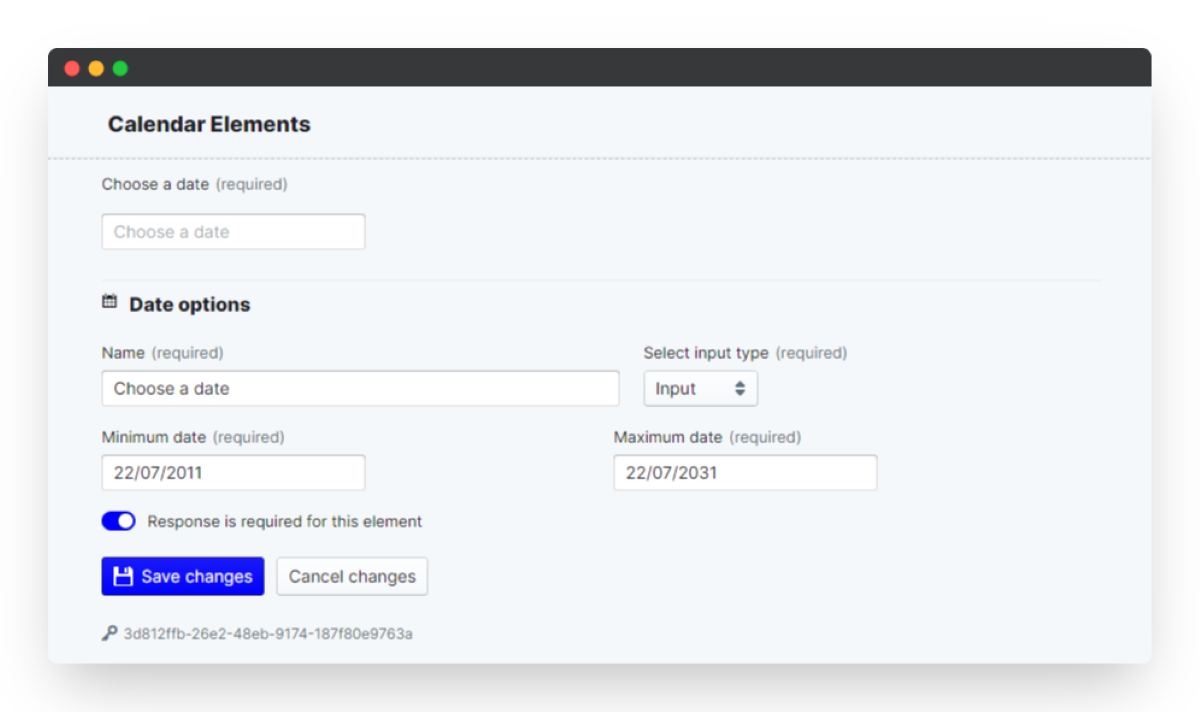
Date picker
The date picker element allows the user to input a date into the form. There are two ways this can be displayed, either as an Input which will look like a typical response field but will expand to a calendar when you click it, or as a Calendar which will take the appearance of a calendar from the outset. Both function in exactly the same way - it just depends on how you want to form to look.
You must also set a minimum and maximum date that the form covers. It is advisable to set the date range for a long period of time, to avoid problems with users inputing data. However, you can adjust this according to your needs.
Goal setting
Date pickers are really useful when setting objectives or goals as they allow users to set a date by which the aim to achieve the objective. They can then measure their progress towards their objective based on how long they have left to complete it. They can be used during goal-setting, development plans or even performance reviews - depending on how you run your process.
Check-ins
Another great way to use the date picker is when setting up one-to-one meetings or check-ins. Use the calendar option to allow users to select a date they want to meet with their employee or manager. We can then set up a state rule which will send a custom email to participants and add the event to their calendar. How to do this is covered further on in this article.
Date range picker
The date range picker is similar to the date picker, the difference being is that the user selects a time period rather than a specific date. This is particularly useful when assessment performance over a period of time, for example in a performance review. The functionality of the element is exactly the same as the date picker element. Name the element, select the input type (Input or Calendar), set a minimum and maximum date.
Performance Reviews
The date rage picker element is particularly useful when setting up a performance review or appraisal form. The user is able to select the period of time that the performance review covers. You can give some guidelines using display only elements to instruct the user on the performance review cycle dates.
Date time picker
The date time picker functions in a very similar way to the date picker, with an additional option to choose a time. This will allow users to request a fixed meeting with the direct report or supervisor. This is a great way to make sure face-to-face conversations are happening alongside your online processes.
Check-ins
A great way to use the date picker is when setting up one-to-one meetings or check-ins. Use the calendar option to allow users to select a date and time they want to meet with their employee or manager. We can then set up a state rule which will send a custom email to participants and add the event to their calendar. How to do this is covered further on in this article.
Time picker
The time picker is an element that allows the user to input a specific time. This could be useful if they want to request a meeting with a direct report or supervisor on a predefined day. For example, if all monthly or bi-annual check-ins are on a fixed day, the user will only have to request a time slot.
One on ones
Use the time picker to request a specific time for a one-on-one meeting with your direct report or supervisor. We can then set up a state rule which will send a custom email to participants and add the event to their calendar. How to do this is covered further on in this article.
Trigger a calendar invitation from a calendar element
You can send out a calendar attachment with your notification by creating a new state rule. To do this:
- Click the Templates tab of your app, then select Set rules.
- Click the state icon in the workflow visual to set it as the active state.
- Then click Create a new state rule.
- Click the title (defaults to "Submission rule in state") to change the name of your rule. This helps you to identify what the rule is doing and to put it in the correct order if you're using multiple rules.
Now you're going to set up your conditions and actions. Conditions are the parameters that need to be met to trigger the action. For calendar invitations you don't need to set any conditions, as these will be triggered simply by moving the form into the next state.
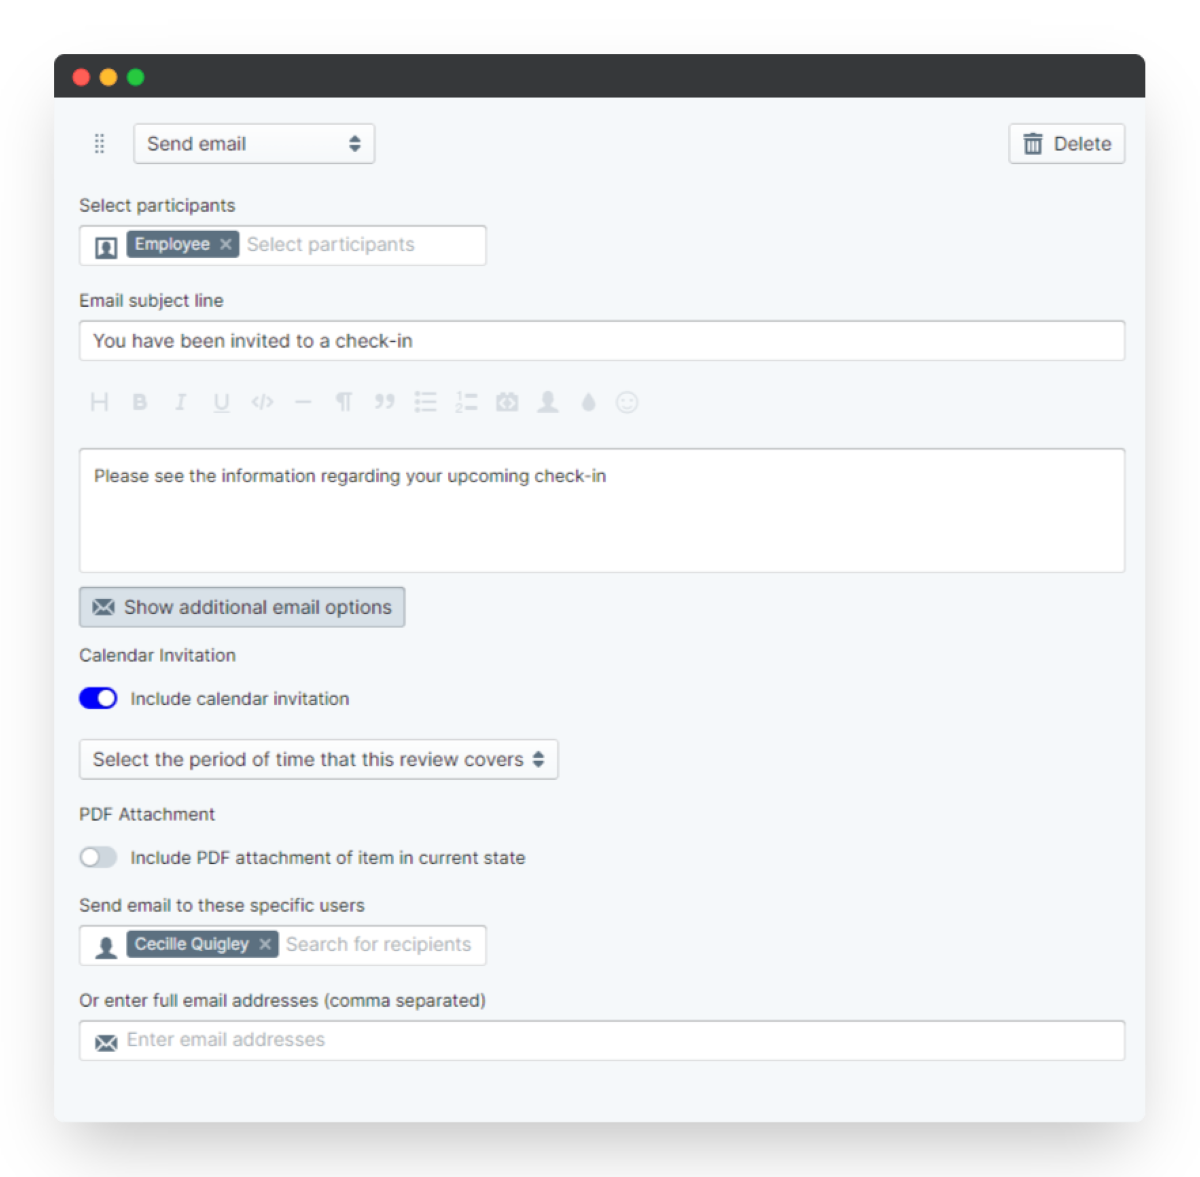
Next you'll create an action to trigger a custom email to be sent, along with a calendar attachment.
- Click Add an action to get started.
- Click Send email, select which app participants should receive the email, and enter your subject line and content.
- Click Show additional email options to add recipients who are not participants, or who have an external email address.
- Toggle on "Include calendar invitation", which will automatically send a calendar invitation to the participants that you have selected or manually inputted.
- Click Save changes.
You are not limited to just one action - you can add as many actions as you like to each rule. We also recommend setting a rule that will show the date on the timeline on the dashboard.
- Click Add an action and then Create a timeline event.
- Select which participant should have the timeline event triggered, and add a timeline event description.
- Click Save changes.
Finally, we'll take a look at Web elements for embedding links and downloads in your app templates.


PeopleGoal Support Team
Account Management & Implementation Specialists


