Most teams underestimate employee onboarding.
I’ve seen it too often: an offer gets signed, and then… It’s a scramble. A few docs, a quick intro call, maybe a Slack message or two, and we call that onboarding.
But the truth is, your retention strategy begins in that first week, the first day, even.
If you’re building a team that’s meant to grow and last, you can’t afford to treat onboarding as an afterthought. It’s not just about paperwork or productivity. It’s about trust, clarity, and momentum. Done right, onboarding gets people aligned early, plugged in fast, and ready to contribute where it counts.
In this guide, I’ll walk you through everything you need to build an employee onboarding process that actually works—one that scales, feels human, and helps people stay.
Let’s get into it.
What Is Employee Onboarding?
Employee onboarding is the process of helping a new hire adjust to their role, team, and company. It includes setting up their tools, introducing them to coworkers, explaining how things work, and guiding them through their first few weeks. A good onboarding makes new employees feel welcomed, supported, and ready to do their job well.
For example, at one company, the manager gave every new hire a 30-day plan with clear tasks, set up weekly check-ins, and paired them with a buddy. The result? The new hire started contributing in just one week and felt confident asking questions from day one.
Why Employee Onboarding Needs a Rethink
Most employee onboarding programs still feel like a checklist exercise: a few welcome emails, a flood of HR paperwork, a quick meet-and-greet over Zoom, and maybe a product doc or two to skim through.
But here’s the problem: that kind of onboarding doesn’t stick.
You’re not just onboarding an employee; you’re shaping their perception of your company from Day One. If that first experience feels disjointed, unclear, or impersonal, you’ve lost momentum before the real work even begins.
The fix? Rethinking what employee onboarding actually needs to do.
And I’m not talking about adding more noise. I’m talking about designing onboarding as a step-by-step employee onboarding process that answers the real questions new hires are asking (but not always saying out loud):
- What am I expected to do in my first 30 days?
- How will I know if I’m doing it right?
- Who do I go to when I get stuck?
- Do I even belong here?
This is where most companies fall short. They assume information = onboarding. But clarity, connection, and trust? That’s the real work.
How to Onboard Employees With PeopleGoal
If you want to move past scattered docs and manual follow-ups, here’s how you can build and run a complete employee onboarding process inside PeopleGoal—step by step.
Step 1. Install Your Onboarding Workspace
- From your PeopleGoal dashboard, click Workspaces in the left-hand menu.
- On the Workspaces page, select Create a new workspace.
- In the search bar, type Onboarding.
- Under Store template, select the Onboarding workspace and click Add this to your account.
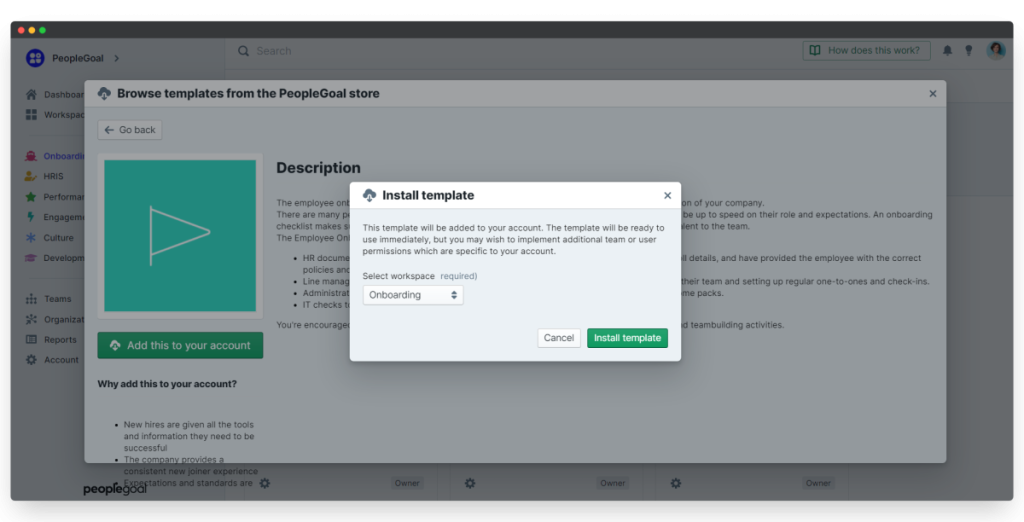
Once added, you’ll see the Onboarding workspace on your Workspaces page. It comes with three onboarding apps already installed:
- Pre-Onboarding Checklist
- Onboarding Checklist
- New Joiner Survey
After installation, click on the Onboarding tab in your Workspaces. From there, you can begin editing any of the three apps or use them as-is to launch your first onboarding flow.
Simple setup, zero configuration headaches. You’re ready to move to customization.
Step 2: Customize Your Onboarding Checklists
Here’s how to configure your onboarding checklist step by step.
Open the Template
- Go to your Onboarding or Pre-Onboarding app
- Click the Template tab
- Select Edit template
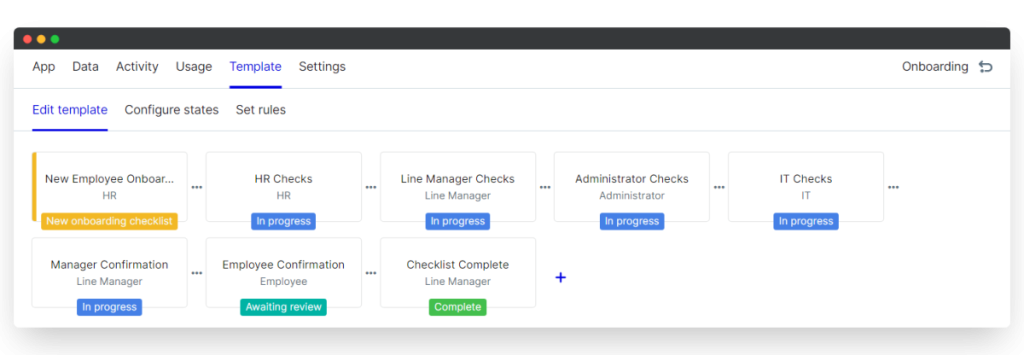
You’ll see the checklist laid out in multiple states (each one tied to a specific phase of the process). For example, the first state might ask the employee to fill in personal details like name, email, and address.
Now, it’s time to tailor that experience to your process.
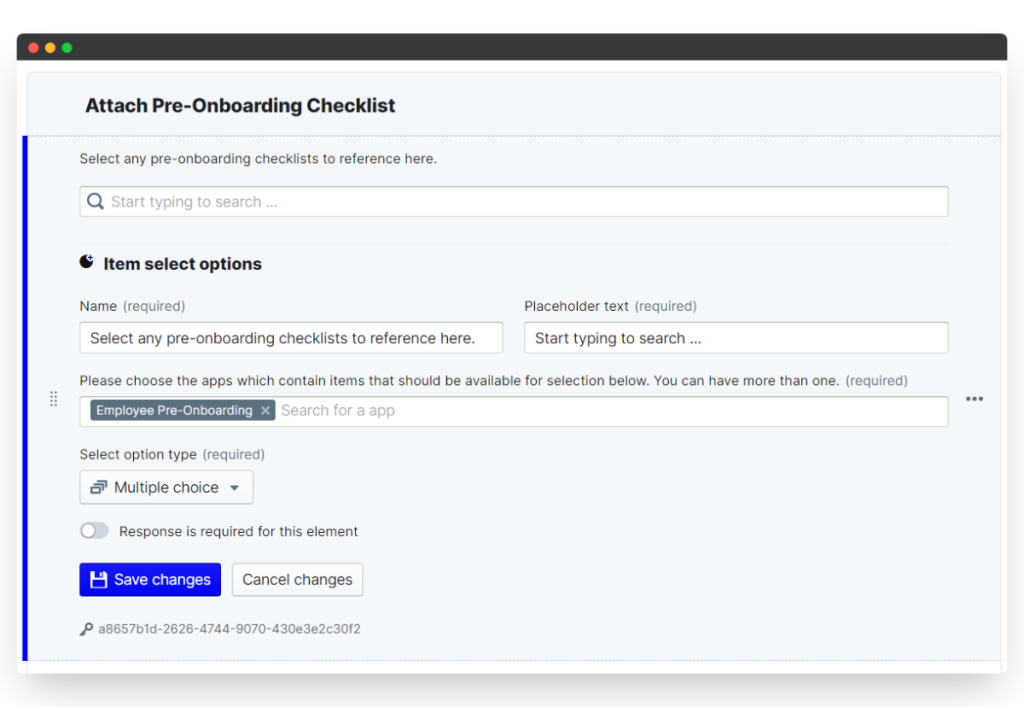
i. Edit Existing Elements

Each question or field in the checklist is called an element. You can edit any of these to match your exact requirements.
Here’s how:
- Hover over the element you want to change
- Click the three-dot menu
- Choose Edit (e.g., “Edit text input”)
- Update the placeholder text, instructions, required settings, and more
- Click Save changes when you’re done
You can adjust everything—from the number of rows in a text box to whether a field is mandatory. If you’ve got multiple offices globally, for instance, you can add an extra line to the postal address field to reflect that.
ii. Duplicate Elements
- Hover over the element
- Click the three dots
- Select Duplicate element

This creates an exact copy below. From there, you can edit the label or field text to suit different use cases.
iii. Reorder Elements and Sections
Moving things around is as easy as drag-and-drop:
- Hover on the left of any element or section title
- Drag to reorder within the section
- To move an element to a different section, click the three-dot menu and choose Change section
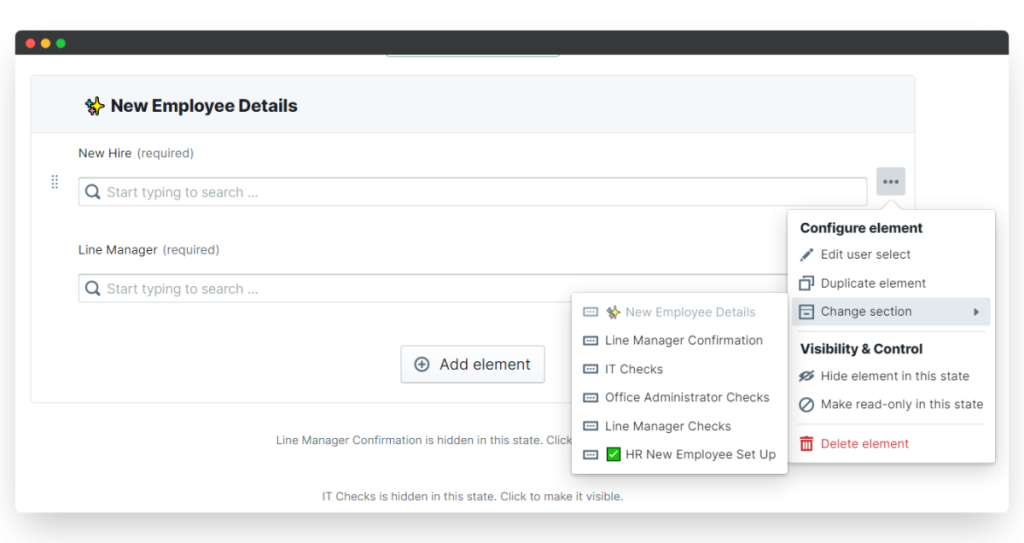
Organize the flow in a way that mirrors how your team actually works.
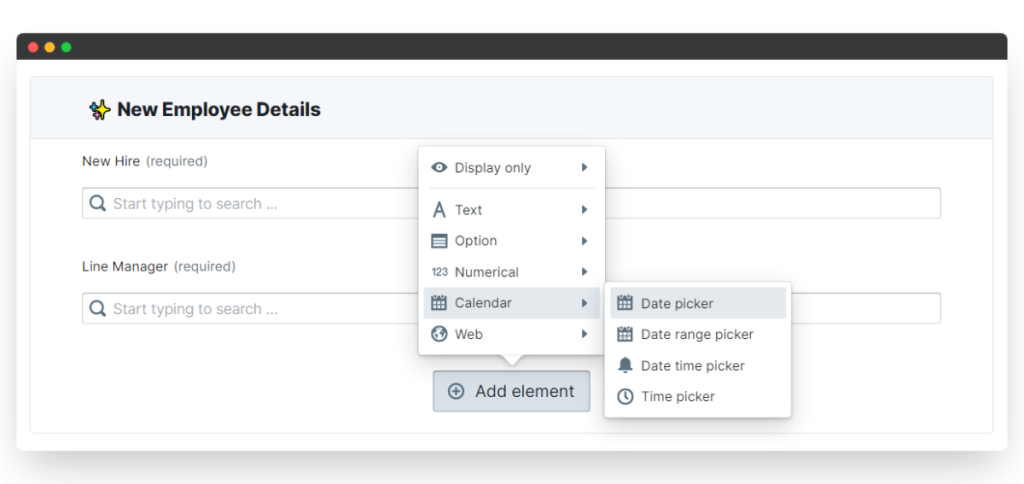
iv. Create New Elements and Sections
Need to collect more information? Add it in seconds:
- At the bottom of any section, click Add element
- Choose from field types like dropdowns, text boxes, file uploads, date range pickers, etc.
You might, for example, add a Date range picker to find out if a new hire has pre-booked time off that would affect their start or training schedule.
To create a whole new section:
- Scroll to the bottom of the Template
- Click Add section
- Drag it into place, name it, and add your fields
Example: Add a section called “Pre-Onboarding Summary” where new hires can review details they’ve already submitted, especially if you’re linking information between two apps.
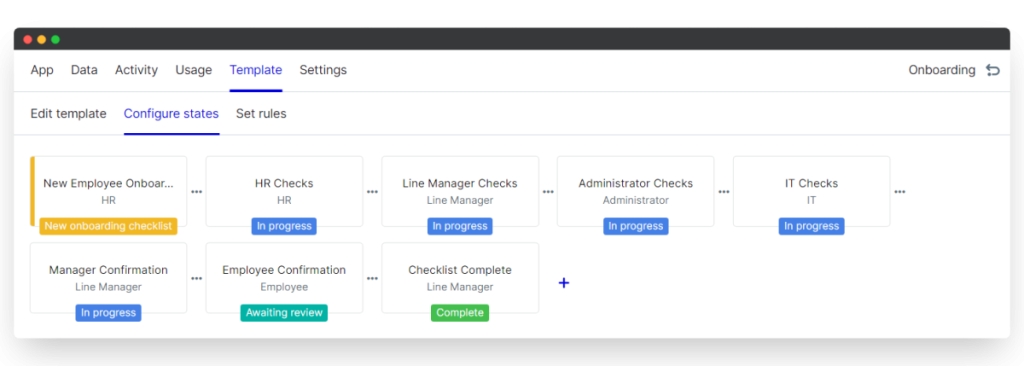
Step 3: Configure the Onboarding States
Now that you’ve customized your checklist, it’s time to define how the process flows and, more importantly, who owns each step. This is where states come in.
Each state in PeopleGoal represents a phase in your onboarding process. Think of it like a mini-workflow that gets passed from one person to the next. One state might be owned by HR, another by the hiring manager, another by IT, and so on.
By assigning specific people to each state, you create a clear, trackable flow that keeps everyone in sync and ensures no task gets missed.
What You Can Do with States:
- Break onboarding into logical stages (e.g., HR review, IT setup, manager intro)
- Assign a participant to each stage
- Control what each person sees or edits (e.g., read-only, full access, hidden)
- Add confirmation steps so nothing falls through the cracks
This gives you a structured, multi-stakeholder onboarding process that adapts to your team’s roles and responsibilities.
i. Add a New State
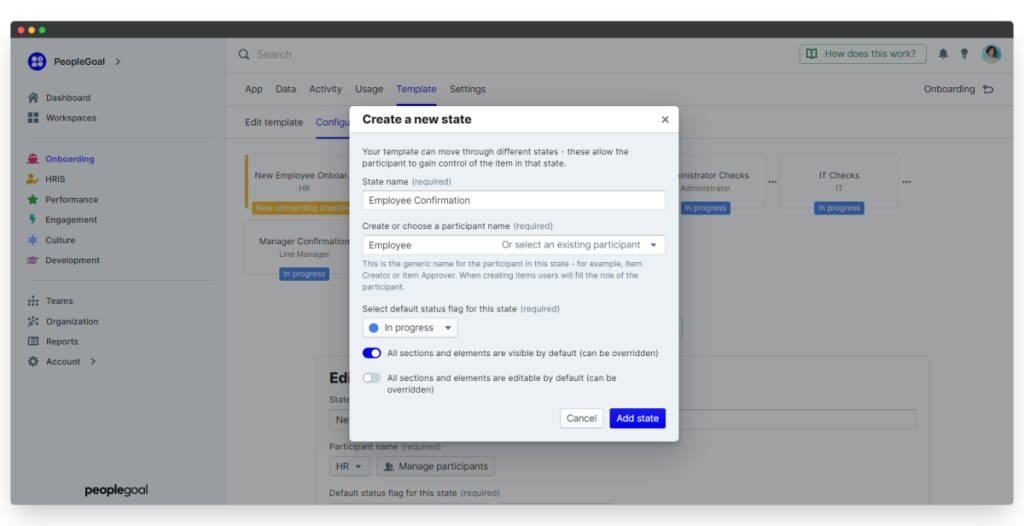
To add a step to your onboarding flow:
- Go to your app’s Edit template page
- Click the + icon to create a new state
- Name the state (e.g., “Employee Confirmation”)
- Assign a participant role (like “HR Manager” or “IT”)
- Choose a status flag (e.g., “In progress,” “Awaiting review”)
- Set visibility: choose if that person can edit, view only, or not see the section
Once created, drag and drop to reorder your states and shape the flow exactly how you need it.
Example: Want the new hire to confirm all steps before wrapping up onboarding? Add a final “Employee Confirmation” state with read-only access so they can review everything completed by HR, IT, and their manager.
ii. Delete a State

Don’t need a particular stage in your flow? Remove it in seconds:
- Go to Template > Configure states
- Select the state you want to remove
- Click Delete state
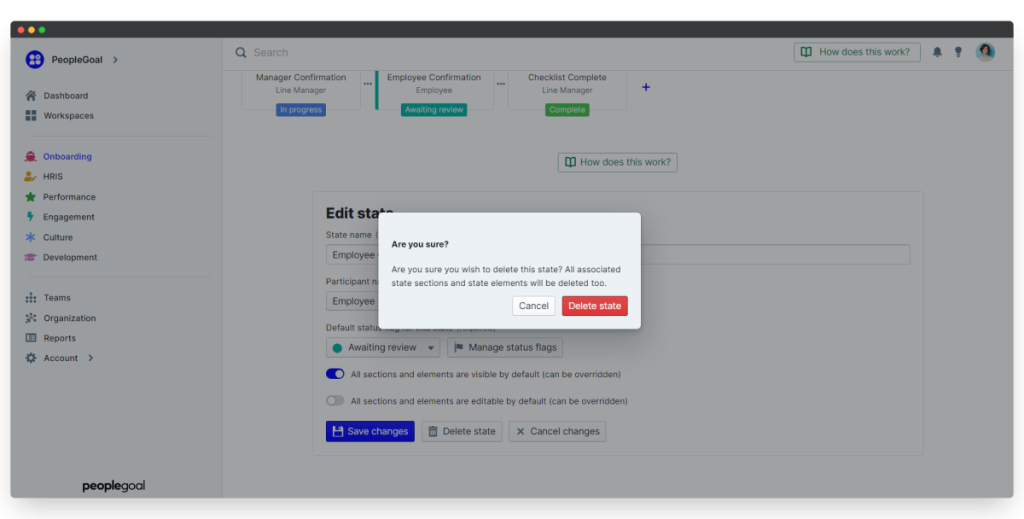
For example, if you are offering remote onboarding and no longer need “Office Admin Checks,” you can delete that state—and the corresponding section in the checklist.
Have a remote team but are not sure where to start? Watch this video to learn exactly how to do it:
iii. Customize Your Status Flags

Each state has a status flag that shows what stage a task is in. You can update these to match your language or internal process.
To customize:
- In Configure states, click Manage status flags
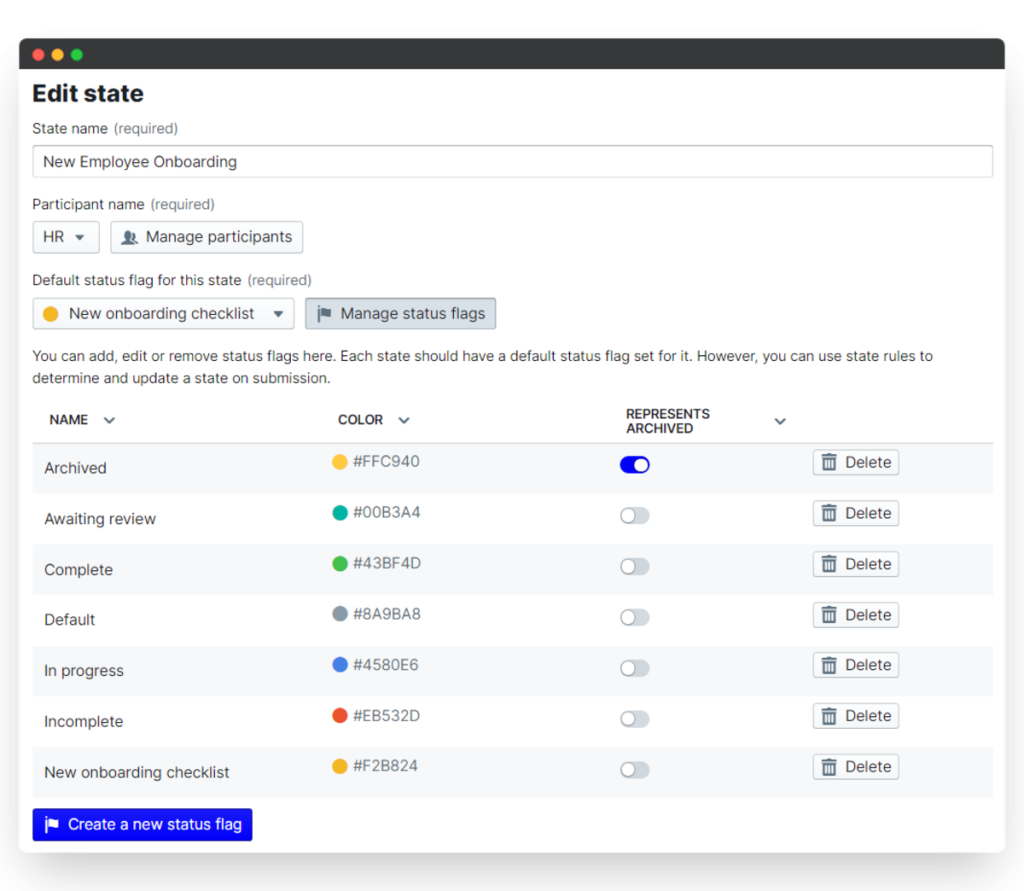
- Click a flag to rename it or change its color
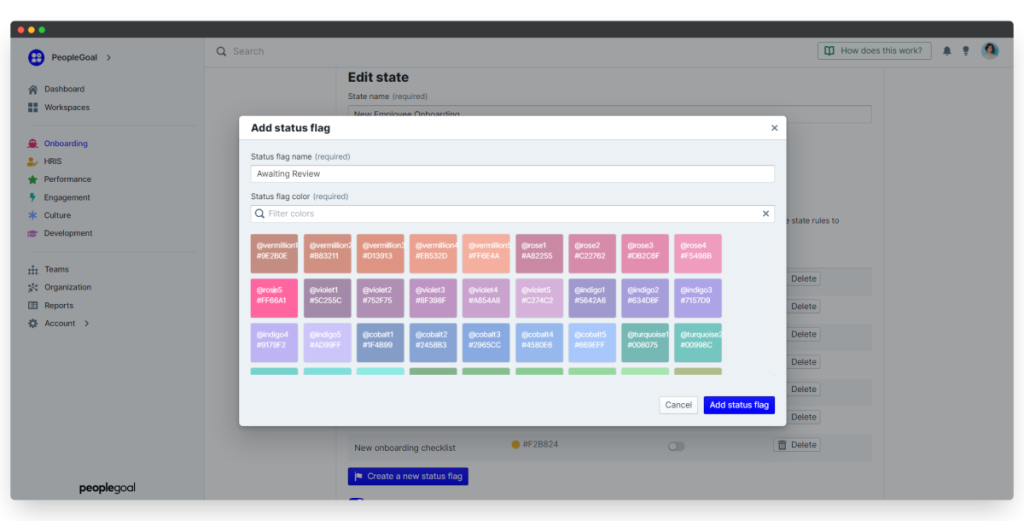
- Click Create a new status flag to add more
- Assign flags to specific states (e.g., “Awaiting review” for final steps)
Step 4: Manage Your Onboarding Checklist Participants
An effective onboarding process isn’t just about the checklist—it’s about the people behind it. At every stage, someone is responsible for reviewing, approving, or supporting the new hire. This is where assigning the right participants to your onboarding workflow becomes critical.
PeopleGoal lets you control exactly who’s involved, what they need to do, and what they’re allowed to see.
i. Automate Who Gets Assigned to What

You likely already know who owns what during onboarding—HR handles compliance, IT sets up hardware, and the hiring manager drives goals and expectations.
Instead of manually assigning them every time, you can automate this with default users and relationship roles.
Here’s how to do it:
- Go to Configure states in your onboarding app
- Click Manage participants
- For each role (e.g. IT Lead, Line Manager, Admin), assign a Default user or Default relationship
- You can also rename participant roles to match your internal language (e.g. “Team Lead” instead of “Line Manager”)
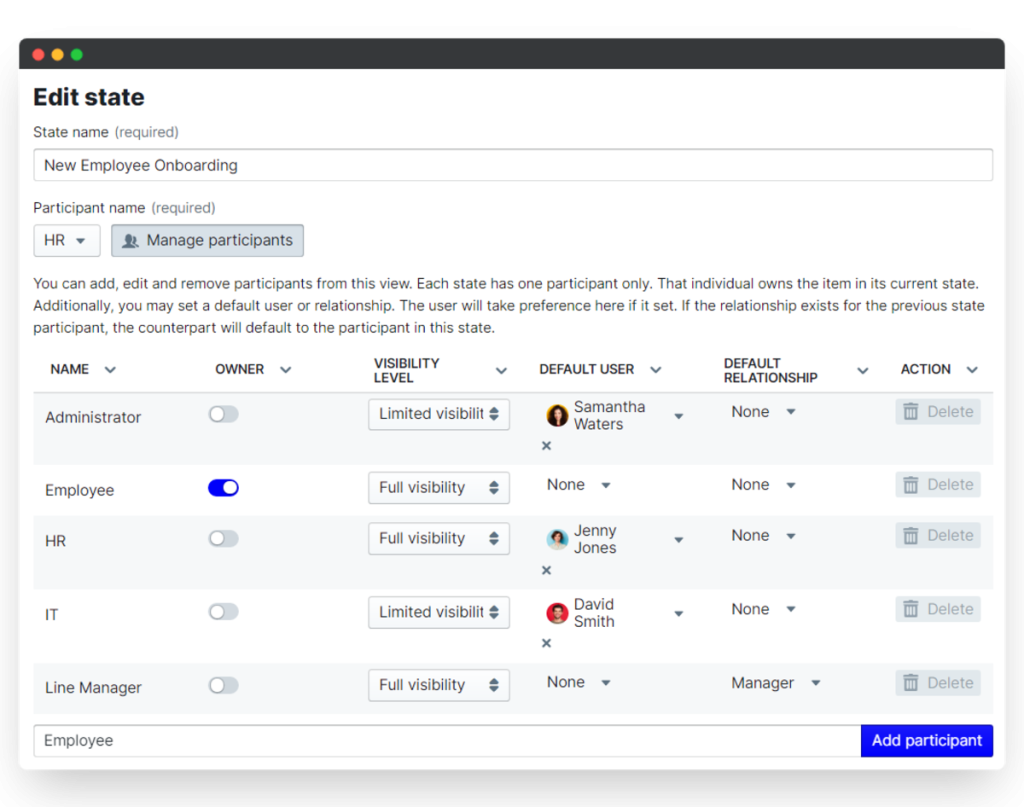
Now, whenever you start a new onboarding checklist, the system will auto-assign the right people based on the hire’s department or reporting line. No extra clicks, no manual input.
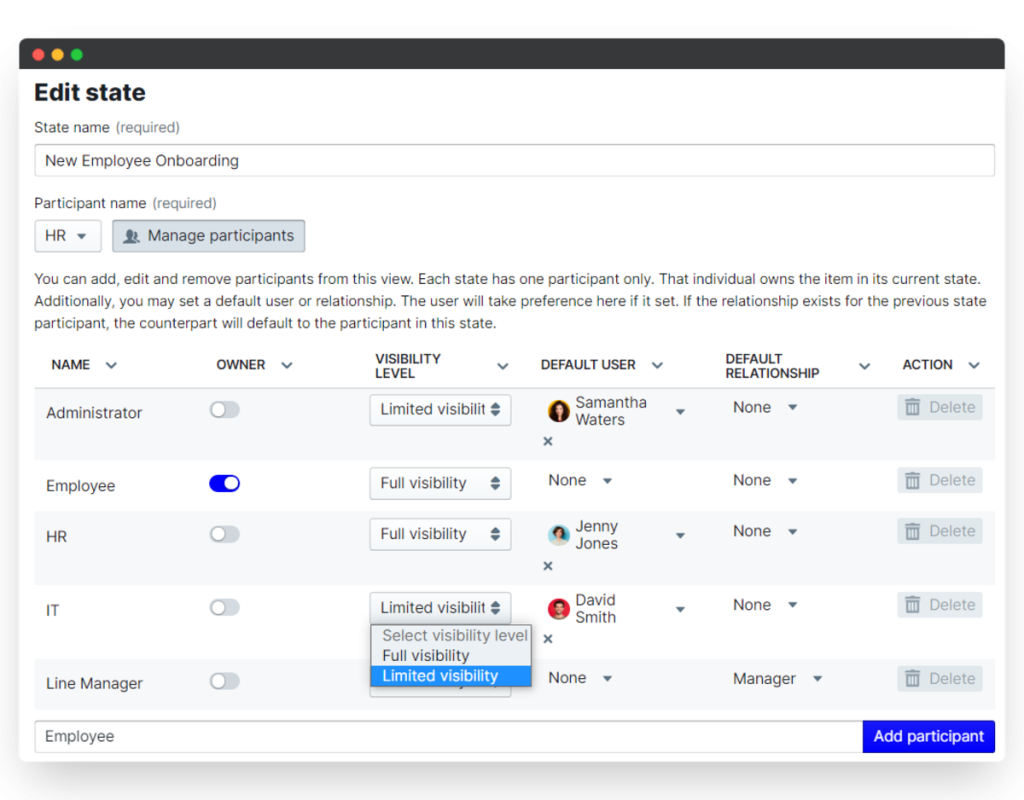
ii. Control Who Sees What (Visibility Settings)
Each participant doesn’t need access to everything, and shouldn’t have it.
In PeopleGoal, you can define visibility at both the section and field level:
- Full visibility: the participant can view and edit the section
- Read-only: participant can view but not make changes
- Hidden: participant doesn’t see the section at all
This matters most when:
- You’re dealing with sensitive employee info
- You want managers to see onboarding comments but not alter them
- You’re protecting compliance documentation from general access
Example: The hiring manager can view the new hire’s responses but only comment in their own section. The new hire can only see and edit the fields assigned to them. Everyone stays focused on what they need to do—nothing more, nothing less.
When you’ve configured all your roles and visibility rules, click Save changes to lock them in.
Managing participants this way saves time, removes guesswork, and keeps your onboarding secure and structured. Everyone knows where they fit, and the process runs like it should—from the first hire to the fiftieth.
Step 5: Set the Onboarding Checklist Permissions
Permissions in PeopleGoal make sure that only the right people can view or edit onboarding materials, especially when sensitive information is involved.
This step is about keeping your process secure and intentional.
How to Access Permissions
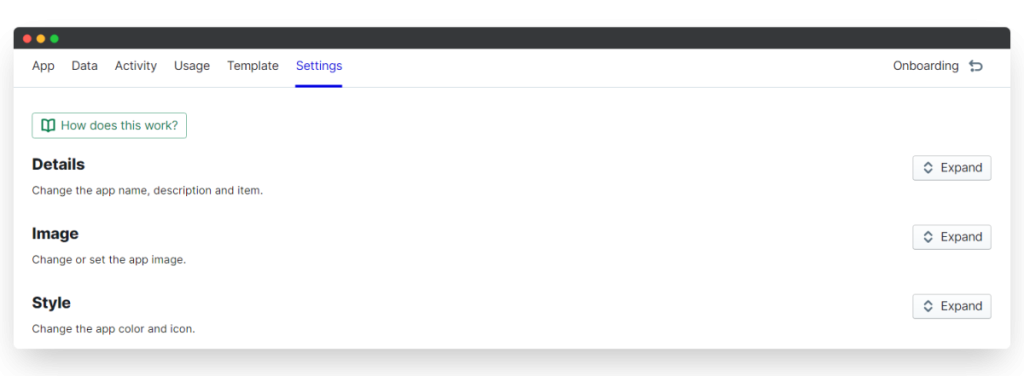
Start by navigating to your onboarding app:
- Click Settings
- Expand the Permissions section
- Click Explain permission types if you want to quickly review what each level means (e.g., Owner, Editor, Access Denied)
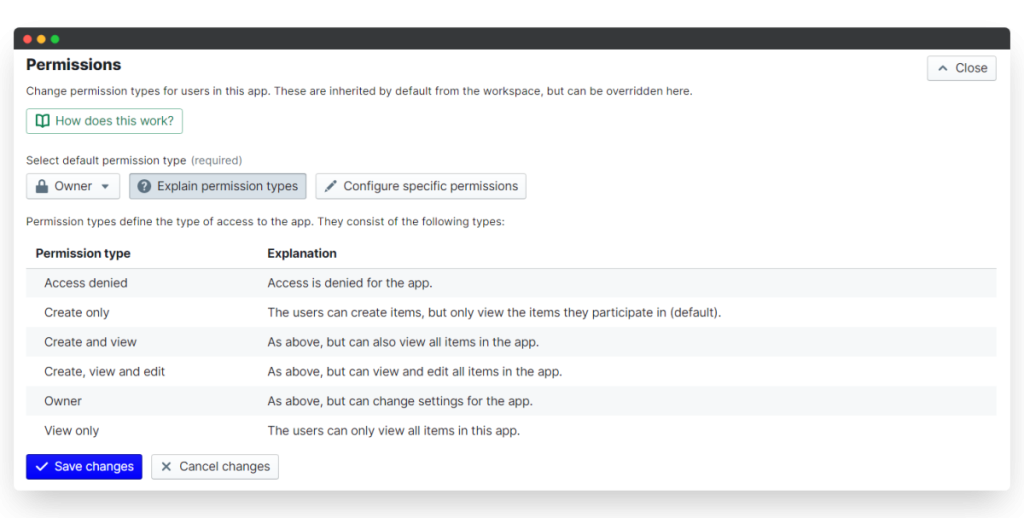
Now, you’ll configure access in three parts: app-wide, individual users, and teams.
i. App-Wide Permissions
First, lock down general access:
- Set your default permission to Access Denied
This blocks the onboarding app from being visible to everyone by default. We’ll open access up only to the users or teams who need it.
Think of this as your baseline security layer.
ii. Specific User Permissions
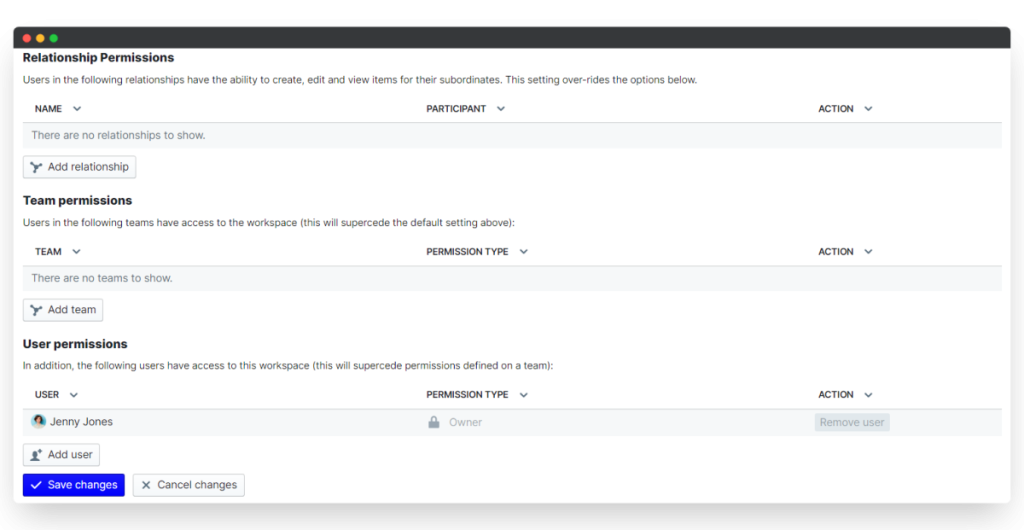
Next, assign permissions to individual users:
- In the same Permissions section, select Configure specific permissions
- Under User permissions, click Add user
- Search for your teammate’s name
- Choose the appropriate permission level (Editor, Viewer, etc.)
This is great for assigning key roles, like HR managers or admins, who will always need access, regardless of the team setup.
iii. Specific Team Permissions
Now create a controlled experience for new hires:
- In the Team permissions area, select your New Joiners team (create this team if you haven’t already)
- Set their permission level to Create only
This gives your new employees access to only their onboarding checklist and nothing else. Once onboarding is complete, simply remove them from the team.
It’s simple, secure, and minimizes risk.
Step 6: Launch Your Onboarding Process
Once you’ve set up your checklist, assigned participants, and locked down permissions, you’re ready to hit the button that makes all of it matter—launching the onboarding process.
You can either launch it immediately or schedule it to roll out ahead of an employee’s first day. Here’s how both options work.
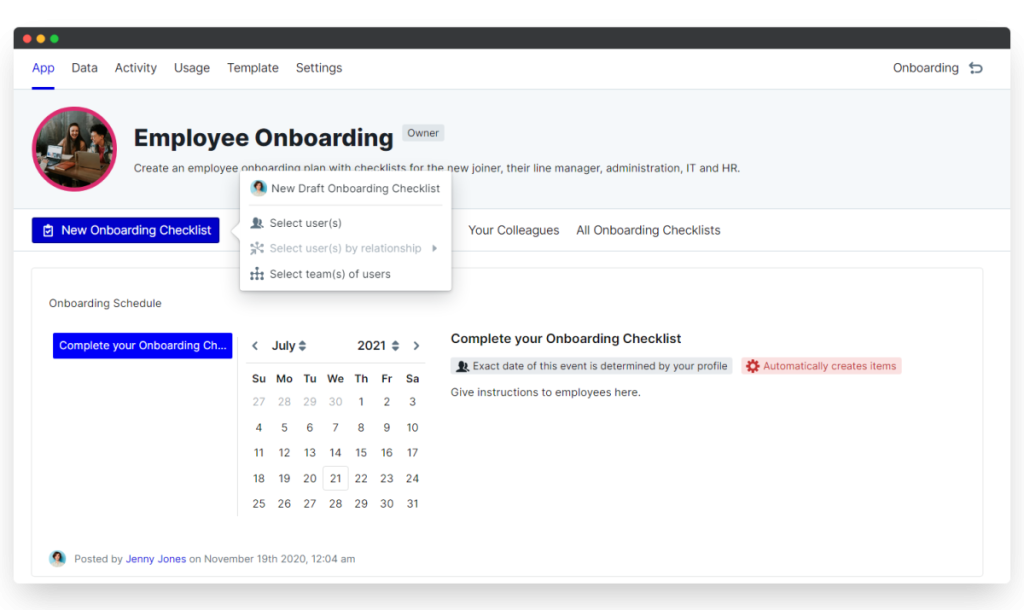
i. Start a New Onboarding Process
If you’re ready to get someone started today:
- Go to either the Pre-Onboarding or Onboarding app
- Click New Pre-/Onboarding Checklist
- Select the user(s) by searching for your new hire’s name
- Click Create
If your workflow has automated participant assignments (which you ideally set up in Step 4), the right people will be notified and everything kicks off automatically.
No automation?
No problem. Just open the checklist manually and assign each state to the relevant team member, like HR, the hiring manager, or IT. It’s a couple of clicks and you’re off and running.
ii. Schedule an Onboarding Process
Want everything to be in place before the new hire walks in (or logs on)? You can schedule onboarding to start days in advance.
Here’s how:
- 1. From the app homepage, click Add…, then Schedule…
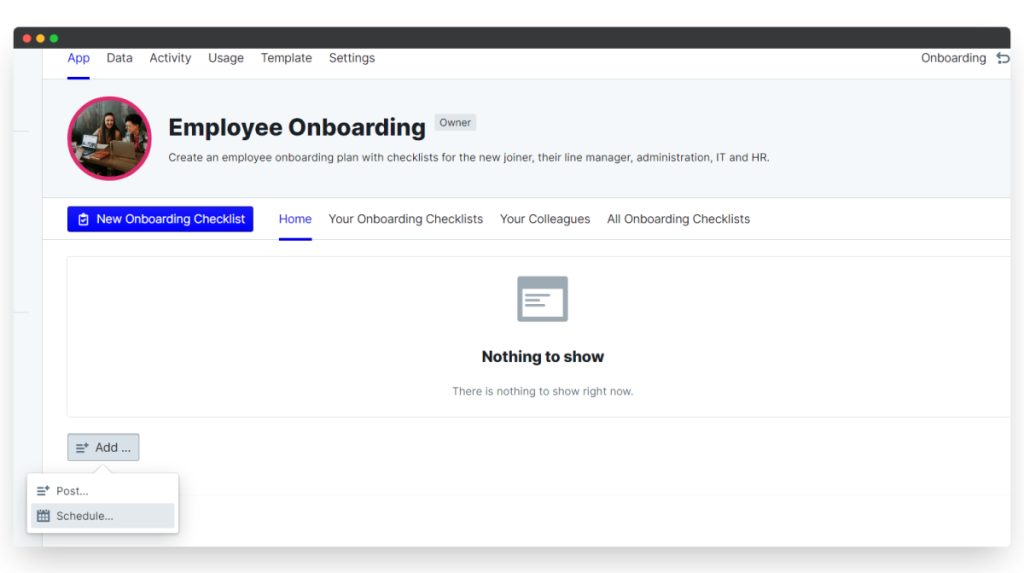
2. You’ll see a content box appear—click the pencil icon to edit
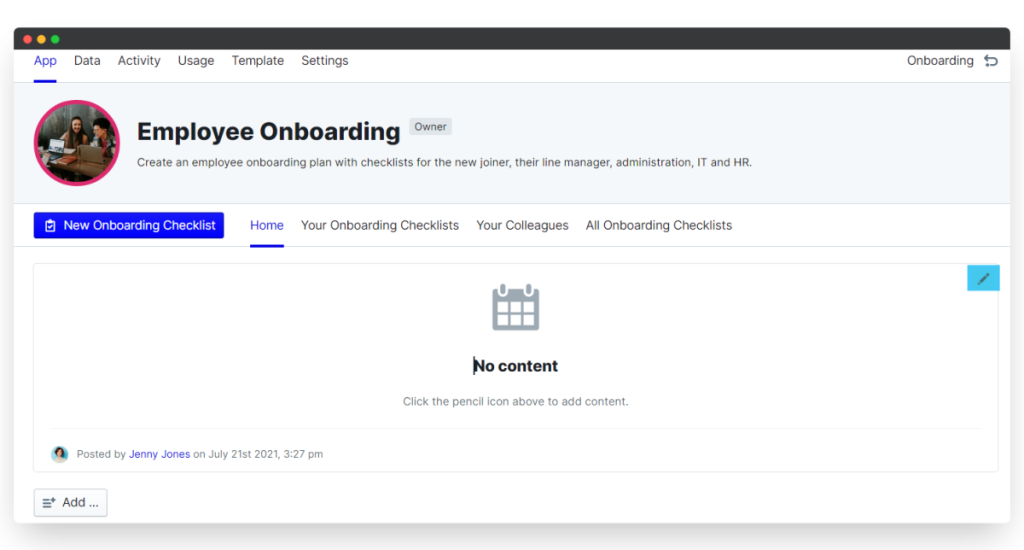
- 3. Add a schedule description so you know what it’s for
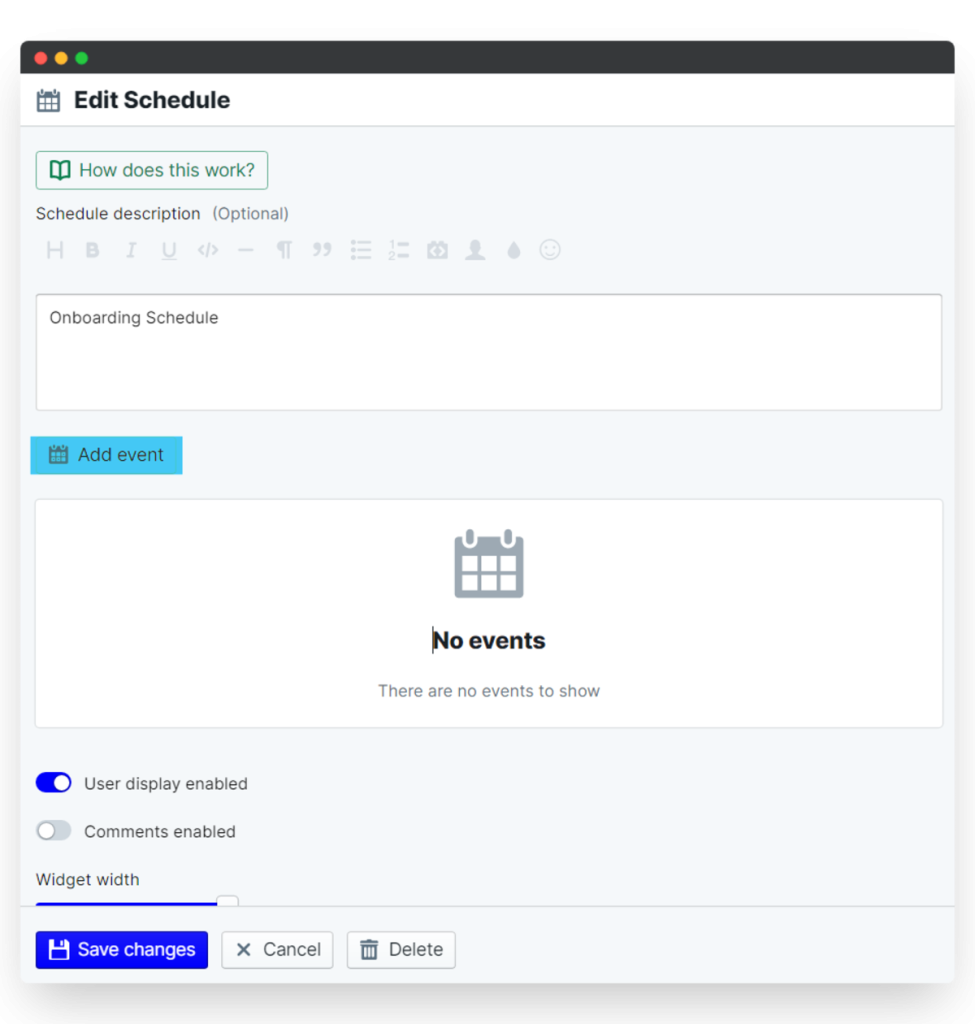
- 4. Toggle on “Show on dashboard” if you want visibility for your team
- 5. Click Add event and set the date you want the checklist to launch
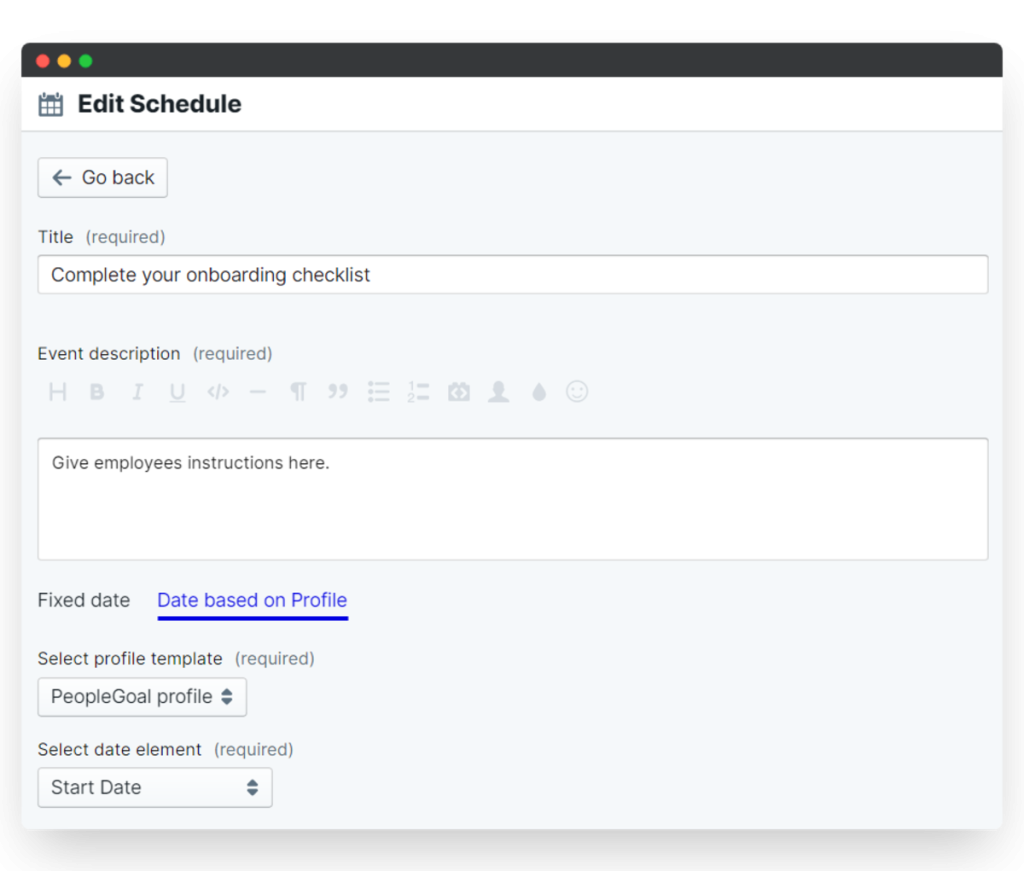
- 6. Set up reminders or use an offset (e.g. “-7”) to start onboarding 7 days before their official start date
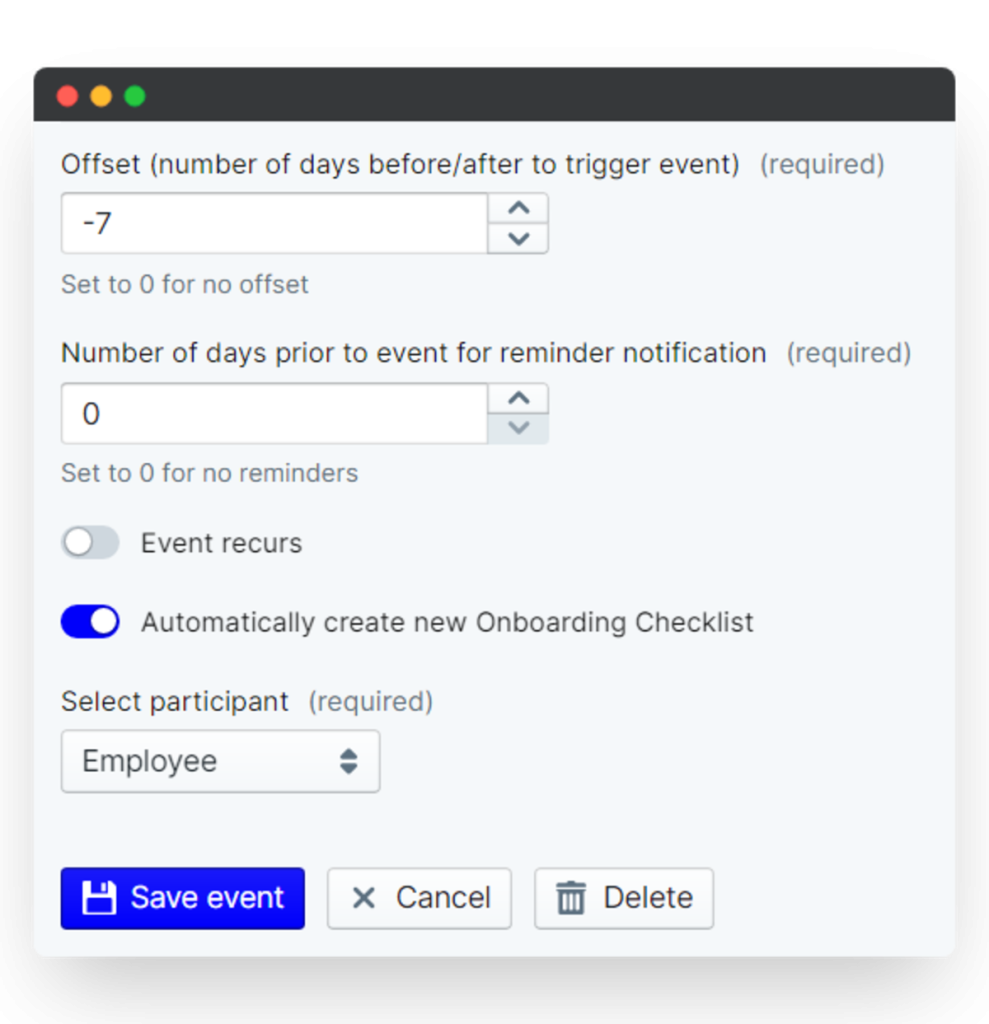
This is especially helpful for pre-boarding—getting equipment sent, paperwork sorted, or access credentials ready ahead of time.
Just remember to hit Save changes when you’re done editing the schedule.
Once you launch the checklist—whether immediately or on a schedule—the process kicks in. Everyone involved is notified, each task is assigned, and your new hire gets a structured, step-by-step experience that’s built to set them up for success.
Want to go a step further? Check out our Engagement workspace to run pulse surveys and monitor employee experience beyond onboarding.
Not on PeopleGoal yet? Book a demo and see how easy it is to build workflows that actually work.
Employee Onboarding Checklist: What to Include
Here’s what your employee onboarding checklist should include at a minimum:
Pre-Onboarding
- Offer letter signed and stored
- Employment contract and policies shared
- Payroll, tax, and ID documentation collected
- Equipment ordered and shipped
- Accounts and tools set up (email, Slack, Zoom, etc.)
- Intro to manager and buddy scheduled
- Pre-boarding welcome email sent
First Day
- Welcome message from the team
- IT and system access verified
- Org chart, key contacts, and team intros
- Kickoff meeting with the manager
- Walkthrough of the onboarding roadmap
- First-day task list shared
The First Week
- Role-specific training sessions
- Access to tools, systems, and documents
- 1:1s with cross-functional teammates
- Intro to company values, mission, and culture
- Initial goal-setting with manager
- Feedback form/check-in
First 30-60-90 Days
- 30-day: knowledge and tools check
- 60-day: project contribution + early wins
- 90-day: performance review + long-term goals
- Final onboarding feedback survey
- Transition into ongoing employee development
This isn’t about overwhelming your new hire. It’s about giving them structure and support. Use this checklist as your foundation, and adapt it based on role, location, and team structure.
Top Employee Onboarding Best Practices
It’s not just what you include in your onboarding process—it’s how you deliver it. These best practices are what separate teams that simply “tick the boxes” from those that turn new hires into long-term contributors.
If you want your onboarding to work—not just look good—here’s what to focus on:
1. Start Before Day One
Get the paperwork, IT setup, and intros out of the way early. Use pre-boarding to reduce stress and show the new hire that you’re ready for them.
How to do it:
Set up a Pre-Onboarding Checklist in PeopleGoal with key tasks like document collection, hardware shipping, and manager intros scheduled before their first login.
2. Assign a Buddy or Onboarding Partner
A new hire should never feel like they’re figuring it out alone. Assigning a peer, not just a manager, gives them someone to ask the “small” stuff.
How to do it:
Create a dedicated “Buddy” task in your onboarding checklist and include prompts for informal check-ins during the first two weeks.
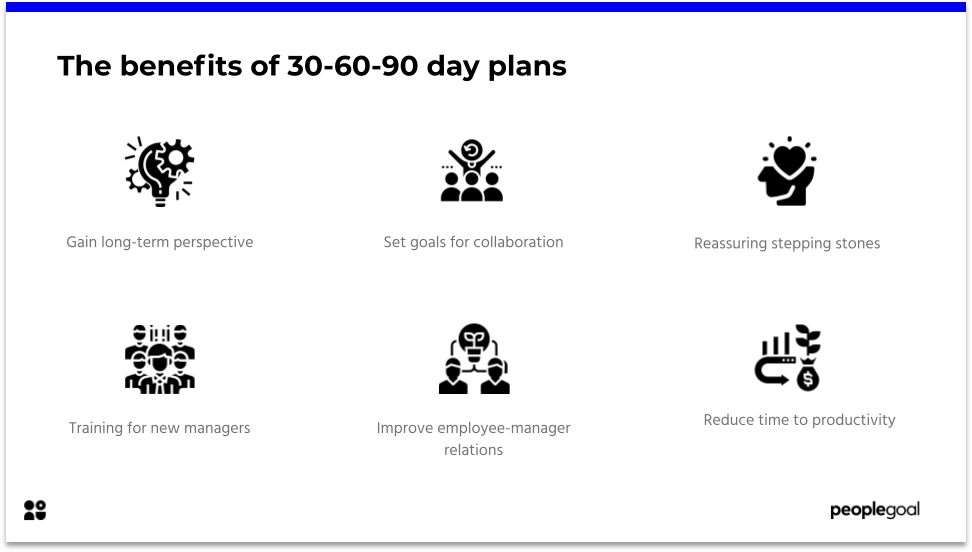
3. Build a 30-60-90 Day Plan
Without clear expectations, people get lost—or worse, disengaged. A structured ramp-up plan, like a 30-60-90 day onboarding plan, keeps everyone aligned.
How to do it:
Use PeopleGoal’s Goals feature to create a template with milestones for each onboarding phase, tied to performance and learning outcomes.
4. Mix Sync and Async Content
Don’t force every introduction or training into a meeting. Let people digest information at their own pace and reserve live time for what really matters.
How to do it:
Add recorded videos, docs, and tool walkthroughs to your onboarding checklist so new hires can explore on demand.
5. Keep Feedback Loops Open
Onboarding is a two-way process. Make it easy for new hires to tell you what’s working and what’s not—early and often.
How to do it:
Use the New Joiner Survey app in PeopleGoal to collect feedback at Day 7, Day 30, and Day 90. Don’t wait until it’s too late.
6. Involve the Manager from the Start
Onboarding isn’t HR’s job alone. The manager needs to be hands-on from day one, setting expectations, reviewing progress, and building trust.
How to do it:
Create dedicated tasks in your workflow just for the manager—like a welcome call, role overview, and first-week check-in.
These aren’t just best practices—they’re friction removers. They help your new hire get up to speed faster, feel like part of the team, and actually want to stay.
Common Onboarding Mistakes and How to Avoid Them
Here are some of the common onboarding mistakes I see teams make when onboarding an employee. and exactly how to fix them.
1. Starting Too Late
If onboarding begins on Day One, you’re already behind. New hires show up unsure, unprepared, and underwhelmed.
Fix it:
Start with pre-boarding. Use PeopleGoal to send welcome emails, collect documents, and schedule intro meetings before they even start.
2. Overloading on Day One
Dumping everything—logins, trainings, policy docs—on Day One overwhelms new hires and guarantees they won’t retain half of it.
Fix it:
Stagger the experience. Break onboarding into manageable phases across the first 30–90 days, and mix in async content they can review at their own pace.
3. Leaving It All to HR
Onboarding is a team effort. If managers aren’t involved early, new hires miss the context and connection that actually help them succeed.
Fix it:
Build manager responsibilities into the process—first-week check-ins, goal-setting sessions, and early performance feedback.
4. Missing Role Clarity
You can have the slickest onboarding flow in the world, but if your new hire still doesn’t know what they’re accountable for, they’ll flounder.
Fix it:
Include a 30-60-90 day plan that outlines specific outcomes and responsibilities. Don’t assume people will “figure it out.”
5. Failing to Collect Feedback
If you never ask new hires how onboarding felt, you’re flying blind—and likely repeating the same issues.
Fix it:
Automate feedback surveys through PeopleGoal at key intervals (like Day 7 and Day 30), and actually use that data to improve the process.
Avoiding these mistakes doesn’t require a massive overhaul. It just takes intention. Onboarding isn’t about checking boxes—it’s about building trust and giving people what they need to do great work from the start.
| Mistake | Why It’s a Problem | How to Fix It |
|---|---|---|
| Starting Too Late | New hires feel unprepared from Day One | Begin pre-boarding before their start date using a checklist |
| Overloading on Day One | Too much info leads to confusion and poor retention | Spread onboarding over 30–90 days with a mix of live and async content |
| Leaving It All to HR | Managers miss key touchpoints, and new hires lack context | Assign onboarding tasks directly to managers in your workflow |
| Missing Role Clarity | New hires don’t know what success looks like | Provide a clear 30-60-90 day plan with goals and checkpoints |
| Not Gathering Feedback | You keep repeating the same issues without realizing it | Schedule surveys at Day 7, 30, and 90 to capture actionable feedback |
Driving Long-Term Success Through Better Onboarding
A strong onboarding process isn’t about doing more—it’s about doing the right things in the right order, every time. It means giving new hires the clarity they need, the support they expect, and the structure that sets them up to contribute from day one.
When onboarding is built with intention, when each step is mapped, owned, and repeatable, it stops being a task and starts becoming a strategic advantage.
This is how you reduce early churn. This is how you build trust fast. And this is how you create a consistent employee experience across every department, every role, every hire.
If you’re ready to bring that kind of consistency to your team, PeopleGoal gives you the tools to make it happen, without the complexity.
Because onboarding should feel seamless, for you and for them.
Frequently Asked Questions

How can we make remote onboarding more engaging for new hires?
To make remote onboarding more engaging, focus on connection, clarity, and pacing:
-
- Assign a buddy for informal support and regular check-ins
-
- Break up content with a mix of live sessions and self-paced resources
-
- Schedule 1:1s with team members early on
-
- Use a structured 30-60-90 day plan so expectations are clear
-
- Gather feedback regularly to improve the experience in real time
The more intentional you are about human interaction and communication, the more engaging onboarding becomes, regardless of location.
How do we ensure new employees feel connected to the company culture?
To help new employees feel connected to your company culture, don’t leave it to chance; build it into your onboarding:
-
- Share stories about how the company was built, your values in action, and what success looks like internally
-
- Include team rituals (like welcome calls, Slack intros, or virtual coffees) early in the process
-
- Introduce a culture ambassador or buddy who can offer insight beyond policies
-
- Use onboarding content that explains not just what you do, but how you work and make decisions
-
- Encourage managers to reinforce cultural values in their 1:1s and feedback
Culture isn’t absorbed automatically in a remote setting—you have to show it, ta
What’s the best way to combine asynchronous and synchronous training in onboarding?
The best way to combine asynchronous and synchronous training is to use async for knowledge transfer and sync for connection and context:
-
- Use asynchronous content (videos, slide decks, how-to guides) for tool walkthroughs, company policies, and product overviews. Let new hires absorb this on their own time.
-
- Use synchronous sessions (live Zoom calls, 1:1s, team intros) for Q&A, real-time discussions, and building relationships.
-
- Share a clear schedule so new hires know what’s expected to be completed on their own vs. what’s happening live.
-
- Follow up async training with brief sync check-ins to reinforce learning and answer questions.
This balance gives structure without overwhelming, and supports both autonomy and team connection.
How can we localize onboarding for a global team?
To localize onboarding for a global team, focus on accessibility, relevance, and cultural alignment:
-
- Translate key content into the primary languages of your regions
-
- Use localized examples and scenarios in training materials
-
- Adjust policies and compliance steps based on regional laws and norms
-
- Offer flexible meeting times to accommodate different time zones
-
- Assign local mentors or buddies who understand cultural nuances
-
- Adapt communication tools (e.g., using messaging apps popular in specific regions)
Localization ensures every new hire feels understood and supported, no matter where they’re joining from.
Ready to 3x Your Teams' Performance?
Use the best performance management software to align goals, track progress, and boost employee engagement.